
Event handling is fundamental to understanding how React processes browser events and updates the DOM. As a React developer, it's a critical skill to have, as it enables efficient management of user interactions within web apps.
This article covers how to set up event handlers and proceeds to more elegant techniques for event management. You'll learn how to create events in React components, pass arguments to the handlers, and prevent default behaviors.
We'll also cover common event handling patterns and best practices to ensure your applications are performant and easy to maintain.
Basic Principles of Event Handling in React
Event handling in React is guided by a few basic principles that align with its component-based architecture. These principles include:
- Synthetic event system
- Naming conventions
- Passing event handlers as props
- Inline function and component methods
React uses a synthetic event system that ensures events behave consistently across different browsers. This wraps the native event system in browsers, providing a unified API regardless of the browser in which React is run.
Naming conventions revolve around a set of consistent naming that developers use for identifying events and the handler functions at a glance. Every event uses a camelCase naming convention, and the handler function they run is prefixed with "handle", followed by the event name. For example, an onClick event running a handleClick function.
Event handlers are the functions that run when the event is fired. They're usually defined before the render, just above the return statement. On many occasions, they are also passed as props to components. This aligns with React component-based architecture, allowing event logic to be embedded within the components using them.
In React components, events typically run inline functions or standalone functions within the component when fired. With this, you can utilize hooks like useState for state and useCallback for memoizing handler functions. This helps manage state changes and optimize performance.
How to Create Event Handlers in React Components
Creating an event in React starts with attaching the event name to the element that will fire it, with the handler function referenced in it:
<button onClick={handleClick}>
  Click me
</button>
What follows is to define that handler function, because it's the function that will run when the event is triggered:
const handleClick = () => {
alert('You clicked me');
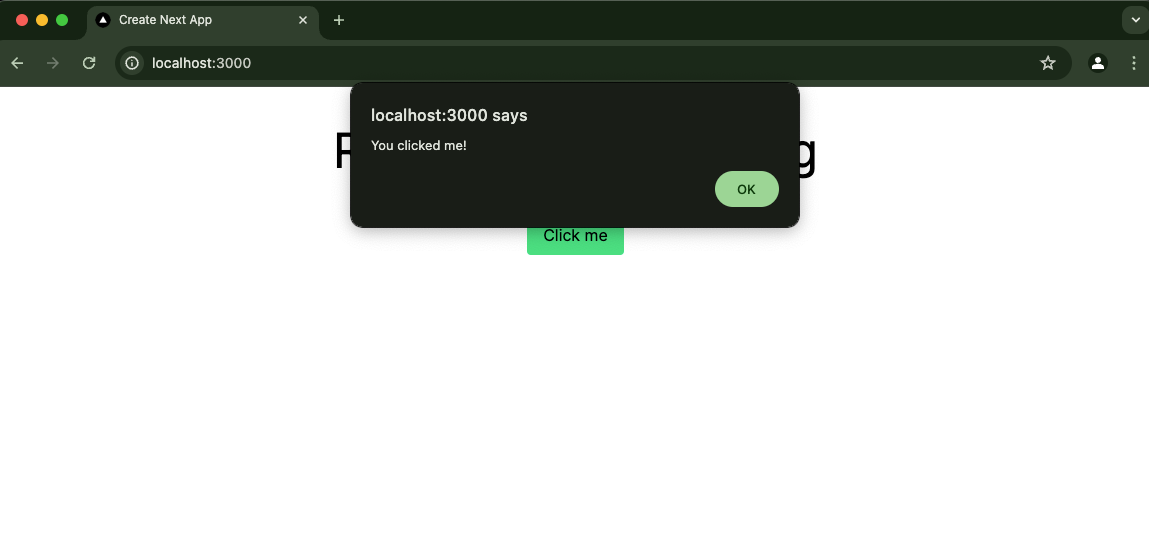
};This is the full code that has been imported into the page.jsx file of a Next.js starter:
'use client';

const Counter = () => {
 const handleClick = () => {
   alert('You clicked me!');
 };

 return (
   <div className="p-10 flex items-center">
     <button
       onClick={handleClick}
       className="bg-green-400 px-4 py-2 rounded mx-auto"
     >
       Click me
     </button>
   </div>
 );
};

export default Counter;
And here's what shows in the browser when the button is clicked:
You can also trigger the event without a separate function. You can do this by defining the function to run as an anonymous function inside the event:
<button onClick={() => alert('You clicked me!')}>
  Click me
</button>
If you want to update the component state based on an event, you might need the useState hook. Here's an example that shows that using a simple counter application:
'use client';

import { useState } from 'react';

const Counter = () => {
 const [count, setCount] = useState(0);

 return (
   <div className="flex items-center justify-center space-x-8 p-10">
     <button
       onClick={() => setCount(count - 1)}
       className="bg-red-500 hover:bg-red-600 text-white font-bold px-4 py-2 rounded "
     >
       Decrement
     </button>
     <p className="text-4xl font-semibold text-gray-800">{count}</p>
     <button
       onClick={() => setCount(count + 1)}
       className="bg-green-500 hover:bg-green-600 text-white font-bold px-4 py-2 rounded "
     >
       Increment
     </button>
   </div>
 );
};

export default Counter;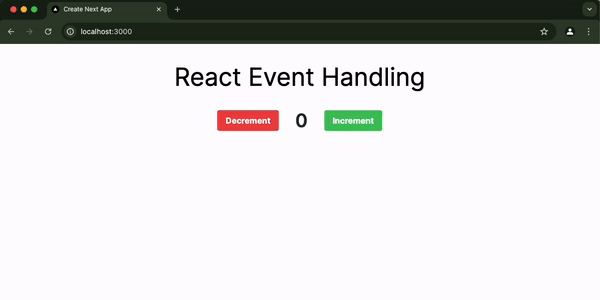
onChange and onSubmt are other popular events in React. onChange is used on input elements and onSubmit is used on a form element.
Here's an example of an onChange event:
'use client';

import { useState } from 'react';

const MyInput = () => {
 const [inputValue, setInputValue] = useState('');

 const handleChange = (e) => {
   setInputValue(e.target.value);
 };

 return (
   <div>
     <input
       type="text"
       value={inputValue}
       onChange={handleChange}
       className="border border-green-400 p-2 rounded shadow"
       placeholder="Type something..."
     />
     <p className="mt-4 text-green-400">You typed: {inputValue}</p>
   </div>
 );
};

export default MyInput;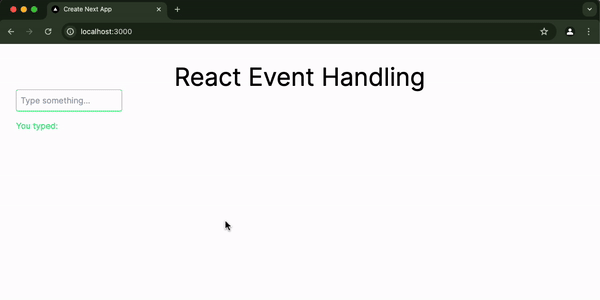
We'll look at an example of an onSubmit event in the section on how to prevent the default browser behavior when submitting a form.
Other examples of events include keyboard events like onKeyDown, onKeyPress, and onKeyUp, mouse events like onMouseUp, onMouseDown, onMouseEnter onDrag, and more. Any popular event in JavaScript is available in React. The only difference is that events are written in camelCase in React.
How to Pass Arguments to Event Handlers
Passing arguments to event handlers in React is a common requirement when you need to perform actions on specific data associated with an event. For example, deleting or editing a resource.
To do this, the handler function needs to take in a parameter:
const handleClick = (item) => {
   console.log('Button click for:', item);
 };
You then pass an argument corresponding to that parameter into the anonymous function of the event:
<button onClick={() => handleClick(item)}>Click Me</button>
Here's an example handling task deletion in a TaskManager component:
'use client';

import { useState } from 'react';

const TaskManager = () => {
 const [tasks, setTasks] = useState([
   { id: 1, text: 'Read an article' },
   { id: 2, text: 'Read a book' },
   { id: 3, text: 'Write an article' },
   { id: 4, text: 'Code' },
 ]);

 // Function takes a a taskId parameter
 const deleteTask = (taskId) => {
   setTasks((currentTasks) =>
     currentTasks.filter((task) => task.id !== taskId)
   );
   console.log('Deleted task with ID:', taskId);
 };

 return (
   <div className="p-5 max-w-md mx-auto bg-gray-100 rounded-lg shadow">
     <ul className="list-none space-y-2">
       {tasks.map((task) => (
         <li
           key={task.id}
           className="flex justify-between items-center bg-white p-3 rounded shadow-sm"
         >
           {task.text}
           <button
             // onClick event takes a task.id argument to account for the taskId parameter of the function
             onClick={() => deleteTask(task.id)}
             className="bg-red-500 hover:bg-red-700 text-white font-bold py-1 px-3 rounded"
           >
             Delete
           </button>
         </li>
       ))}
     </ul>
   </div>
 );
};


export default TaskManager;
Common Event Handling Patterns in React
Event handling patterns refer to the techniques for handling user interactions within React components.
These patterns include but aren't limited to:
- Binding event handlers with
useCallbackto memoize the handler - Event handlers with parameters (you've seen this in the section on how to pass arguments to event handlers)
- Conditional event handling
- Event delegation
- Event bubbling
- Optimized handling for lists
- Inline arrow functions (anonymous functions that you pass into event handlers)
Here's an example using useCallback to prevent creating a new function on every render:
'use client';

import { useCallback } from 'react';

function HandlerComponent() {
 const handleClick = useCallback(() => {
   console.log('Button clicked');
 }, []);

 return (
   <button onClick={handleClick}>
     Click Me
   </button>
 );
}

export default HandlerComponent;
And here's an example of conditional event handling:
'use client';

import { useState } from 'react';

function CheckLogin() {
 const [isLoggedIn, setLoggedIn] = useState(false);

 const toggleLogin = () => {
   setLoggedIn(!isLoggedIn);
 };

 const handleLogin = () => {
   if (isLoggedIn) {
     console.log('User is logged in');
   } else {
     console.log('User is logged out');
   }
 };

 return (
   <div>
     <h2 className="text-3xl text-center mb-4">
       {isLoggedIn ? 'User is logged in' : 'User is not logged in'}
     </h2>
     <button
       onClick={handleLogin}
       className="bg-green-400 hover:bg-green-500 px-2 py-3 rounded mr-3"
     >
       Check Login
     </button>
     <button
       onClick={toggleLogin}
       className="bg-green-400 hover:bg-green-500 px-2 py-3 rounded"
     >
       {isLoggedIn ? 'Log Out' : 'Log In'}
     </button>
   </div>
 );
}

export default CheckLogin;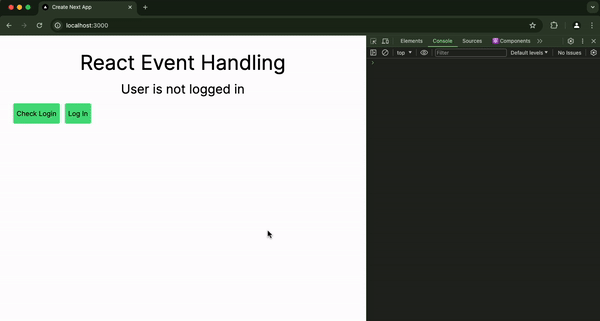
How to Prevent the Default Browser Behavior in Event Handlers
Default browser behavior is the automatic actions the browser performs when a specific event is fired. In event handling, the most common default browser behavior is that it refreshes when a form is submitted.
To prevent the browser from refreshing when a form is submitted, or prevent any other default behavior, pass the event parameter into the function handling the onSubmit event, then use that event to call a preventDefault function.
const handleSubmit = (event) => {
 // prevent the default behavior
 event.preventDefault();
};

return (
 // reference the function in onSubmit
 <form onSubmit={handleSubmit}>
   <input
     type="text"
     value={inputValue}
     onChange={handleInputChange}
     placeholder="Enter something..."
   />
   <button type="submit">Submit</button>
 </form>
);
Best Practices for Efficient Event Handling in React
Here are the most important rules for event handling in React:
Avoid Using Anonymous Arrow Functions Inside Events
It looks convenient to use arrow functions directly in events, like onClick={() => console.log('button clicked')}). The downside to this is that it can lead to performance issues because a new function is created on every render.
Always define the handler function to run when the event is fired outside the render method to avoid those performance issues.
Memoize Events with useCallback hook
For components that re-render often, memoizing the handlers in it with the useCallback hook can prevent unnecessary re-renders. This is useful when passing events as props to child components that might re-render unnecessarily.
Use Event Delegation
For multiple similar elements, like items in a list, consider using event delegation. Attach a single event listener to the parent element and use the event target to handle user interaction with child elements. This reduces the number of event listeners and can improve performance.
Prevent Default Behavior Where Necessary
Use event.preventDefault() in your event handlers when you need to stop the browser from performing default actions, like submitting a form. However, you should use this method prudently to avoid blocking browser behaviors unnecessarily.
Clean Up Event Listeners
If you set up your event listeners in useEffect, always return a cleanup function to remove the event listener. Otherwise, it'll cause memory leaks.
Test Event Handlers
Make sure your event handlers are covered in your unit and integration tests. Testing frameworks like Jest combined with React Testing Library can help verify that your event handlers are functioning as expected.
Conclusion
In this article, you learned the fundamentals of event handling in React, focusing on how to use the React synthetic event system to create events in React web apps.
We explored defining event handlers, passing arguments, and preventing default browser behaviors to enhance user experiences.
In addition, you learned about the benefits of using useCallback to optimize event handlers for efficient performance under various user interactions.
With these insights, you should be able to implement event handling in your projects, so you can improve both functionality and user engagement.
Bring your React skills to the next level
Would you like to learn more about event handling or other React concepts? Then join my React course on Udemy. I will show you how to become a better React developer by building a 2048 Game. Building games make learning more fun and enjoyable.
So join now and start your journey to mastering React!