
![How to Protect Data in Transit using HMAC and Diffie-Hellman in Node.js [Full Handbook]](https://www.freecodecamp.org/news/content/images/size/w2000/2024/03/Protect-Data-in-Transit-Handbook-v2--1-.png)
Data integrity refers to the assurance that data will remain accurate, unaltered, and consistent throughout its lifecycle. In communication, data integrity is important in safeguarding against unintended alterations and malicious interventions during data transmission.
The integrity of Digital Data is accomplished using Hashing Algorithms. The crypto module in Node provides various built-in vetted library functions to provide means to not only verify the integrity of data but also the authenticity of its origin.
This handbook aims to highlight the internal workings of the functions in the crypto library and give you some insights into the internal workings of HMAC and Diffie-Hellman Key Exchange. This will help you make informed decisions about hash algorithms and key lengths depending on your business requirements.
The primary focus of this handbook is to emphasize the crucial aspect of data integrity rather than discussing the various encryption algorithms available.
Encryption is used to protect information by converting it into a secure format, which ensures its confidentiality. But data integrity is concerned with ensuring that the data remains accurate and unaltered.
You can also watch the associated video here:
Table of Contents
- Prerequisites
- The Alice-Bob Paradigm
- Message Detection Code (MDC)
- Message Authentication Code (MAC)
- Hash-based MACs (HMAC)
- The Diffie-Hellman-Merkle Protocol
- Connecting the Dots
- Invoking the APIs
- Wrapping Up
- References
Prerequisites
- Node and Express: We'll create a TypeScript sample application using the Express framework. A basic understanding of the framework would be helpful. You will need the Node Runtime Environment to execute the scripts.
- Postman Client: To make an API request and to test out the sample application, you will need a tool to make HTTP Requests. You may use your web browser's "Edit and Send" feature under the Networks tab, but since not all browsers allow this, it's best to use a tool like Postman which provides a better UI to observe responses.
The Alice-Bob Paradigm
Throughout this handbook you will come across numerous sequence diagrams and mathematical proofs that use the Alice-Bob Paradigm.
The Alice-Bob paradigm is a common convention in cryptography where two generic entities, often named Alice and Bob, are used to illustrate various scenarios, protocols, or cryptographic principles.

These characters represent two parties engaged in communication, with Alice typically representing the sender or initiator, and Bob representing the receiver or responder.
We often introduce Eve as a third party, symbolizing an eavesdropper or potential attacker, adding an element of security risk and illustrating scenarios where external entities might attempt to intercept or manipulate the communication.
The sample application shown in the later sections models after this Alice-Bob Paradigm to use Boost Inc. and Account Aggregator (AA) as the parties engaged in communication.
Message Detection Code (MDC)
When Alice needs to send critical data to Bob over the internet, the data changes hands, jumping between routers and servers, each step carrying the potential risk of unintended alterations.
If Eve manages to get their hands on Alice's data, they might modify it. So the integrity of the data becomes questionable, emphasizing that its original state may have been compromised during transmission.
Note that we are talking about the integrity and not the confidentiality of the data. Say even after Alice encrypts the data, it doesn't inherently guarantee that the data hasn't been tampered with during transit.
Consider this scenario: even though Eve may be unable to decrypt the encrypted message, they might attempt to modify the ciphertext in transit. This could involve altering bits, rearranging packets, or injecting malicious code, potentially leading to unintended consequences upon decryption.
This is where a Message Detection Code (MDC) or a hash comes in picture. A modification detection code (MDC) is a message digest or a checksum that can prove the integrity of a message: that the message has not been changed [1].
The figure below explains how MDC is used to verify the integrity of a message:
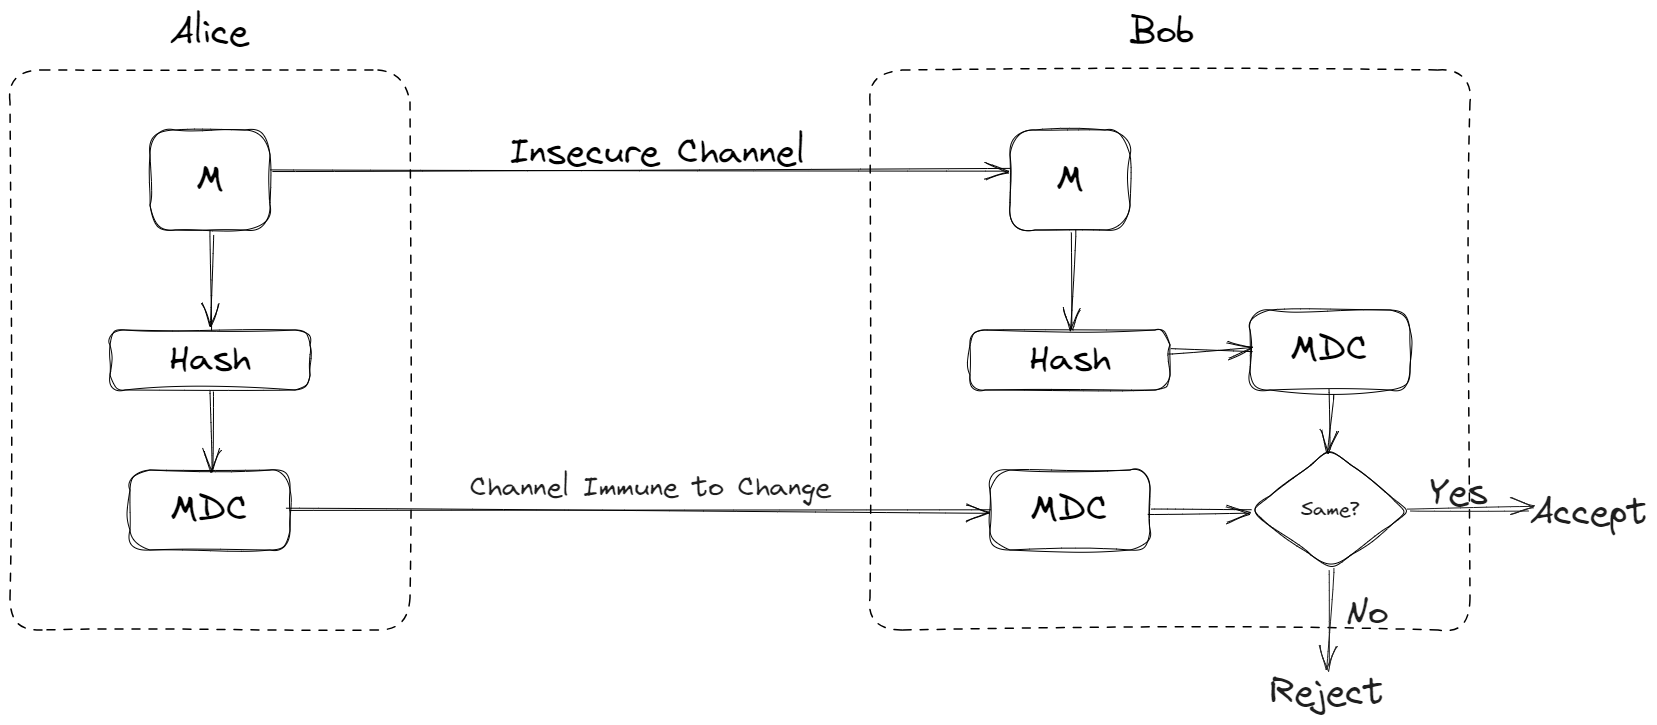
A Hash Function is used to generate the digest for any given message. This hash function processes the entire content of the message, producing a fixed-size string of characters that uniquely represents the message's contents. This is called the message digest or MDC.
Note that any hash function, such as SHA-256, SHA-3, or MD5, can be used depending on your specific security requirements and preferences.
Once the digest is generated, it serves as a unique fingerprint for the original message. When Alice sends both the message and its corresponding digest to Bob, they can independently apply the same hash function to the received message. If the calculated digest matches the one received from Alice, it serves as irrefutable evidence that the message has not undergone any modifications during transmission.
Message Authentication Code (MAC)
While MDC or the checksum is typically transferred over a safe channel, it may so happen that the safety of the channel or the trusted party itself is compromised. In such a case Eve can easily modify both the message and the digest and Bob will never know if the message actually came from Alice as intended.
What MDC lacks is a definitive guarantee of the message origin, leaving a potential vulnerability in confirming the true sender.
This is where Message Authentication Code (MAC) comes in. MACs not only ensure the integrity of the message, detecting any unauthorized alterations, but they also provide a mechanism for authenticating the origin of the data. In other words, MACs offer assurance that the message is indeed originating from Alice and not by someone else.
The figure below explains how MAC can help authenticate the origin of a message besides providing integrity check:
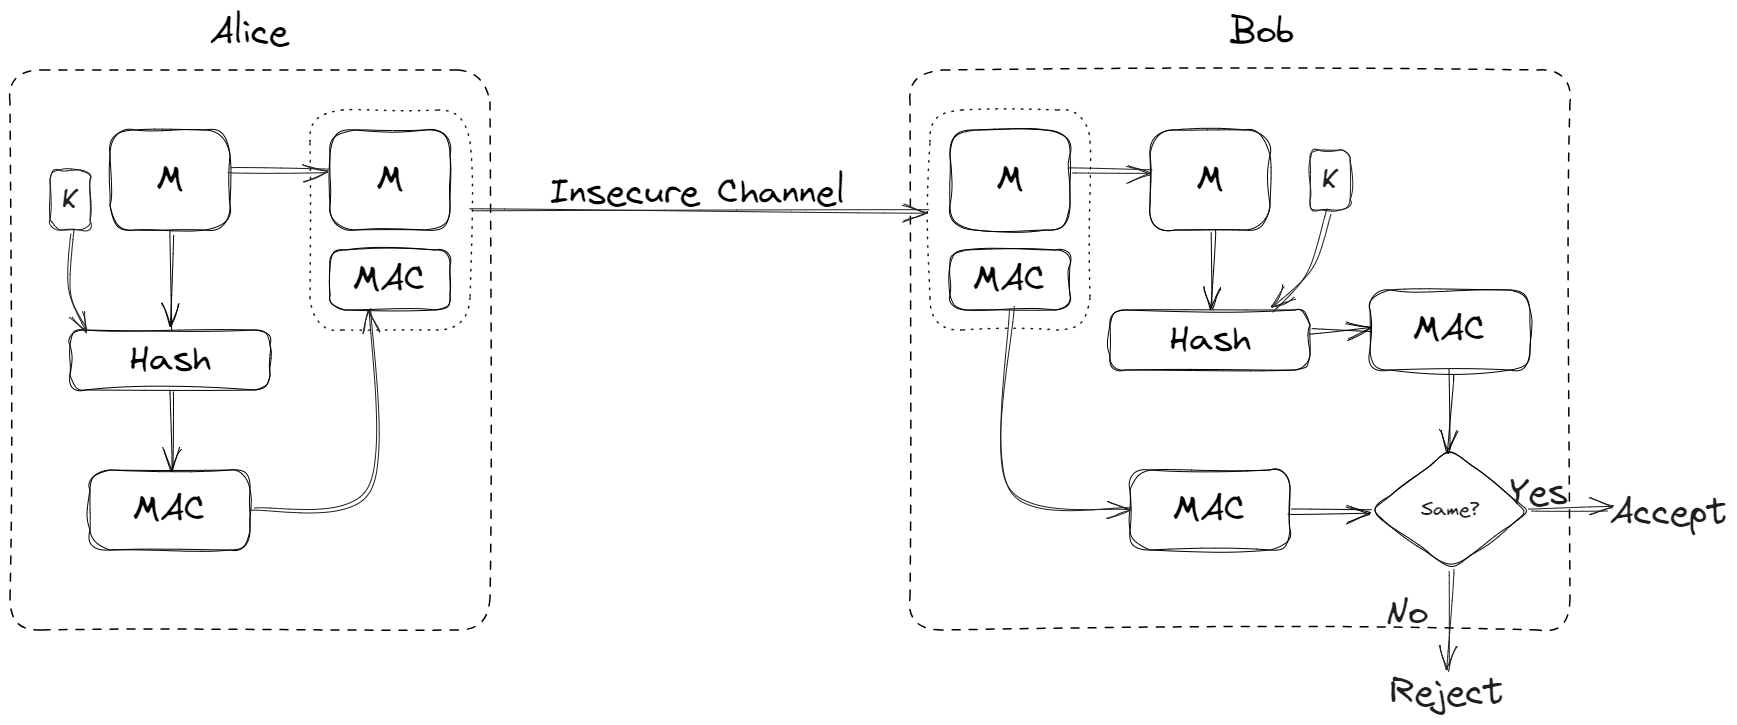
Notice that the difference between a MDC and a MAC is that MAC also includes a secret key \(K\) between Alice and Bob. The hash function also takes in a key \(K\) along with the message \(M\) to generate a MAC.
\[h (K | M) = MAC \]
Now both the message and MAC can be sent over the same insecure channel. When Bob receives this \( M + MAC \), he can separate out the message M and compute the MAC for it using the same hash function and the secret key \(K\).
Bob will then compare the newly computed MAC with the one he received. If the two MACs match, the message is authentic and has not been modified by an adversary.
\[ Alice: S(K,M) = MAC \\ Bob: V(M, K, MAC) = Accept/ Reject \]
Since Eve does not have this secret key \(K\), they cannot modify the message and generate a valid MAC. Consequently, the resulting MAC becomes a unique fingerprint, signifying not only the integrity of the message but also authenticating its origin.
Hash-based MACs (HMAC)
While MAC do provide a guarantee of authentication of the origin of a message, it is still falls short in ensuring unforgeability. It is easy for Eve to perform a Man in The Middle (MiTM) attack, intercept the MAC + Message pair and then perform the Length Extension Attack.
Given \( S = h( K || M) \) and the message \(M\), Eve can extend \(M\) to \(M' = M || Pad || w\) and create \(MAC(M')\); where \(MAC(M')\) is evaluated as
\( S = h( K || M || Pad || w) \).
Eve does not require knowledge of the secret key \(K\) to extend the message \(M\) to \(M'\). When Alice receives this modified \(M'\) and \(MAC(M')\), they are unable to determine the modification.
HMAC or a Hash-based MAC is a specific method for constructing a MAC algorithm out of a collision resistant hash function. HMAC uses two passes of hash computation and provides a better immunity against length extension attacks. The figure below explains the construction of HMACs.
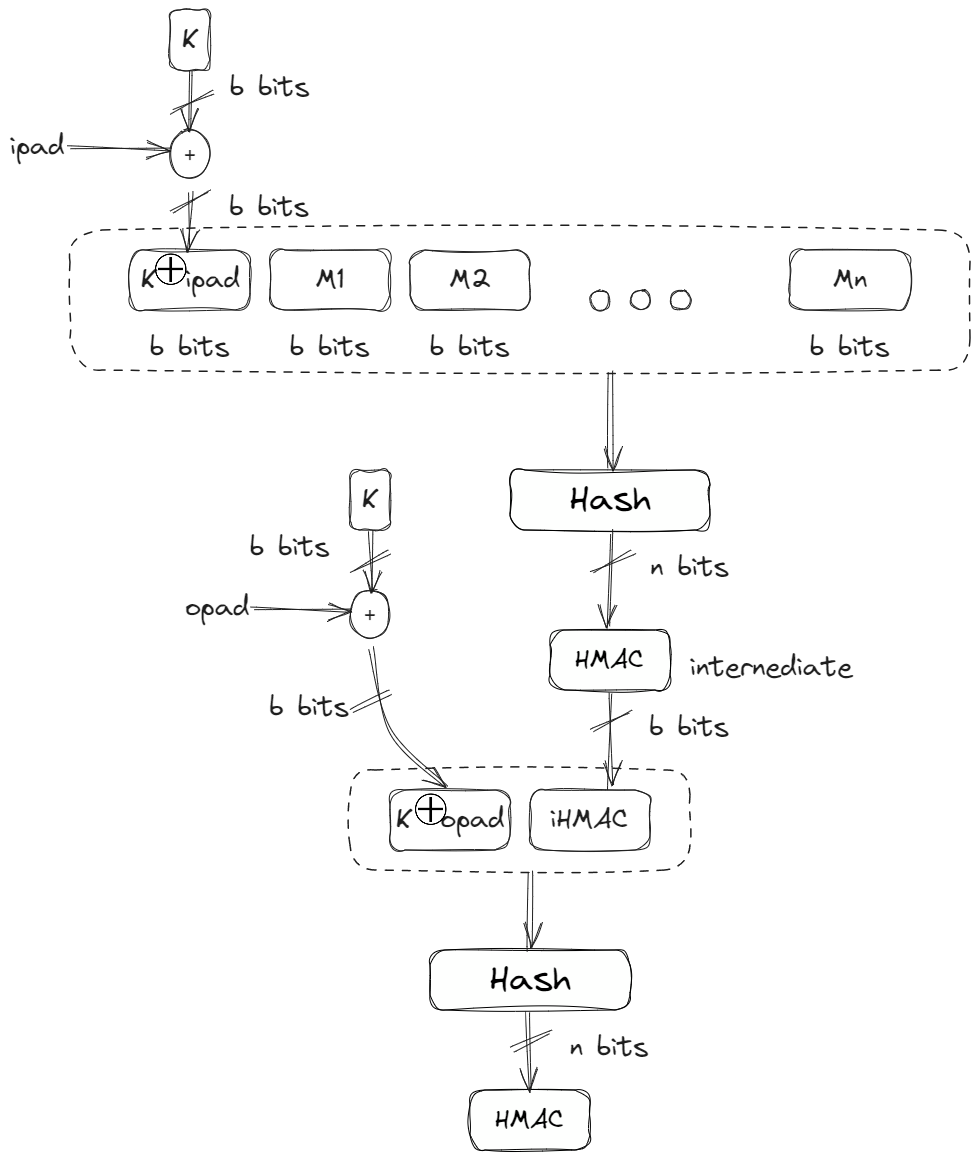
There are several steps involved in the implementation of HMACs [1]:
- Divide the message into N blocks, each of b bits
- Select a secret key and left-padded with 0’s to create a b-bit key and exclusive-ored with a constant called \(ipad\) (input pad).
- Use the same secret key and XOR it with an another constant called \(opad\).
The value of \(ipad\) and \(opad\) are fixed constants as defined in the HMAC Standards [3]. The value of \(ipad\) is taken as b/8 repetition of the sequence
00110110 (hex: 36) and the value of \(opad\) is taken as b/8 repetition of the sequence 01011100 (hex: 5C).
These values are defined in such a way to have the most "non-regular" Hamming distance from each other.
The Hamming distance between \(ipad\) and \(opad\) 4, meaning exactly half of the bits are flipped. - Prepend the result produced in Step 2 to the message block. Use the hash function on this \(N+1\) block to create a n bit message digest called the intermediate HMAC.
- The intermediate HMAC is prepended with \(0\)s to make a b bit block and then the result of Step 3 is prepended to this block.
- Use the hash function again on the result of step 5 to get a final n bit HMAC.
Mathematically, this can be represented as:
\[ S(k, m) = H(k \oplus \text{opad} || H(k \oplus \text{ipad} || m)) \]
Now if Eve tries to extend \(M\) to \(M' = M || Pad || w\), the resulting HMAC construction this would be: \[ HMAC(K, M')=H(K||opad, H(K||ipad, M || Pad || w)) \]
Due to the unique application of \(opad\) in the outer hash, the attacker cannot construct \(H(K||opad, <...> )\) without knowing the key \(K\). The outer padding disrupts the internal state for any additional input, thwarting the attacker's attempt.
The Diffie-Hellman-Merkle Protocol
One of the main challenges in Symmetric-key Ciphers is the distribution of keys. A fundamental question naturally arises: How will Bob know what keys Alice has used?
A very intuitive answer to this problem could be to use a Key Exchange or a Key Distribution Center (KDC). However, the utilization of a KDC or a Key Exchange introduces a notable caveat: the requirement of a secure channel for transmitting keys.
The security of a system employing a Key Distribution Center (KDC), such as in the case of the Kerberos authentication protocol, is heavily dependent on the security of the KDC itself. If the KDC is compromised, the cryptographic keys it manages and distributes can be exposed, leading to potential security vulnerabilities throughout the system as seen in a Golden Ticket Attack.
In the year 1979, Ralph Merkle, Whitfield Diffie and Martin Hellman came up with a way to Securely exchange Cryptographic Keys over Public Insecure Channels.
The Diffie-Hellman-Merkle Protocol provides a way for two parties to agree upon a shared secret key over an insecure channel without directly exchanging that key. The crypto module in Node.js contains the DiffieHellman class, which is a utility for creating Diffie-Hellman key exchanges.
Before we go through all of the functions defined in this class, it is important to understand the mathematics that goes around in The Diffie-Hellman-Merkle Protocol. The UML Sequence Diagram below explains the steps involved in The Diffie-Hellman-Merkle Protocol:

The process begins with either of the party who wants to establish a secure communication with the other. In this case, Alice wants to start the communication.
Alice will first pick a randomly chosen Generator g and a large prime number p. Increasing the length of the prime number results in heightened security, as it amplifies the difficulty for adversaries to execute certain cryptographic attacks.
However, enlarging the prime number also comes with computational costs. Longer prime numbers require more computational resources to perform the key generation.
Now, Alice needs to select a Private a and compute a modular exponentiation:
\[A = g^a (\text{mod} , p)\]
Alice will send over the Generator g, the large prime p and Alice's Public Key A to Bob. At this point, Bob has all the values he needs to evaluate his own modular exponentiation of:
\[A = g^b (\text{mod} , p)\]
He will send back this Public Key B to Alice.
Note that up until this point, all communication are occurring over insecure channel. The values g, p, A and B "might" as well be sent as plaintext. The Actual Secret Key is evaluated when Alice and Bob use these data to compute what is known as a "Shared Secret".
Shared Secret computed by A:
\[ S = A^b (\text{mod} , p) \\ S = g^{\left(ab\right)} (\text{mod} , p) \]
Shared Secret computed by B:
\[ S = B^a (\text{mod} , p) \\ S = g^{\left(ab\right)} (\text{mod} , p) \]
Notice how the Shared Secret computed by both parties at their end are the same.
This symmetrical outcome is the essence of the Diffie-Hellman key exchange, where each party independently computes the shared secret using their private key and the public key received from the other party. This ensures that both Alice and Bob arrive at an identical Shared Secret, establishing a secure foundation for further encrypted communication.
Why is the Shared Secret Secure?
Diffie-Hellman key exchange relies on the mathematical principles of discrete logarithm, primitive roots and Modular exponentiation.
Modular exponentiation is the problem of computing \(a^b mod n\), where \(a\), \(b\), and \(n\) are known integers. Discrete logarithm is the problem of finding \(x\) such that \(a^x mod n = b\), where \(a\), \(b\), and \(n\) are known integers and \(a\) is a primitive root modulo \(n\).
The security of Diffie-Hellman is rooted in the computational complexity of calculating discrete logarithms.
For example, given g, p and a, it's easy to compute A as Modular exponentiation is in P, meaning that there is a polynomial-time algorithm to solve it.
But, the other way can't be said true. Given g, p, and A, computing a requires solving the discrete logarithm problem, which is widely believed to be a computationally infeasible task [2].
Remember that both parties will compute the Shared Secret at their end and there is no need to send over this secret to the other party. This eliminates the risk of the Shared Secret getting intercepted by Eve and the only option they are left with is to solve the discrete logarithm problem.
Connecting the Dots
The key \(K\) that we provide in an HMAC has to be the same for both Alice and Bob. Now that we know how a Diffie-Hellman-Merkle key exchange works, it becomes intuitive that we can plug in the shared secret as the key for an HMAC.
Alice can use the shared key \(S\) in the HMAC function as a parameter and Bob can use the same shared secret \(S\), computed at their end, in the verification algorithm.
The crypto module in Node.js provides various built-in functions to implement cryptographic constructs such as HMACs and Diffie-Hellman Key Exchange. It is always recommended to use vetted cryptographic libraries and avoid implementing cryptographic algorithms yourselves over the concerns of Side Channel Attacks or a Heartbleed.
Let's create a TypeScript/ Node.js application to understand the implementation and prototypes of these functions. The two entities involved in communication in this application would be Boost Inc. and Account Aggregator. Boost needs to send a critical data over to the Account Aggregator.
We will first utilize the DiffieHellman class to create Secret Keys for both entities. Boost will then use the Secret Key to create a HMAC using the Hmac Class in Node. Account Aggregator will recieve this HMAC along with the message. They will verify this HMAC against the newly generated HMAC from the message they received.
Note that the code at Account Aggregator's end will be simulated and we will create API endpoints for each operation to show separation of concerns in this sample application.
The following sequence diagram explains what the application does:

Project Setup
In the root of your workspace, install Express, Axios, type definitions of Node, and type definitions of Express using the following command:
npm init -y | npm install axios express
npm install -D nodemon ts-node @types/express @types/node typescript
Configure tsconfig as per your liking and create a file called cryto.utils.ts under src/utils. Let's create an interface and import all necessary modules from the crypto library:
import { createHmac, createDiffieHellman, DiffieHellman, KeyObject, BinaryLike } from 'crypto';

export interface KeyPair {
  publicKey: Buffer;
  privateKey: Buffer;
  generator: Buffer;
  prime: Buffer;
  diffieHellman: DiffieHellman;
}
This interface will function as a blueprint for managing cryptographic key pairs throughout this application. It encapsulates the public and private keys, generator, prime, and a Diffie-Hellman object.
By using this interface we will ensure a structured and standardized approach to handle cryptographic key pair information, thus promoting clarity and consistency in cryptographic operations within a Node.js environment.
The createDiffieHellman Function
Next, we will define the function generateKeyPair which will allow us to generate the private and public keys, \(A\) and \(B\) along with the large prime \(p\) and the generator \(g\) using the createDiffieHellman and generateKeys functions.
export function generateKeyPair(prime?: any, generator?: any): KeyPair {
  const diffieHellman = prime && generator ? createDiffieHellman(prime, 'hex', generator, 'hex') : createDiffieHellman(2048);
  diffieHellman.generateKeys();

  return {
    publicKey: diffieHellman.getPublicKey(),
    privateKey: diffieHellman.getPrivateKey(),
    generator: diffieHellman.getGenerator(),
    prime: diffieHellman.getPrime(),
    diffieHellman,
  };
}
Notice that the parameters to this function – prime and generator – are optional. This is because the underlying createDiffieHellman has five defined overloads:
function createDiffieHellman(primeLength: number, generator?: number): DiffieHellman;

function createDiffieHellman(
	prime: ArrayBuffer | NodeJS.ArrayBufferView,
	generator?: number | ArrayBuffer | NodeJS.ArrayBufferView,
): DiffieHellman;

function createDiffieHellman(
    prime: ArrayBuffer | NodeJS.ArrayBufferView,
    generator: string,
    generatorEncoding: BinaryToTextEncoding,
): DiffieHellman;

function createDiffieHellman(
    prime: string,
    primeEncoding: BinaryToTextEncoding,
    generator?: number | ArrayBuffer | NodeJS.ArrayBufferView,
): DiffieHellman;

function createDiffieHellman(
    prime: string,
    primeEncoding: BinaryToTextEncoding,
    generator: string,
    generatorEncoding: BinaryToTextEncoding,
): DiffieHellman;
The first function creates a Diffie-Hellman object with a randomly generated prime of the specified length. The createDiffieHellman(2048); creates a Diffie-Hellman object where the length of the randomly generated prime is 2048 bits.
When no generator value is provided to this function, it takes the default value of 2. The length of the prime necessarily has to be large and if you select a small value Node will throw an error signifying that this length will not make a secure key.
Instead of passing in the length of the prime, we can pass the prime as a buffer. This is what Account Aggregator will to at their end when Boost sends over the necessary details.
Similarly you can use the other function declarations as per your use case to pass the prime and generator as ArrayBuffer or ArrayBufferView types or as string with a specified encoding.
The computeSecret Function
Now, let's define a method generateSharedSecret that takes in a Key pair and a public key as parameter and computes the shared secret \(S\):
export function generateSharedSecret(keyPair: KeyPair, publicKey: Buffer): Buffer {
  return keyPair.diffieHellman.computeSecret(publicKey);
}
The computeSecret function also has four overrides, which allows you to either provide the Public key parameter as string or ArrayBufferView as well as options to specify the inputEncoding and outputEncoding.
The createHmac Function
Now that we've computed our shared secret, let's create a function generateHMAC that consumes this shared secret and generates a digest against it.
export function generateHMAC(data: any, secretKey: KeyObject | BinaryLike): any {
  data = JSON.stringify(data);
  const hmac = createHmac('sha256', secretKey);
  hmac.update(data);
  return hmac.digest('hex');
}
The first parameter of the createHmac function takes an algorithm. This is where you need to specify what underlying hash function do you want to use.
Remember that the security of HMAC relies on various factors, including the cryptographic strength of the underlying hash function, the size of its hash output, and the quality and size of the key.
The options given to you under this algorithms parameter depends on the available algorithms supported by the OpenSSL version on the platform. To check what algorithms are available to you, execute the following command in the terminal:
openssl list -digest-algorithmsThis will give you a list from which you can select your desired algorithm for the underlying hash function:
RSA-MD4 => MD4
RSA-MD5 => MD5
RSA-MDC2 => MDC2
RSA-RIPEMD160 => RIPEMD160
RSA-SHA1 => SHA1
RSA-SHA1-2 => RSA-SHA1
RSA-SHA224 => SHA224
RSA-SHA256 => SHA256
...
The secret key that the createHmac function takes could either be of type KeyObject or of type BinaryLike. Note that the type BinaryLike is a union type in TypeScript. It is a type that can be either a string or a NodeJS.ArrayBufferView.
The createHmac function's data parameter is designed to accepts strings, Buffer, TypedArray and DataView. To simplify the developer experience and minimize complexity, we intentionally set the data parameter type in the generateHMAC function as any. Internally, we handle the conversion to a string using JSON.stringify.
Initializing communication
Now on Boost's end create a file verification.controller.ts under src/controllers:
import { generateKeyPair, generateSharedSecret, generateHMAC, KeyPair } from '@boost/v1/utils/crypto.utils';
import { KeyObject, BinaryLike } from 'crypto';

const boostKeyPair: KeyPair = generateKeyPair();

export function shareKeys() {
    const boostPublicKey: Buffer = boostKeyPair.publicKey;
    const boostPrivateKey: Buffer = boostKeyPair.privateKey;
    const boostGenerator: Buffer = boostKeyPair.generator;
    const boostPrime: Buffer = boostKeyPair.prime;
    const boostDiffieHellman = boostKeyPair.diffieHellman;

    return {
        boostPublicKey,
        boostPrivateKey,
        boostGenerator,
        boostPrime,
        boostDiffieHellman,
    };
}

export function hmacDigest(data: any, secretKey: KeyObject | BinaryLike): any {
    return generateHMAC(JSON.stringify(data), secretKey);
}
This file imports the interface and all necessary modules from cryto.utils.ts and defines two wrapper functions – shareKeys and hmacDigest. shareKeys will only serve as a wrapper around generateKeyPair which will allow developers at Boost to send only the required keys over to the Account Aggregator.
Setting up the Account Aggregator
At the Account Aggregator's end, we need to set up a function that computes AA's public key and sends it over to Boost Inc. We will also need a function to verify the received HMAC of a data by comparing it against one that AA generates:
import { generateKeyPair, generateSharedSecret, generateHMAC, KeyPair } from '../utils/crypto.utils';
import axios from 'axios';

let sharedSecret: Buffer;

export async function sendAAPublicKey(): Promise<Buffer> {
  try {
    const response = await axios.get('http://localhost:3000/init');

    const boostPublicKey: Buffer = Buffer.from(response.data.boostPublicKey, 'hex');
    const boostGenerator: Buffer = Buffer.from(response.data.boostGenerator, 'hex');
    const boostPrime: Buffer = Buffer.from(response.data.boostPrime, 'hex');

    const AA: KeyPair = generateKeyPair(boostPrime, boostGenerator);
    sharedSecret = generateSharedSecret(AA, boostPublicKey);

    return AA.publicKey;
  } catch (error) {
    console.error('Error sending AA public key:', (error as Error).message);
    throw error;
  }
}

export async function verifyData(data: any, hmac: string): Promise<string> {
  try {
    const calculatedHMAC = generateHMAC(JSON.stringify(data), sharedSecret);
    return calculatedHMAC === hmac ? "Integrity and authenticity verified" : "Integrity or authenticity compromised";
  } catch (error) {
    console.error('Error verifying data:', (error as Error).message);
    throw error;
  }
}
We make an Axios request to the /init endpoint defined at Boost and fetch \(p\), \(g\) and \(A\). Once we've computed the public key, we'll send that back to Boost. We will also compute our shared secret here which we'll use while verifying the HMAC in the verifyData method.
Setting up the Express APIs
Now that all the controllers and utility functions are in place, we'll create a few endpoints to facilitate communication between Boost Inc. and the Account Aggregator.
Boost:
import express, { Request, Response } from 'express';
import { hmacDigest, shareKeys } from '@boost/v1/controllers/verification.controller';
import { KeyPair, generateSharedSecret } from '@boost/v1/utils/crypto.utils';
import { DiffieHellman } from 'crypto';
import axios from 'axios';

const appBoost = express();
const PORT_BOOST = 3000;

let boostPublicKey: Buffer, boostPrivateKey: Buffer;
let boostGenerator: Buffer, boostPrime: Buffer;
let sharedSecret: Buffer;
let boostKeyPair: KeyPair, boostDiffieHellman: DiffieHellman;

appBoost.get('/init', async (req: Request, res: Response) => {
    ({ boostPublicKey, boostPrivateKey, boostGenerator, boostPrime, boostDiffieHellman } = shareKeys());
    res.send({ boostPublicKey, boostGenerator, boostPrime });
});

// Simulated Data
const data = {
    name: 'Boost User 1',
    phone: '1234567890',
};

appBoost.get('/fetchData', async (req: Request, res: Response) => {
    const hmac = hmacDigest(data, sharedSecret);
    res.send({ data, hmac });
});

appBoost.listen(PORT_BOOST, () => {
  console.log(`Boost server is running on http://localhost:${PORT_BOOST}`);
});
The /init endpoint, hosted by Boost, is invoked by AA within its sendAAPublicKey function. When the shared secret is calculated, AA will invoke the endpoint /fetchData to retrieve the critical information.
Account Aggregator (AA):
import express, { Request, Response } from 'express';
import { sendAAPublicKey, verifyData } from '@AA/v1/controllers/aa.controller';
import { KeyPair, generateSharedSecret } from '@boost/v1/utils/crypto.utils';
import { DiffieHellman } from 'crypto';
import axios from 'axios';

const appAA = express();
const PORT_AA = 3001;

let boostPublicKey: Buffer, boostPrivateKey: Buffer;
let boostGenerator: Buffer, boostPrime: Buffer;
let AAPublicKey: Buffer;
let sharedSecret: Buffer;
let boostKeyPair: KeyPair, boostDiffieHellman: DiffieHellman;

appAA.get('/fetchAAPublicKey', async (req: Request, res: Response) => {
    AAPublicKey = await sendAAPublicKey();
    res.send({ AAPublicKey: AAPublicKey.toString('hex') });

    boostKeyPair = {
        publicKey: boostPublicKey,
        privateKey: boostPrivateKey,
        generator: boostGenerator,
        prime: boostPrime,
        diffieHellman: boostDiffieHellman,
    }

    sharedSecret = generateSharedSecret(boostKeyPair, AAPublicKey);
});

appAA.get('/verifyData', async (req: Request, res: Response) => {
    const response = await axios.get('http://localhost:3000/fetchData');
    const { data, hmac } = response.data;
    const verified = await verifyData(data, hmac);
    res.send({ verified });
});

appAA.listen(PORT_AA, () => {
  console.log(`AA server is running on http://localhost:${PORT_AA}`);
});
The fetchAAPublicKey endpoint, hosted as AA's end, will be invoked by Boost when it wants to evaluate the Shared Secret. The verifyData method is encapsulated within a GET request, enabling either party to confirm the integrity of the transmitted data.
Invoking the APIs
Head over to your Postman Client to test out these APIs. Since the sendAAPublicKey method takes care of the initiation, we need to start our communication using the /fetchAAPublicKey endpoint:
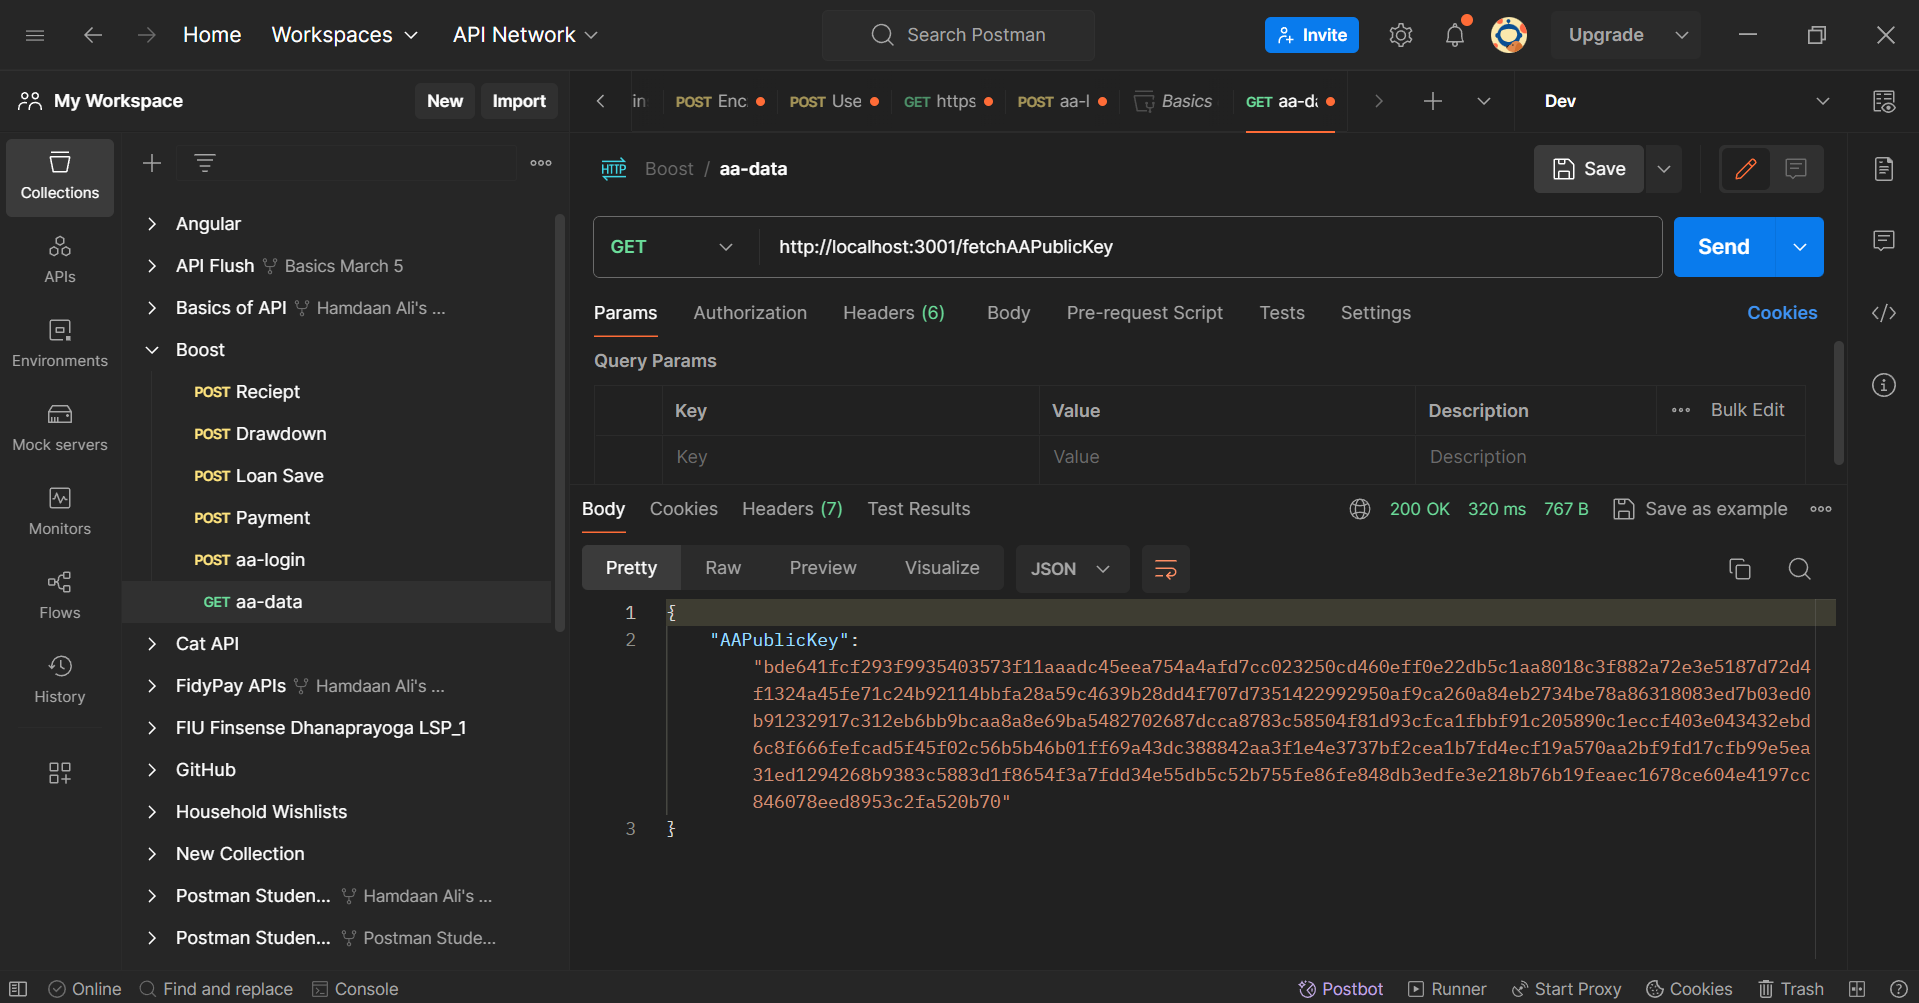
You will observe the AA's public key as a response. Now, Boost Inc. will use this Public Key and evaluate the Shared Secret.
Once that is done, it will use the Shared Secret to compute the message digest in the /fetchData endpoint. Since /verifyData invokes the former endpoint, we'll check this in action on our Postman Client:
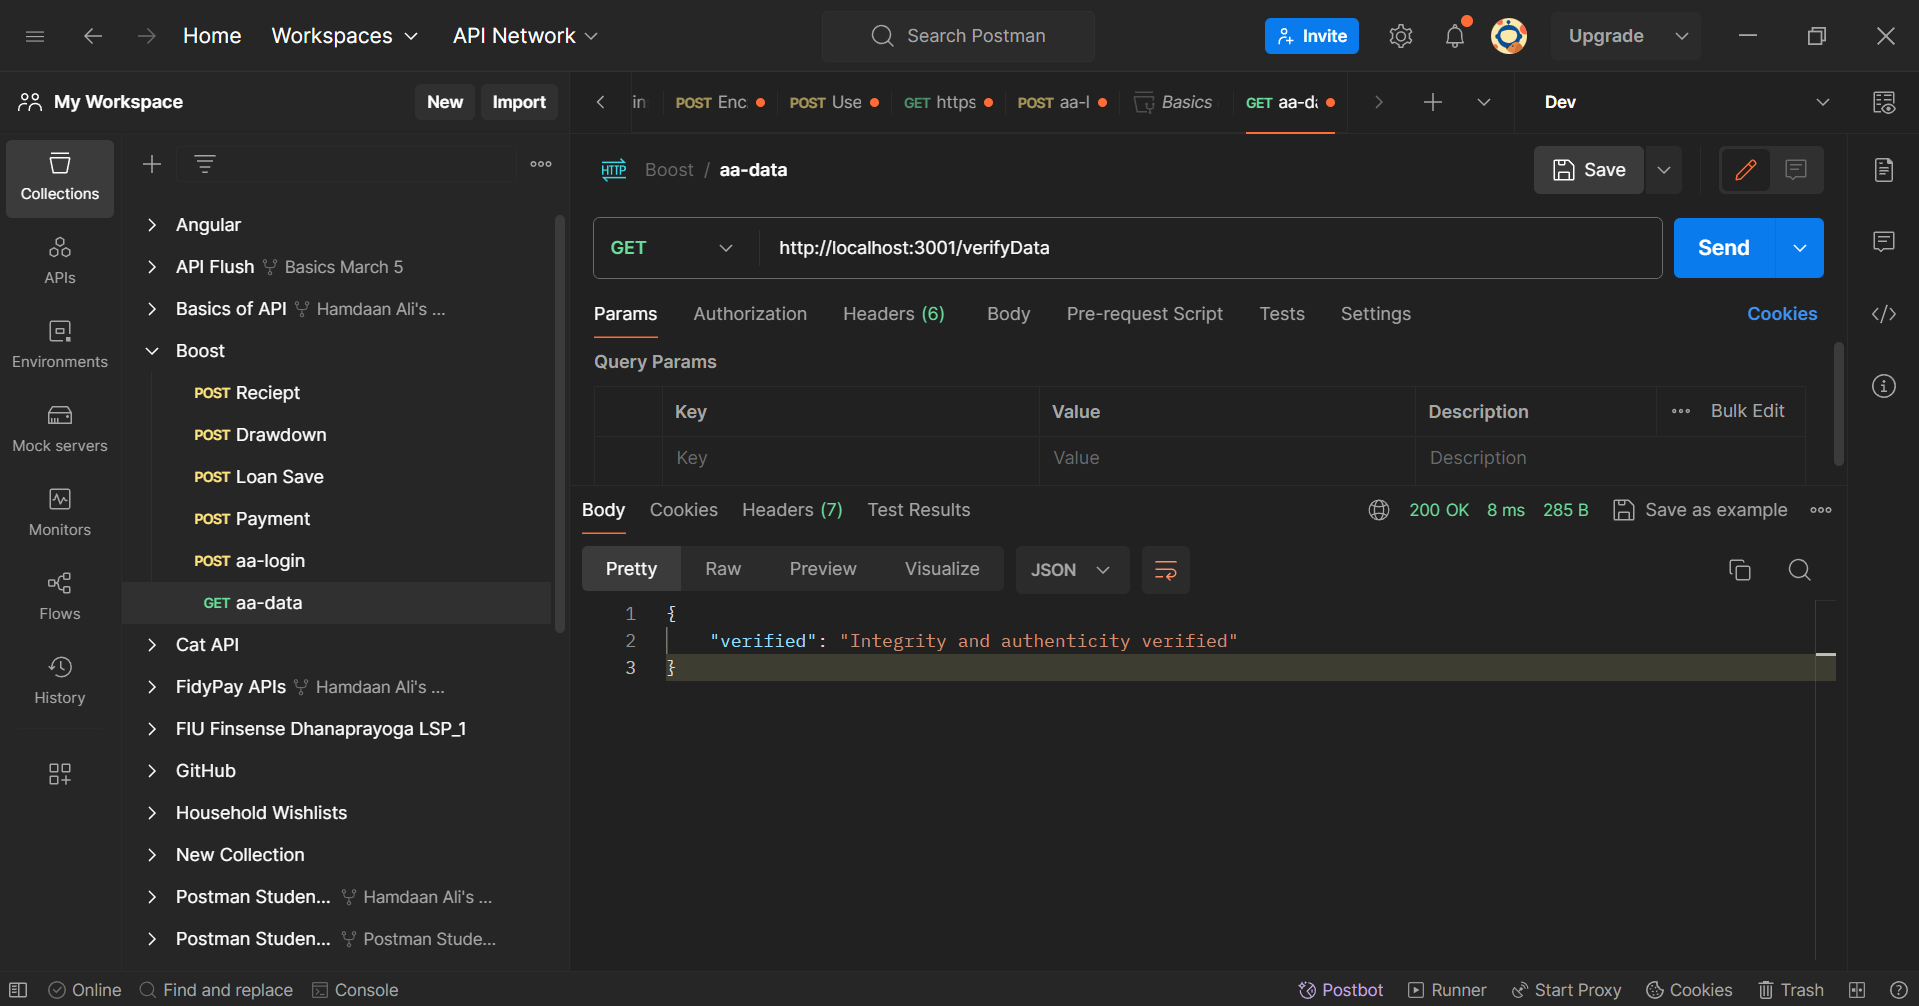
You will notice that the /verifyData response declares the successful verification of both integrity and authenticity. This acknowledgment ensures that the transmitted data remains untampered and originates from the authenticated source, providing a layer of security for communication between the two entities.
Wrapping Up
And there you have it: by utilizing HMACs and the Diffie-Hellman-Merkle Key Exchange, you can verify the integrity and authenticity of your transmitted data, enhancing the security of your applications and ensuring a reliable API communication framework for developers.
By understanding the intricacies and mathematical underpinnings of these practices, you can now make informed decisions, fortifying your system against tampering threats.
Find the complete code snippets here — GitHub Gist | HamdaanAliQuatil.
You may find me on X (formerly Twitter) – Hamdaan Ali Quatil.
References
[1] Behrouz A. Forouzan – Introduction to Cryptography and Network Security
[2] New Directions in Cryptography, Whitfield Diffie and Martin E. Hellman diffie.hellman.pdf (jhu.edu)
[3] Keying Hash Functions for Message Authentication, Mihir Bellare, Ran Canetti, Hugo Krawczyk https://cseweb.ucsd.edu/~mihir/papers/kmd5.pdf