

Serverless databases are all the rage these days. They allow you to develop a fully functional app without building a server or writing server code.
A serverless database is a cloud computing solution that lets you distribute and flexibly manage your resources.
In this tutorial, we'll build a full-stack application with Supabase, React, and TailwindCSS in Next.js.
Outline
- What is Supabase?
- Why Should You Use Supabase?
- How to Set Up a Supabase Project
- How to Set Up Our Frontend Application
- How to Build Our Frontend Application Layout with the Supabase Client
- How to Build Our Application
- Conclusion
- Resources
Prerequisites
- Practical React.js experience
- A basic grasp of async functions
- A GitHub account
What Is Supabase?
Supabase is a PostgreSQL-based open-source serverless database that allows you to build a real-time backend for your application in a few minutes.
PostgreSQL is an object-relational database system that has been actively developed for more than 25 years and is known for its dependability and performance.
Supabase includes several out-of-the-box services/functionalities that are designed to make your life easier. These include the following, but are not limited to:
- Authentication
- Realtime Database
- UI components
- RLS (Row Level Security)
Why Should You Use Supabase?
- Supabase takes care of the scaling (even though it uses an SQL database).
- Although Supabase is based on PostgreSQL, data migration is easy.
- You can run complicated queries or text searches, unlike with Firebase.
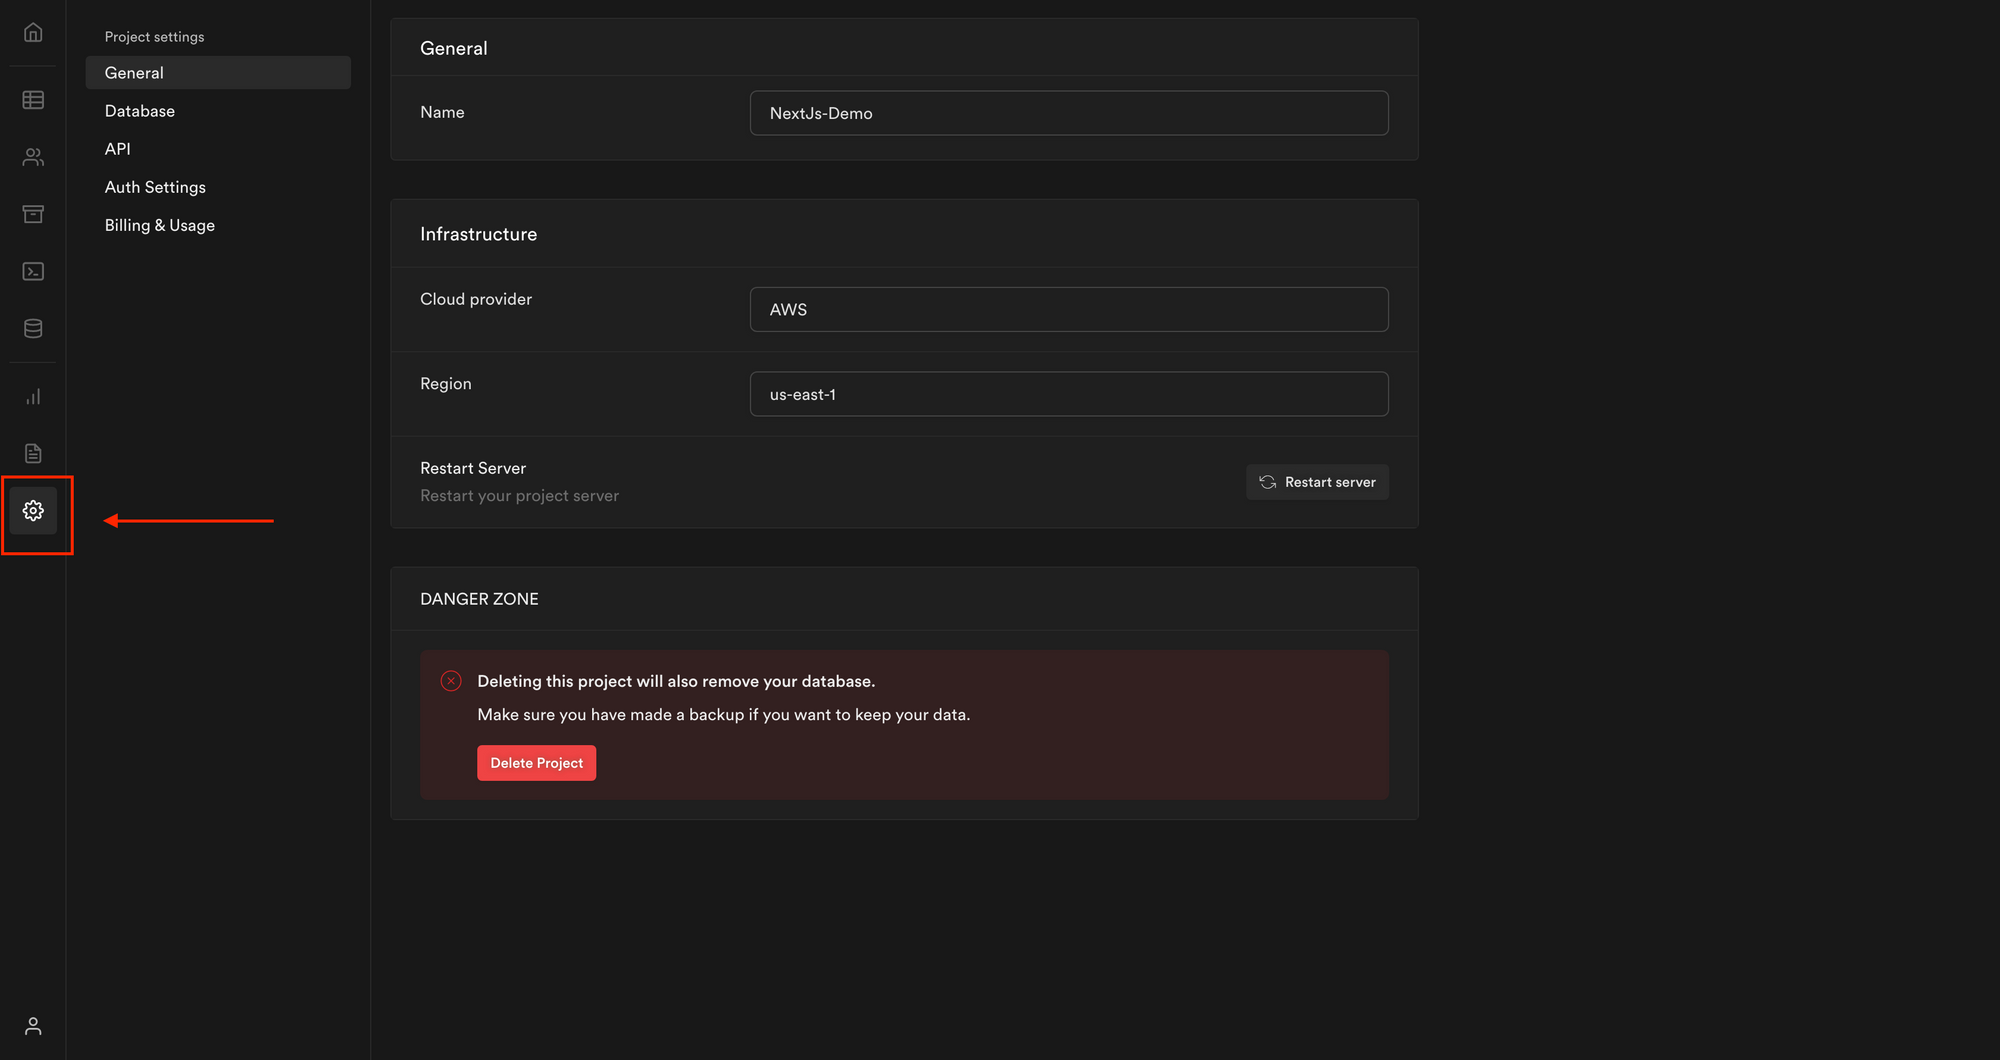
Step 1: How to Set Up a Supabase Project
This section will build our project and integrate Supabase into our application.
Sign up for a Supabase account and create a project
To get started, let's sign up for a Supabase account here. To continue, you'll need a GitHub account. You can register here if you don't yet have an account on GitHub.
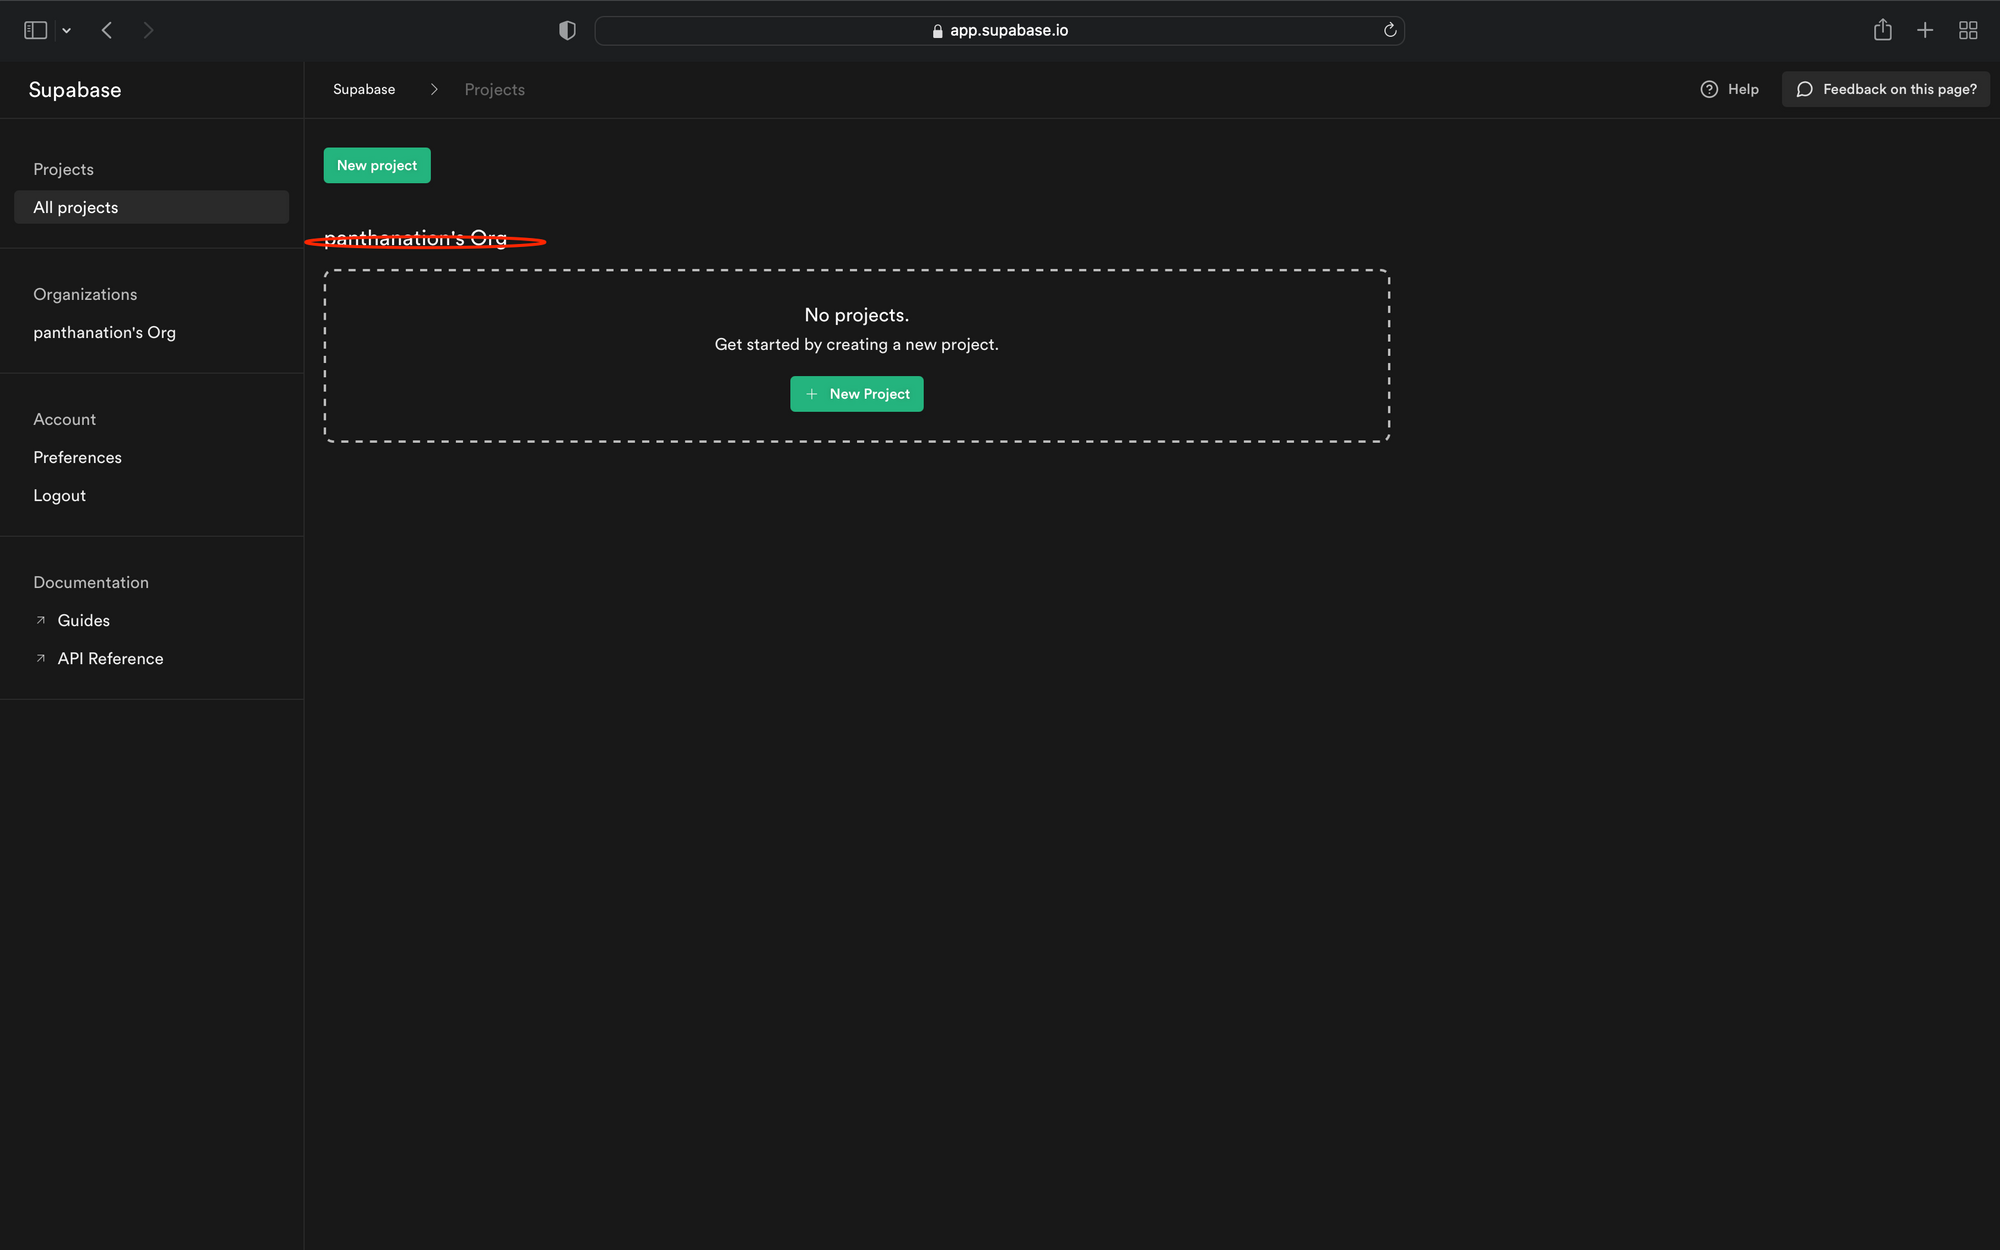
After we've logged in, we're redirected to our dashboard, as shown in the screenshot above.
Next, we can now click on the New Project Button to create a new project for our demo application, as shown below:

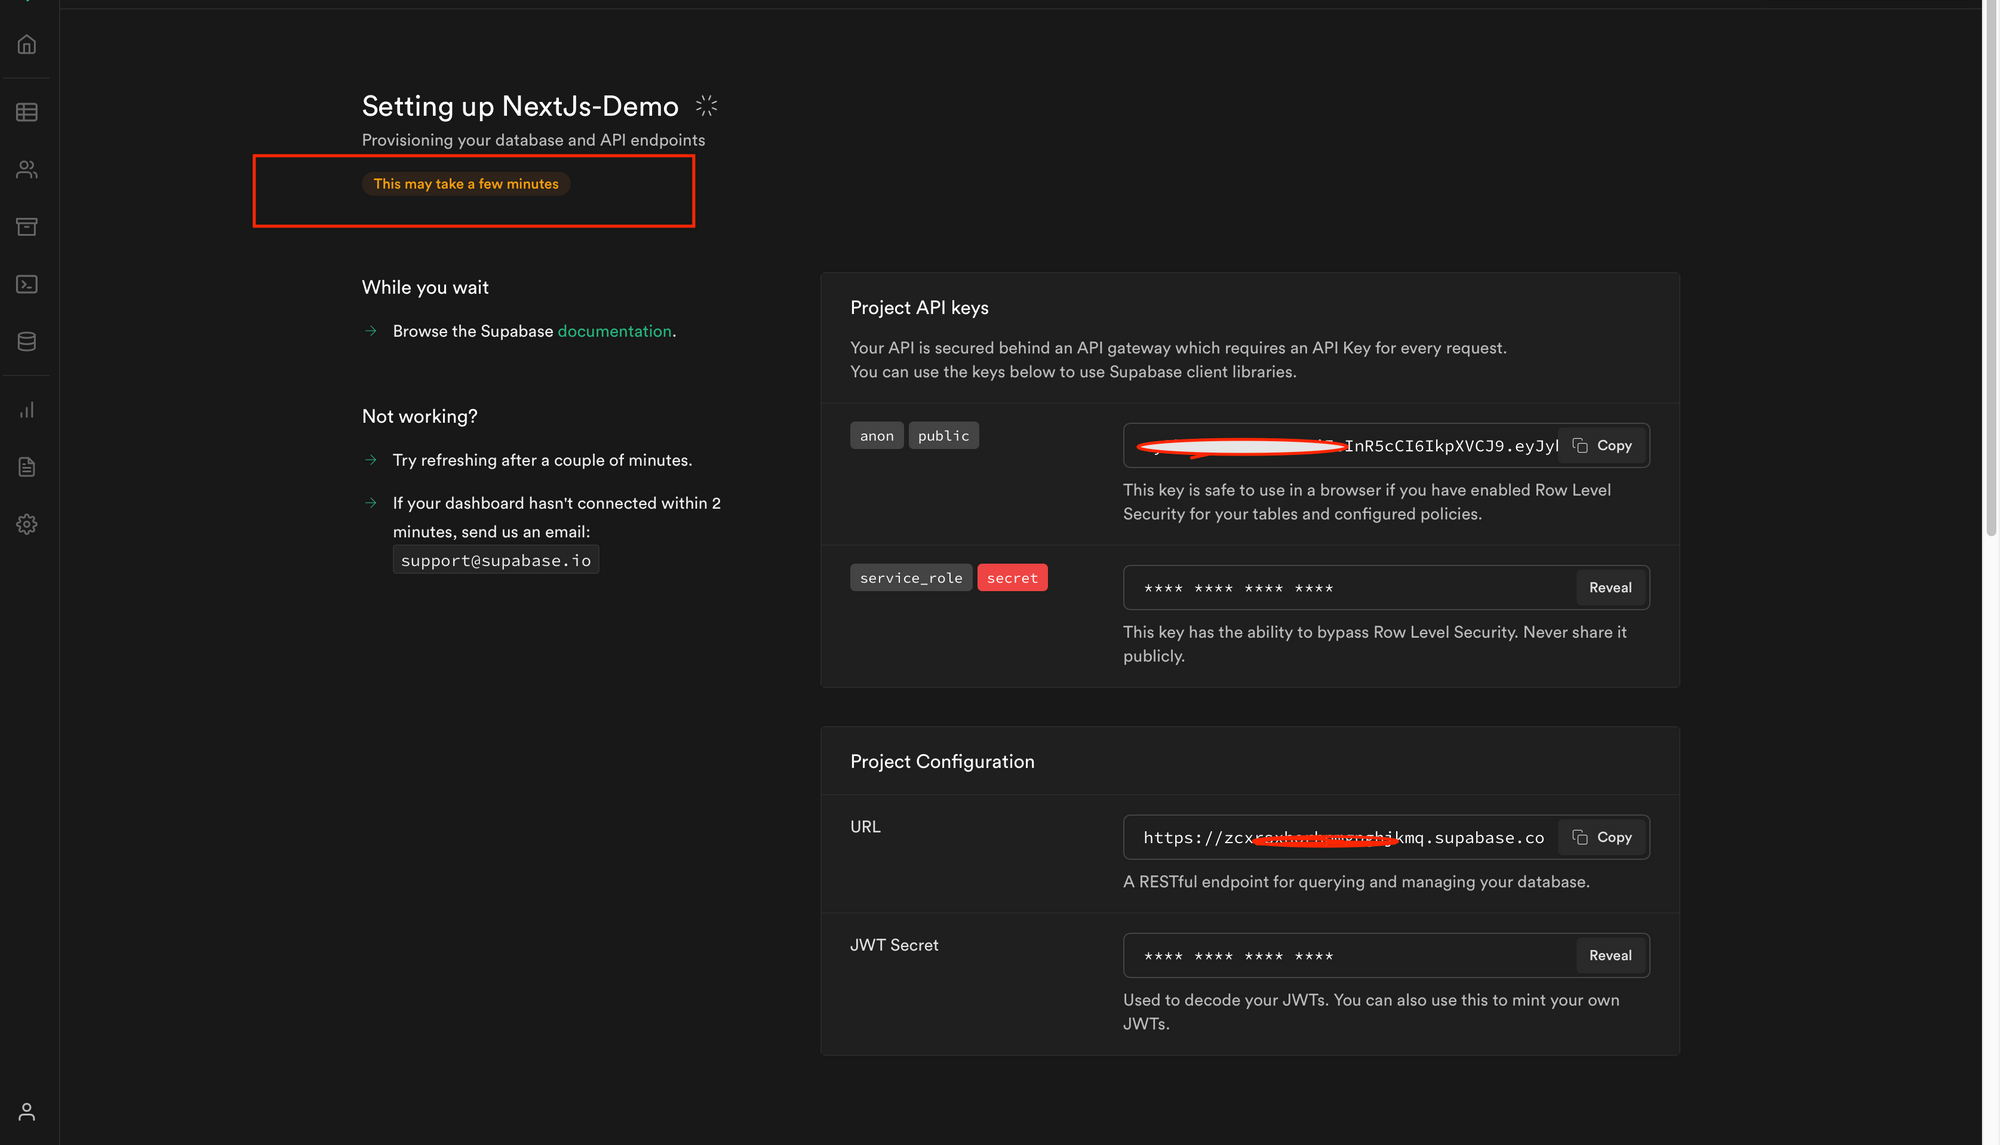
Then we'll see the screen below, which shows us that the project is now being built.
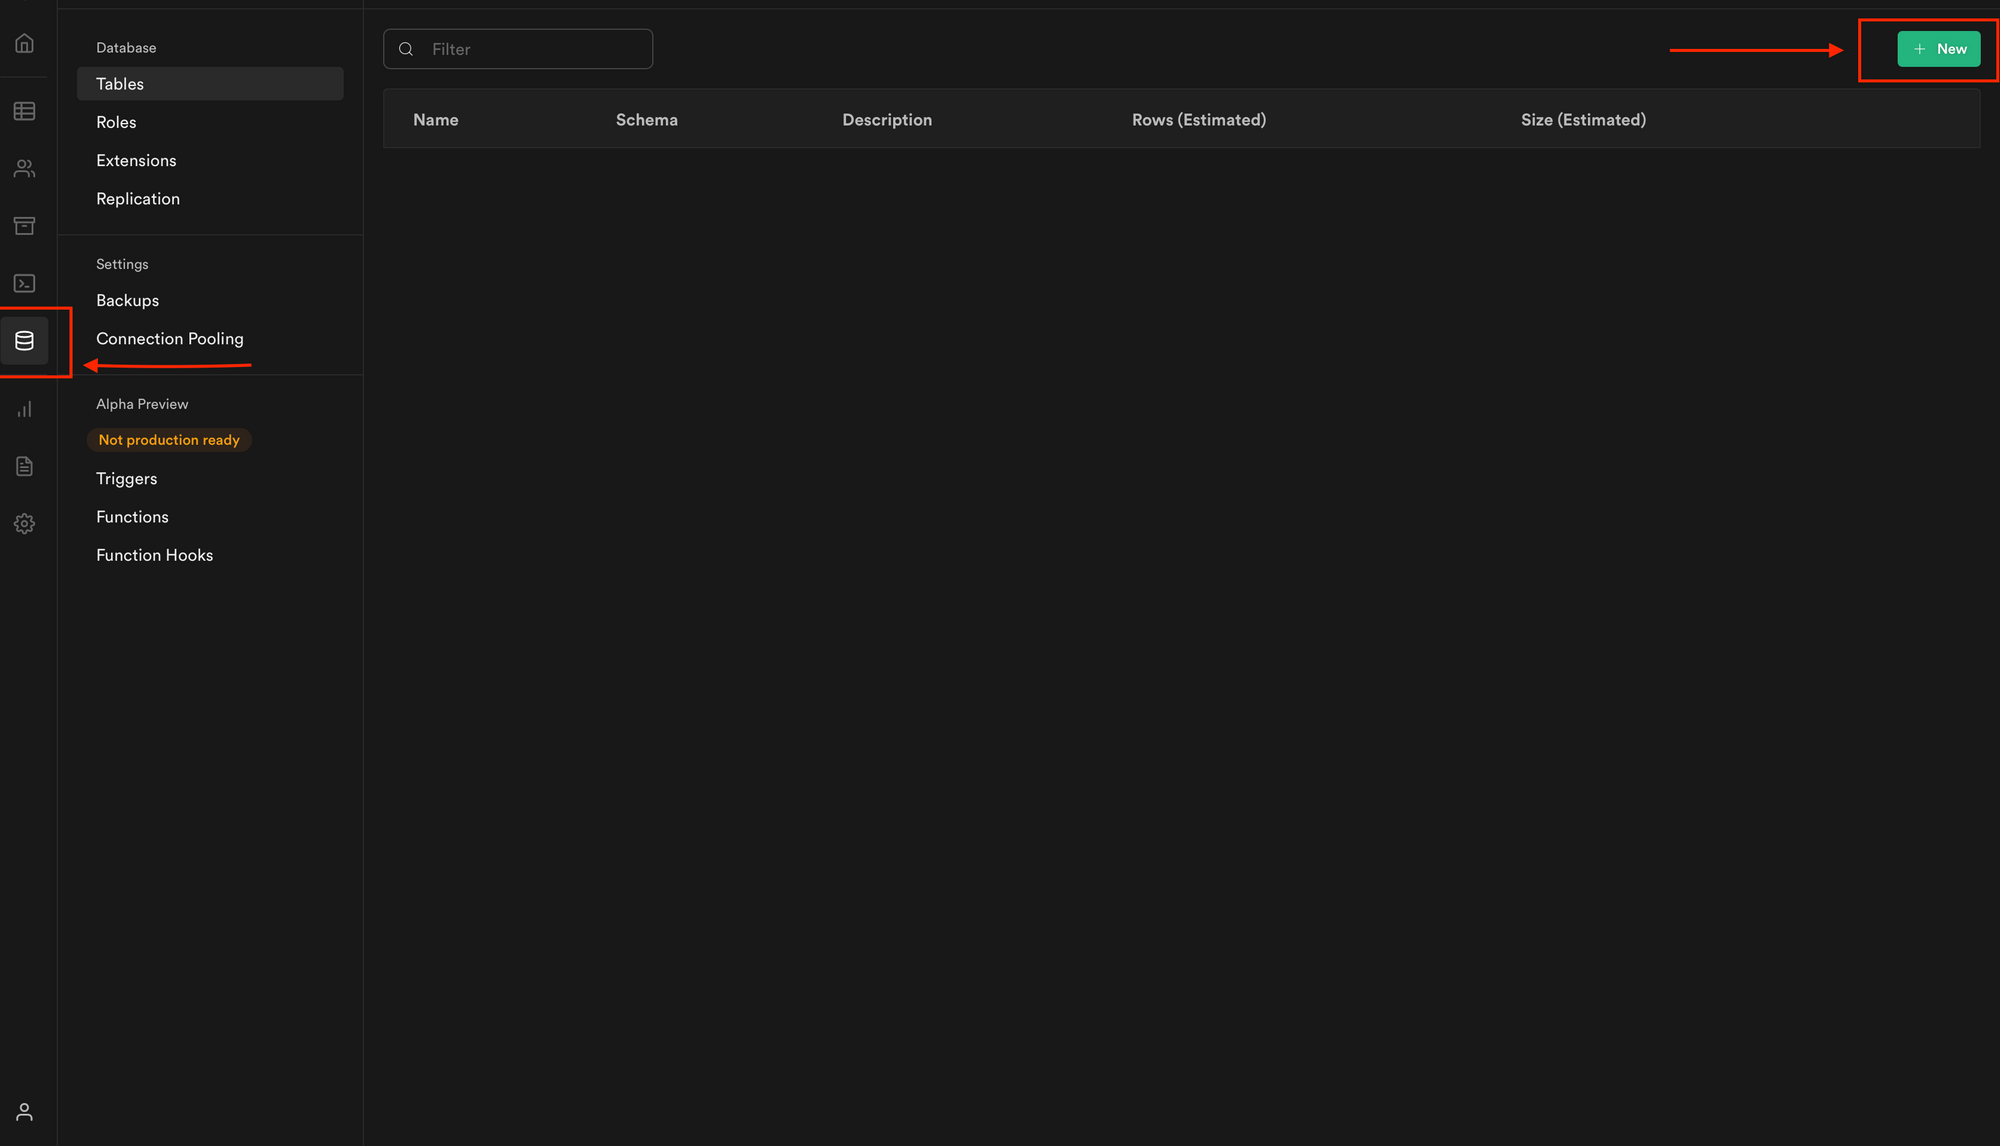
Next, we'll need to create our database by clicking the database icon shown on the sidebar. We also need to click the plus icon shown on the top right of the screen to make each column we need, as shown below.
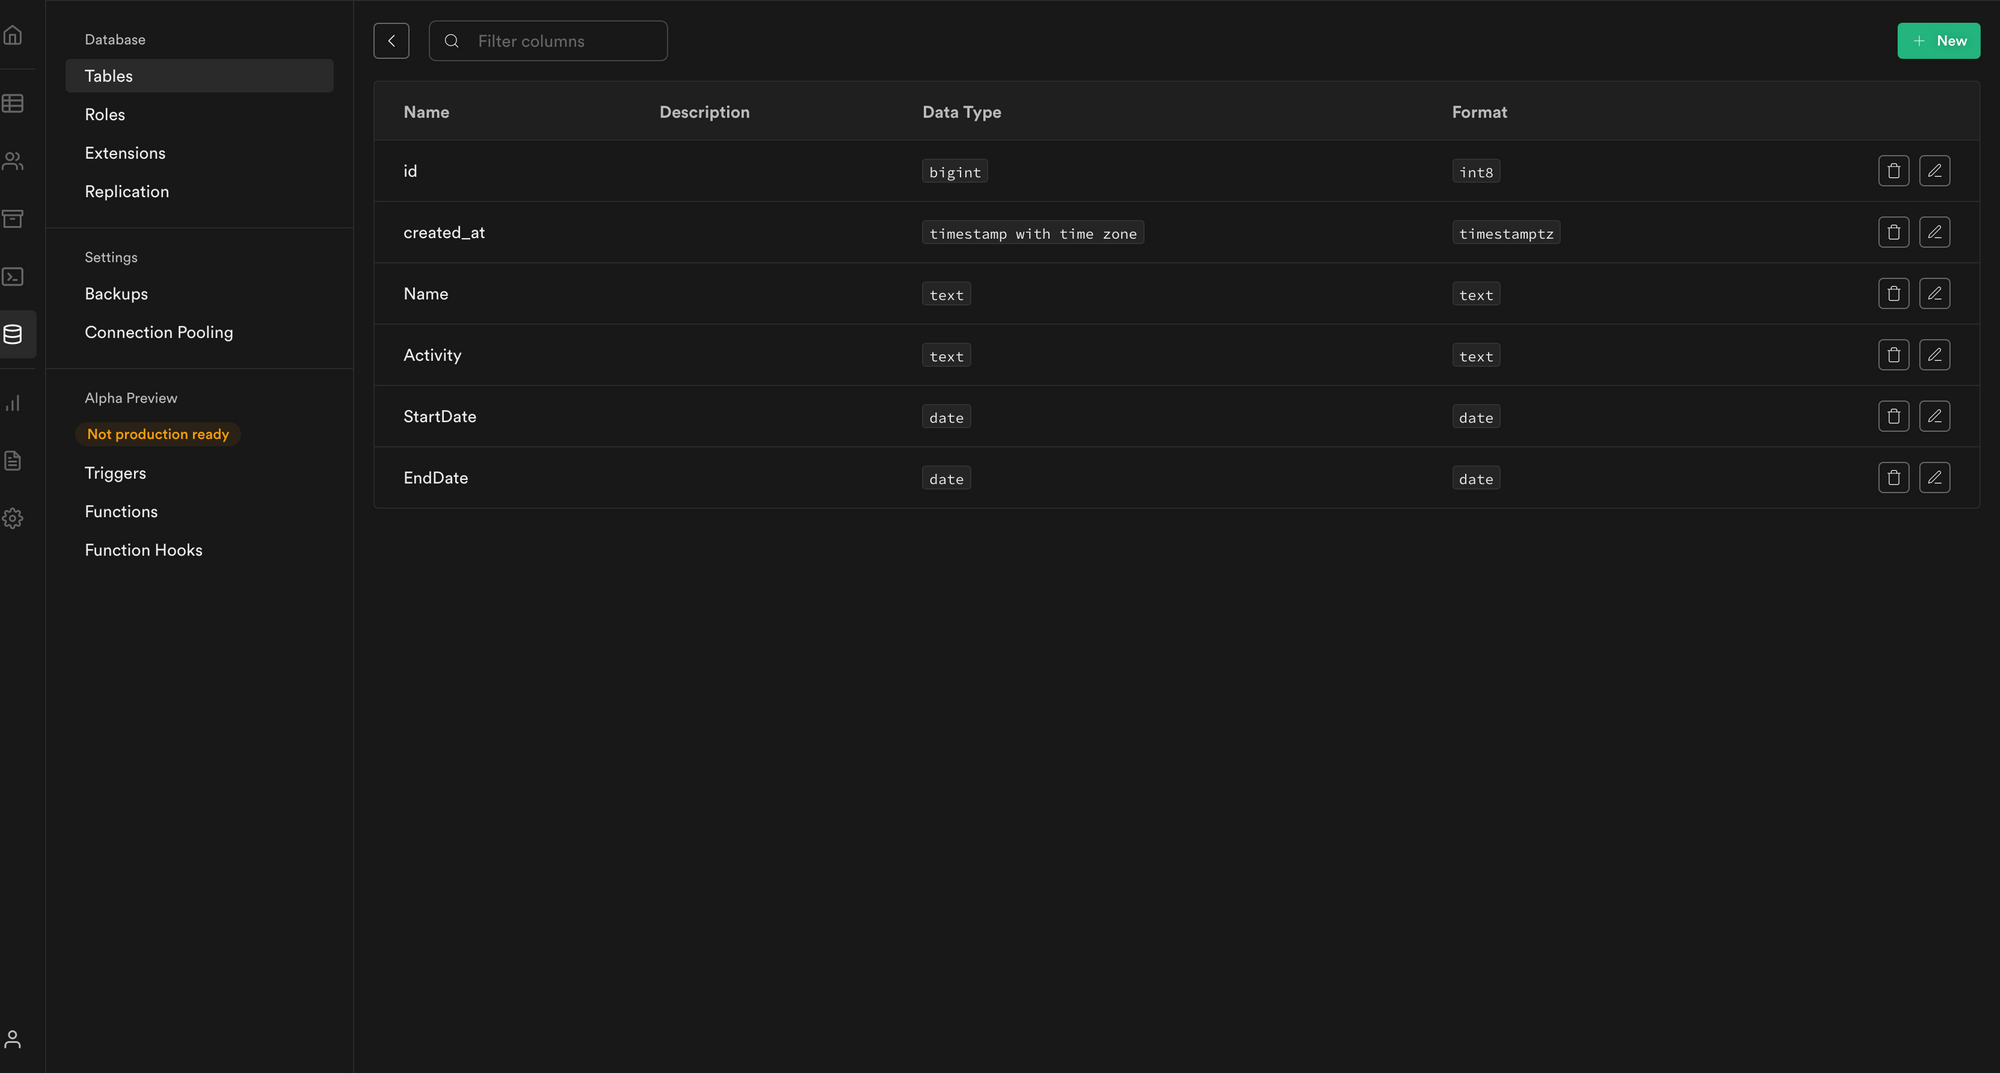
How to create the columns required for our application
For this todo project, we will be creating five columns:
Name: This is the task's name with the type oftext.
Activity: This is the task's activity related to the type oftext.StartDate: This is when the task is expected to start with the type ofdate.EndDate: This is the date that the task is expected to end with the type ofdate.
After creating all these fields, we should have something similar to what we have below.
We have created our project and created individual columns. We will proceed to the next step by setting up our frontend application in the next section.
Step 2: Setting Up Our Frontend Application
To create a new project, we use the npx create-next-app -e with-tailwindcss . command to scaffold a new project in a directory of our choice.
The command specified above sets up a TailwindCSS project in Next.js.
TailwindCSS is a CSS framework containing a lot of classes to help us style our website.
We use the following commands to install the dependencies:
    cd <project name>
    yarn add @supabase/supabase-js
We'll see a message with instructions for browsing our site and running it locally after the app is created and the dependencies have been installed. Using the below command, we can execute this.
npm run dev
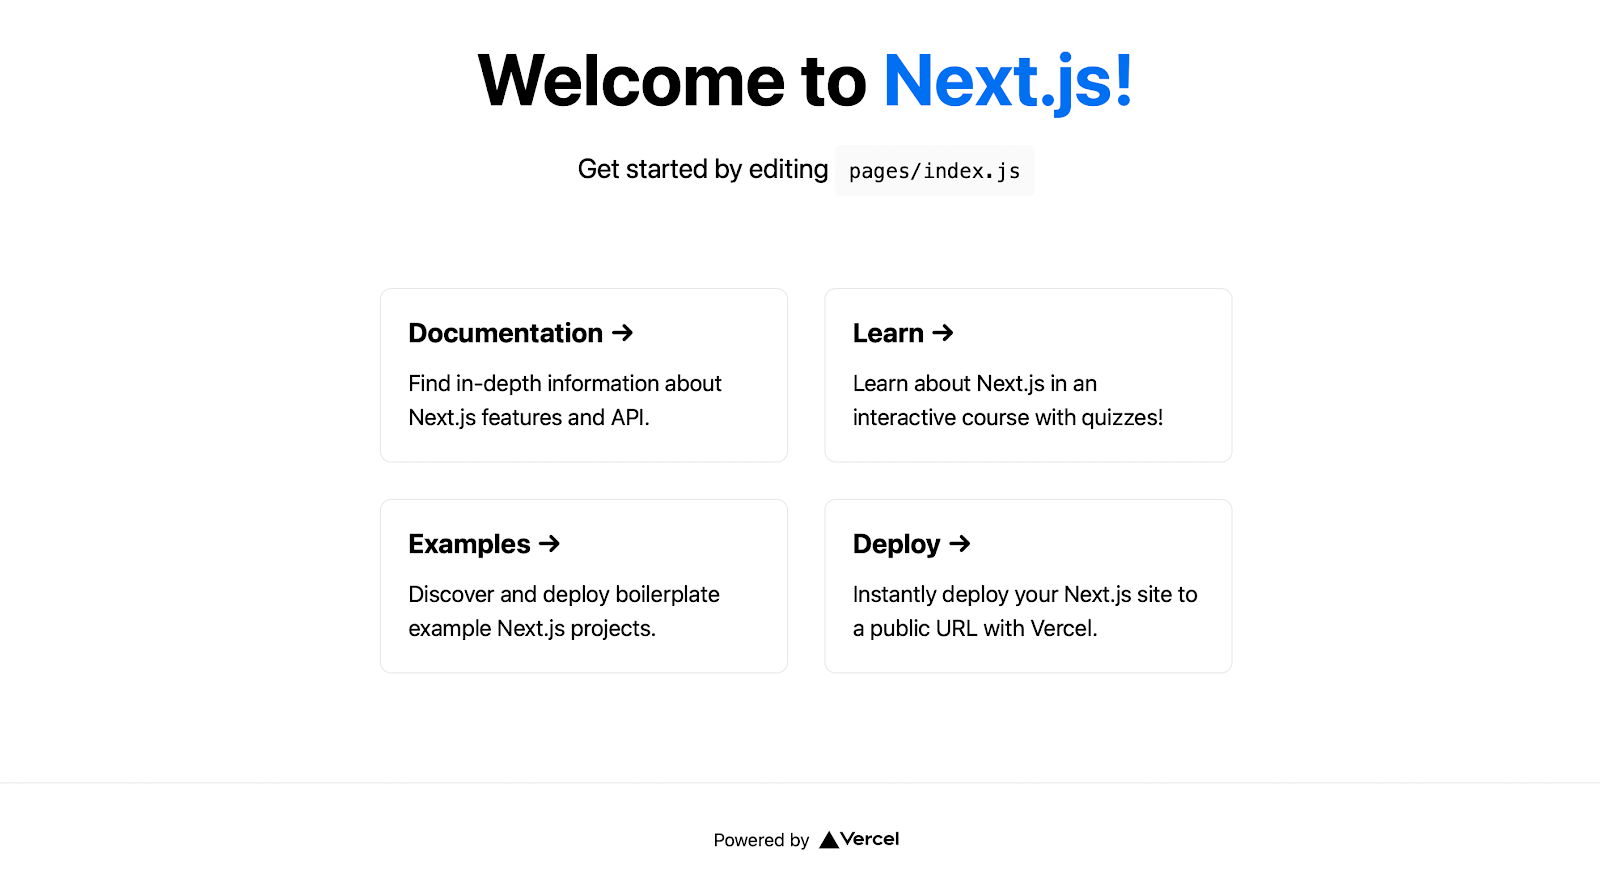
Next.js will start a hot-reloading development environment accessible by default at http://localhost:3000.
We should see something similar to what we have below.
Step 3: Building Our Frontend Application Layout with the Supabase Client
We can now build our front-end application since we have completed our front-end setup.
Let's update our pages/index.js file to include the following code:
import Head from "next/head";

export default function Home() {
  return (
    <div className="flex flex-col items-center justify-center py-2">
      <div>
        <Head>
          <title>Supabase and NextJs Demo</title>
          <link rel="icon" href="/favicon.ico" />
        </Head>

        <main className="flex flex-col items-center justify-center w-full flex-1 px-20 text-center">
          <h1 className="text-4xl font-bold mt-20">
            <a className="text-blue-600" href="/">
              Full Stack Application With Tailwind CSS and Supabase in NextJs
            </a>
          </h1>

          <div className="flex flex-wrap items-center justify-around max-w-4xl mt-6 sm:w-full">
            <div className="p-8 mt-6 border w-96 rounded-xl hover:text-blue-600 focus:text-blue-600">
              <div className="w-full max-w-sm">
                <form className="bg-white rounded px-8 pt-6 pb-8 mb-4">
                  <div className="mb-4">
                    <label
                      className="block text-gray-700 text-sm font-bold mb-2"
                      htmlFor="taskName"
                    >
                      Task Name
                    </label>
                    <input
                      className="shadow appearance-none border rounded w-full py-2 px-3 text-gray-700 leading-tight focus:outline-none focus:shadow-outline"
                      id="taskName"
                      type="text"
                    />
                  </div>
                  <div className="mb-4">
                    <label
                      className="block text-gray-700 text-sm font-bold mb-2"
                      htmlFor="taskActivity"
                    >
                      Task Activity
                    </label>

                    <textarea
                      className="form-textarea mt-1 block shadow appearance-none border rounded w-full py-2 px-3 text-gray-700 leading-tight focus:outline-none focus:shadow-outline"
                      rows="3"
                      placeholder="Task Activity"
                    ></textarea>
                  </div>

                  <div className="mb-4">
                    <label
                      className="block text-gray-700 text-sm font-bold mb-2"
                      htmlFor="startDate"
                    >
                      Task Start Date
                    </label>
                    <input
                      className="shadow appearance-none border rounded w-full py-2 px-3 text-gray-700 leading-tight focus:outline-none focus:shadow-outline"
                      id="startDate"
                      type="date"
                    />
                  </div>
                  <div className="mb-4">
                    <label
                      className="block text-gray-700 text-sm font-bold mb-2"
                      htmlFor="endDate"
                    >
                      Task End Date
                    </label>
                    <input
                      className="shadow appearance-none border rounded w-full py-2 px-3 text-gray-700 leading-tight focus:outline-none focus:shadow-outline"
                      id="endDate"
                      type="date"
                    />
                  </div>
                  <div className="flex items-center justify-between">
                    <button
                      className="bg-blue-500 hover:bg-blue-700 text-white font-bold py-2 px-4 rounded focus:outline-none focus:shadow-outline"
                      type="button"
                    >
                      Add Task
                    </button>
                  </div>
                </form>
              </div>
            </div>

            <div className="p-2 mt-6 w-96 rounded-xl focus:text-blue-600">
              <table className="shadow-lg bg-white">
                <tbody>
                  <tr>
                    <th className="bg-blue-400 border text-left px-4 py-4">
                      S/N
                    </th>
                    <th className="bg-blue-400 border text-left px-8 py-4">
                      Name
                    </th>
                    <th className="bg-blue-400 border text-left px-8 py-4">
                      Activity
                    </th>
                    <th className="bg-blue-400 border text-left px-14 py-4">
                      Start Date
                    </th>
                    <th className="bg-blue-400 border text-left px-16 py-4">
                      End Date
                    </th>

                    <th className="bg-blue-400 border text-left px-4 py-4">
                      Action
                    </th>
                  </tr>
                  <tr>
                    <td className="border px-4 py-4"></td>
                    <td className="border px-4 py-4"></td>
                    <td className="border px-8 py-4"></td>
                    <td className="border px-8 py-4"></td>
                    <td className="border px-8 py-4"></td>
                    <td className="border px-8 py-4">
                      {" "}
                      <button
                        className="bg-red-500 hover:bg-red-700 text-white font-bold py-2 px-4 rounded focus:outline-none focus:shadow-outline"
                        type="button"
                      >
                        Delete
                      </button>
                    </td>
                  </tr>
                </tbody>
              </table>
            </div>
          </div>
        </main>
      </div>
    </div>
  );
}
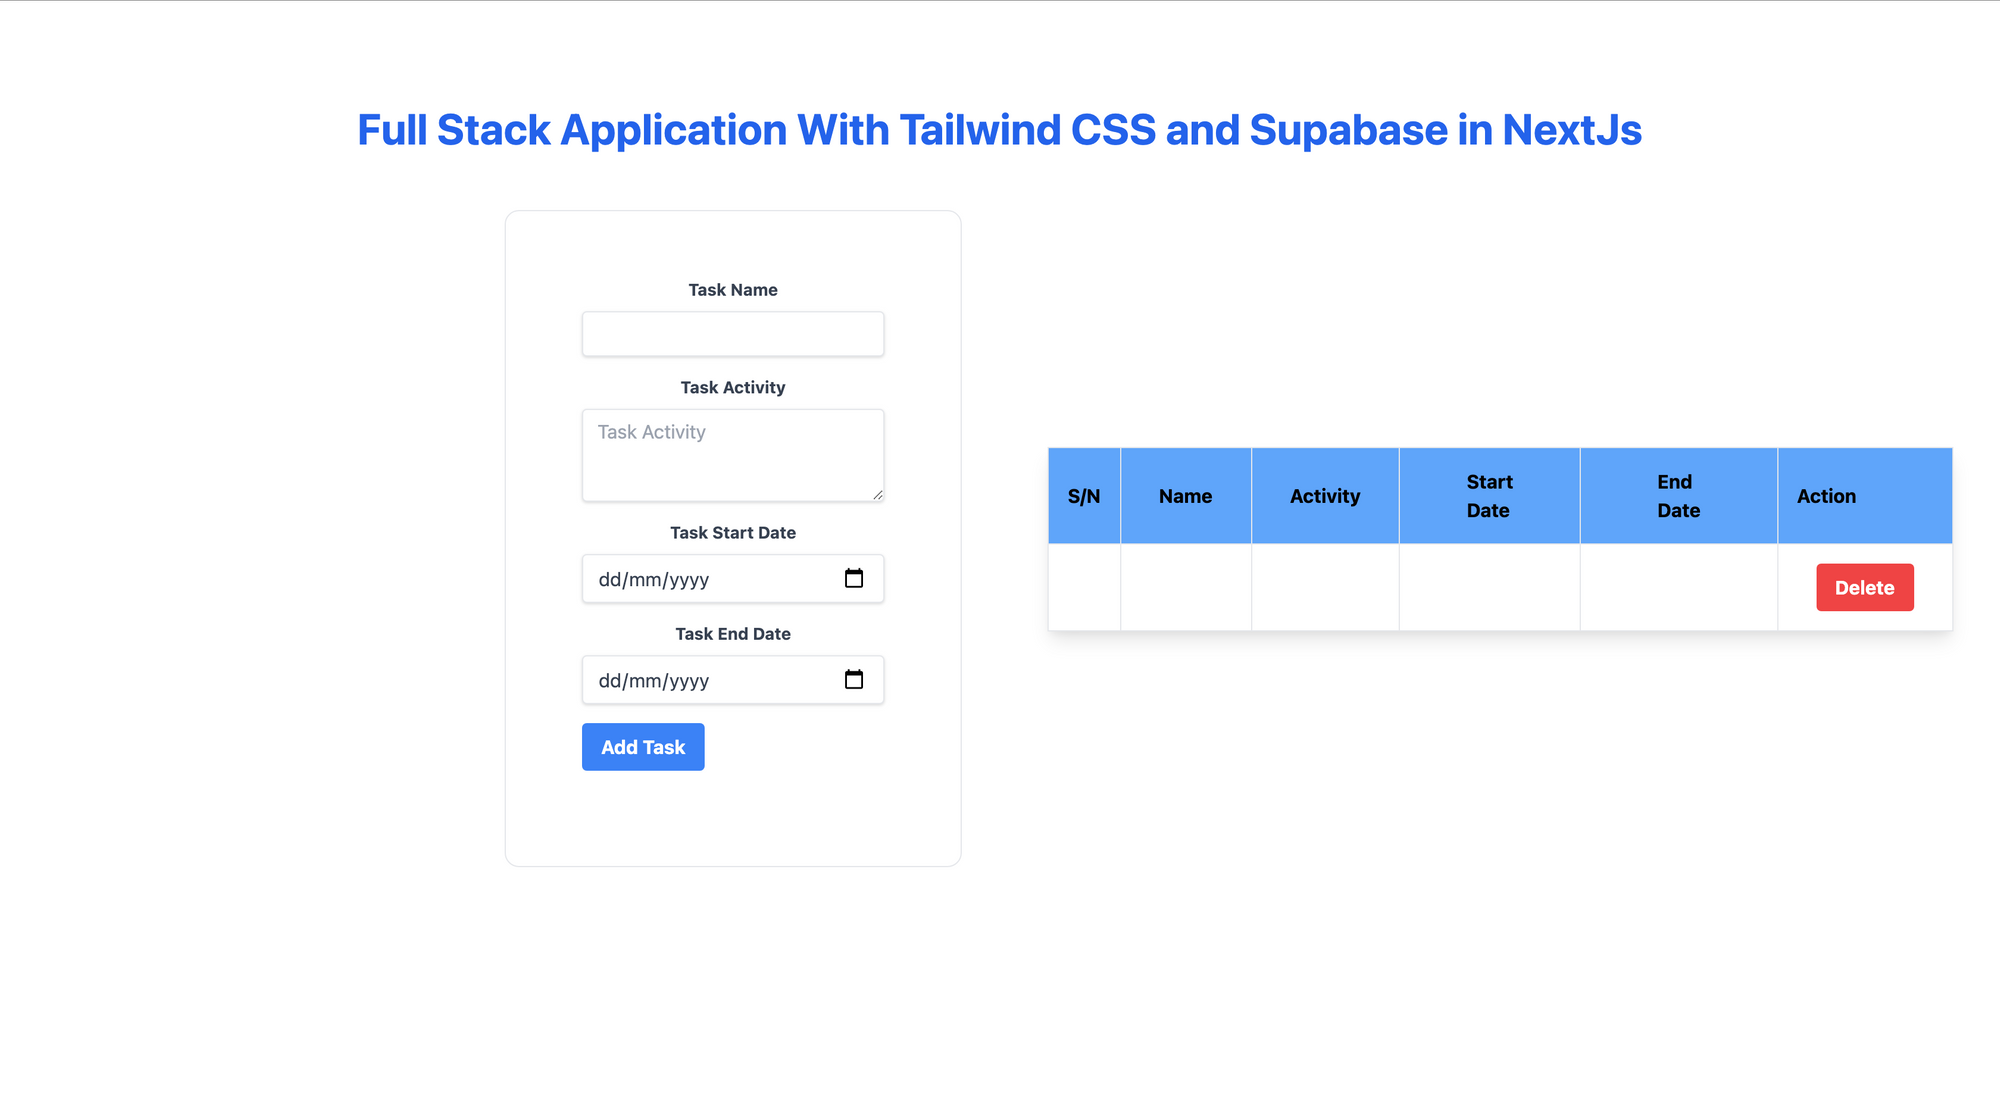
We added a layout for our application in the code snippet above, and we styled it with TailwindCSS.
We should have something similar to what we have below if we visit our application in the browser.
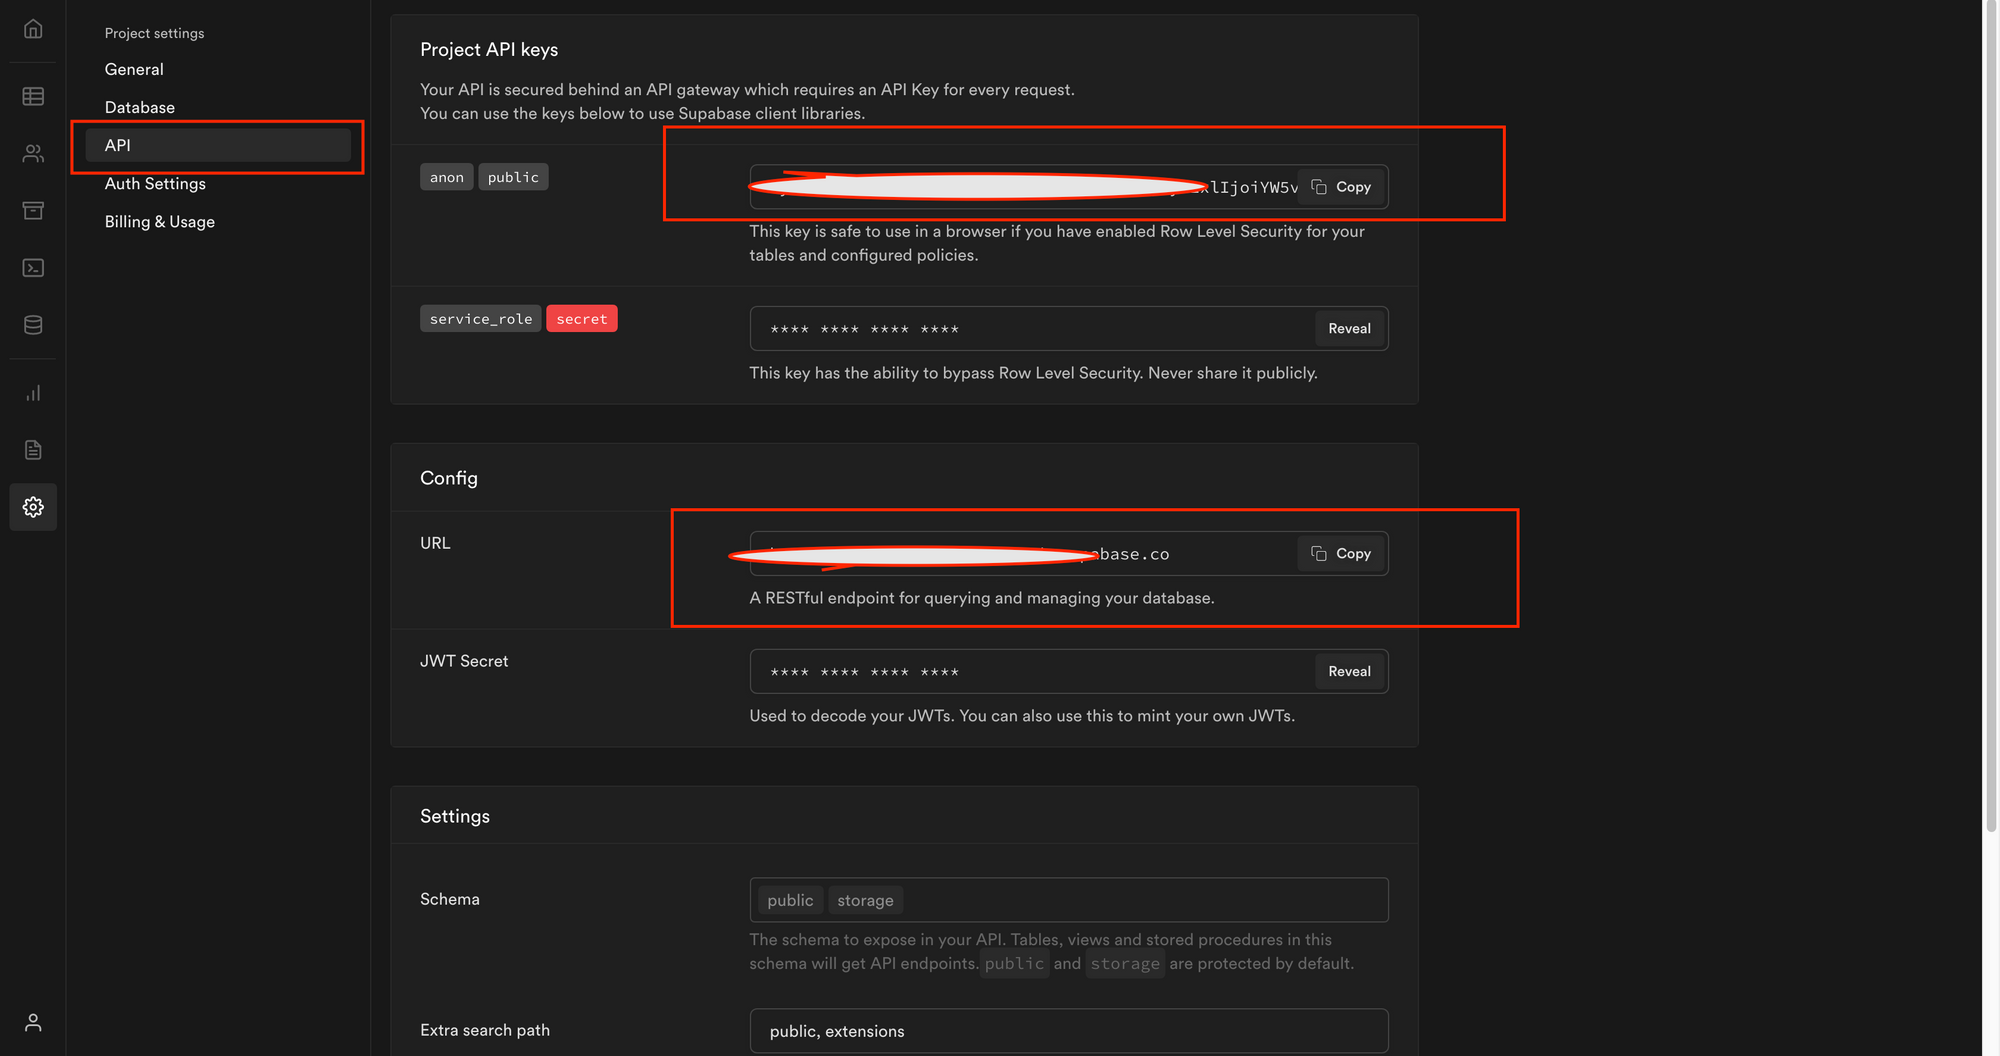
We'll use the Supabase package to link our application to our database. Using environment variables is the best approach for us to configure this.
You can set environment variables in Next.js by creating a file called .env in the project's root directory and saving them there.
It's best to precede a variable with NEXT_PUBLIC_ to expose it to the browser.
Add the following configuration to a file called .env in the project's root directory:
NEXT_PUBLIC_SUPABASE_URL=https://app-id.supabase.co
NEXT_PUBLIC_SUPABASE_ANON_KEY=your-public-api-key
We can find the values of our API URL and API Key in the Supabase dashboard settings, as shown below:
Next, we will create a file called client.js in the root of the project and then add the following code:
import { createClient } from "@supabase/supabase-js";

export const supabase = createClient(
  process.env.NEXT_PUBLIC_SUPABASE_URL,
  process.env.NEXT_PUBLIC_SUPABASE_TOKEN
);
After importing it, we can now utilize the Supabase instance everywhere in our app.
Step 4: Building our Application
Let's update our pages/index.js file so that we can add a new task using the Supabase instance with the following code:
// ...
import { useState, useEffect } from "react";
import { supabase } from "../client";

export default function Home() {

  // Declare a new state variable to store task details
  const [task, setTask] = useState({
    Name: "",
    Activity: "",
    StartDate: "",
    EndDate: "",
  });

  const { Name, Activity, StartDate, EndDate } = task;

  // Create a function that handles the new task creation
  async function addTask() {
    await supabase
      .from("Task") // Select the Table
      .insert([
        {
          Name,
          Activity,
          StartDate,
          EndDate,
        },
      ]) // Insert the new task
      .single();
    setTask({
      Name: "",
      Activity: "",
      StartDate: "",
      EndDate: "",
    }); // Reset the task details
  }

  return (
    <div className="flex flex-col items-center justify-center py-2">
      <div>
       // ...
        <main className="flex flex-col items-center justify-center w-full flex-1 px-20 text-center">
          <h1 className="text-4xl font-bold mt-20">
            <a className="text-blue-600" href="/">
              Full Stack Application With Tailwind CSS and Supabase in NextJs
            </a>
          </h1>

          <div className="flex flex-wrap items-center justify-around max-w-4xl mt-6 sm:w-full">
            <div className="p-8 mt-6 border w-96 rounded-xl hover:text-blue-600 focus:text-blue-600">
              <div className="w-full max-w-sm">
                <form className="bg-white rounded px-8 pt-6 pb-8 mb-4">
                  <div className="mb-4">
                    <label
                      className="block text-gray-700 text-sm font-bold mb-2"
                      htmlFor="taskName"
                    >
                      Task Name
                    </label>
                    <input
                      className="shadow appearance-none border rounded w-full py-2 px-3 text-gray-700 leading-tight focus:outline-none focus:shadow-outline"
                      id="taskName"
                      type="text"
                      value={Name.toString()}
                      onChange={(e) =>
                        setTask({ ...task, Name: e.target.value })
                      }
                    />
                  </div>
                  <div className="mb-4">
                    <label
                      className="block text-gray-700 text-sm font-bold mb-2"
                      htmlFor="taskActivity"
                    >
                      Task Activity
                    </label>

                    <textarea
                      className="form-textarea mt-1 block shadow appearance-none border rounded w-full py-2 px-3 text-gray-700 leading-tight focus:outline-none focus:shadow-outline"
                      rows="3"
                      placeholder="Task Activity"
                      value={Activity.toString()}
                      onChange={(e) =>
                        setTask({ ...task, Activity: e.target.value })
                      }
                    ></textarea>
                  </div>

                  <div className="mb-4">
                    <label
                      className="block text-gray-700 text-sm font-bold mb-2"
                      htmlFor="startDate"
                    >
                      Task Start Date
                    </label>
                    <input
                      className="shadow appearance-none border rounded w-full py-2 px-3 text-gray-700 leading-tight focus:outline-none focus:shadow-outline"
                      id="startDate"
                      type="date"
                      value={StartDate.toString()}
                      onChange={(e) =>
                        setTask({ ...task, StartDate: e.target.value })
                      }
                    />
                  </div>
                  <div className="mb-4">
                    <label
                      className="block text-gray-700 text-sm font-bold mb-2"
                      htmlFor="endDate"
                    >
                      Task End Date
                    </label>
                    <input
                      className="shadow appearance-none border rounded w-full py-2 px-3 text-gray-700 leading-tight focus:outline-none focus:shadow-outline"
                      id="endDate"
                      type="date"
                      value={EndDate.toString()}
                      onChange={(e) =>
                        setTask({ ...task, EndDate: e.target.value })
                      }
                    />
                  </div>
                  <div className="flex items-center justify-between">
                    <button
                      className="bg-blue-500 hover:bg-blue-700 text-white font-bold py-2 px-4 rounded focus:outline-none focus:shadow-outline"
                      type="button"
                      onClick={addTask} // Call the addTask Function
                    >
                      Add Task
                    </button>
                  </div>
                </form>
              </div>
            </div>

            <div className="p-2 mt-6 w-96 rounded-xl focus:text-blue-600">
              // ...
            </div>
          </div>
        </main>
      </div>
    </div>
  );
}
In the code snippet above, we created a function called AddTask to add a new task using the Supabase instance. We also referenced it in the onClick attribute of our AddTask Button.
Next, after testing our application, you might notice that nothing happens after entering the task details and clicking on the button Add Task. This is because we have not handled task retrieval from our database.
Let's update our pages/index.js file to be able to retrieve all the tasks from our database as shown below:
// ...
export default function Home() {
  const [loading, setLoading] = useState(true);
  const [tasks, setTasks] = useState([]);

  // ...

  async function getTasks() {
    const { data } = await supabase.from("Task").select(); // Select all the tasks from the Task Table
    setTasks(data);
    setLoading(false);
  }

  // Run the getTasks function when the component is mounted
  useEffect(() => {
    getTasks();
  }, []);

  // Check if loading
  if (loading)
    return (
      <div className="flex justify-center items-center">
        <div
          className="
      animate-spin
      rounded-full
      h-32
      w-32
      border-t-2 border-b-2 border-blue-500 mt-36
    "
        ></div>
      </div>
    );
  return (
    <div className="flex flex-col items-center justify-center py-2">
      <div>
       // ...
        <main className="flex flex-col items-center justify-center w-full flex-1 px-20 text-center">
          <h1 className="text-4xl font-bold mt-20">
            <a className="text-blue-600" href="/">
              Full Stack Application With Tailwind CSS and Supabase in NextJs
            </a>
          </h1>

          <div className="flex flex-wrap items-center justify-around max-w-4xl mt-6 sm:w-full">
            <div className="p-8 mt-6 border w-96 rounded-xl hover:text-blue-600 focus:text-blue-600">
              // ...
              </div>
            </div>

            <div className="p-2 mt-6 w-96 rounded-xl focus:text-blue-600">
              <table className="shadow-lg bg-white">
                <tbody>
                  <tr>
                    <th className="bg-blue-400 border text-left px-4 py-4">
                      S/N
                    </th>
                    <th className="bg-blue-400 border text-left px-8 py-4">
                      Name
                    </th>
                    <th className="bg-blue-400 border text-left px-8 py-4">
                      Activity
                    </th>
                    <th className="bg-blue-400 border text-left px-14 py-4">
                      Start Date
                    </th>
                    <th className="bg-blue-400 border text-left px-16 py-4">
                      End Date
                    </th>

                    <th className="bg-blue-400 border text-left px-4 py-4">
                      Action
                    </th>
                  </tr>
                  {task &&
                    tasks.map((task, index) => (
                      <tr key={task.id}>
                        <td className="border px-4 py-4">{index + 1}</td>
                        <td className="border px-4 py-4">{task.Name}</td>
                        <td className="border px-8 py-4">{task.Activity}</td>
                        <td className="border px-8 py-4">{task.StartDate}</td>
                        <td className="border px-8 py-4">{task.EndDate}</td>
                        <td className="border px-8 py-4">
                          {" "}
                          <button
                            className="bg-red-500 hover:bg-red-700 text-white font-bold py-2 px-4 rounded focus:outline-none focus:shadow-outline"
                            type="button"
                          >
                            Delete
                          </button>
                        </td>
                      </tr>
                    ))}
                </tbody>
              </table>
            </div>
          </div>
        </main>
      </div>
    </div>
  );
}
We created a function called getTasks to retrieve all the tasks added using the Supabase instance. We also iterated all the tasks retrieved displayed all the records in a table format, as shown in the code snippet above.
Let's test our application, and we should be able to add a new task and see all of the tasks we've created so far.
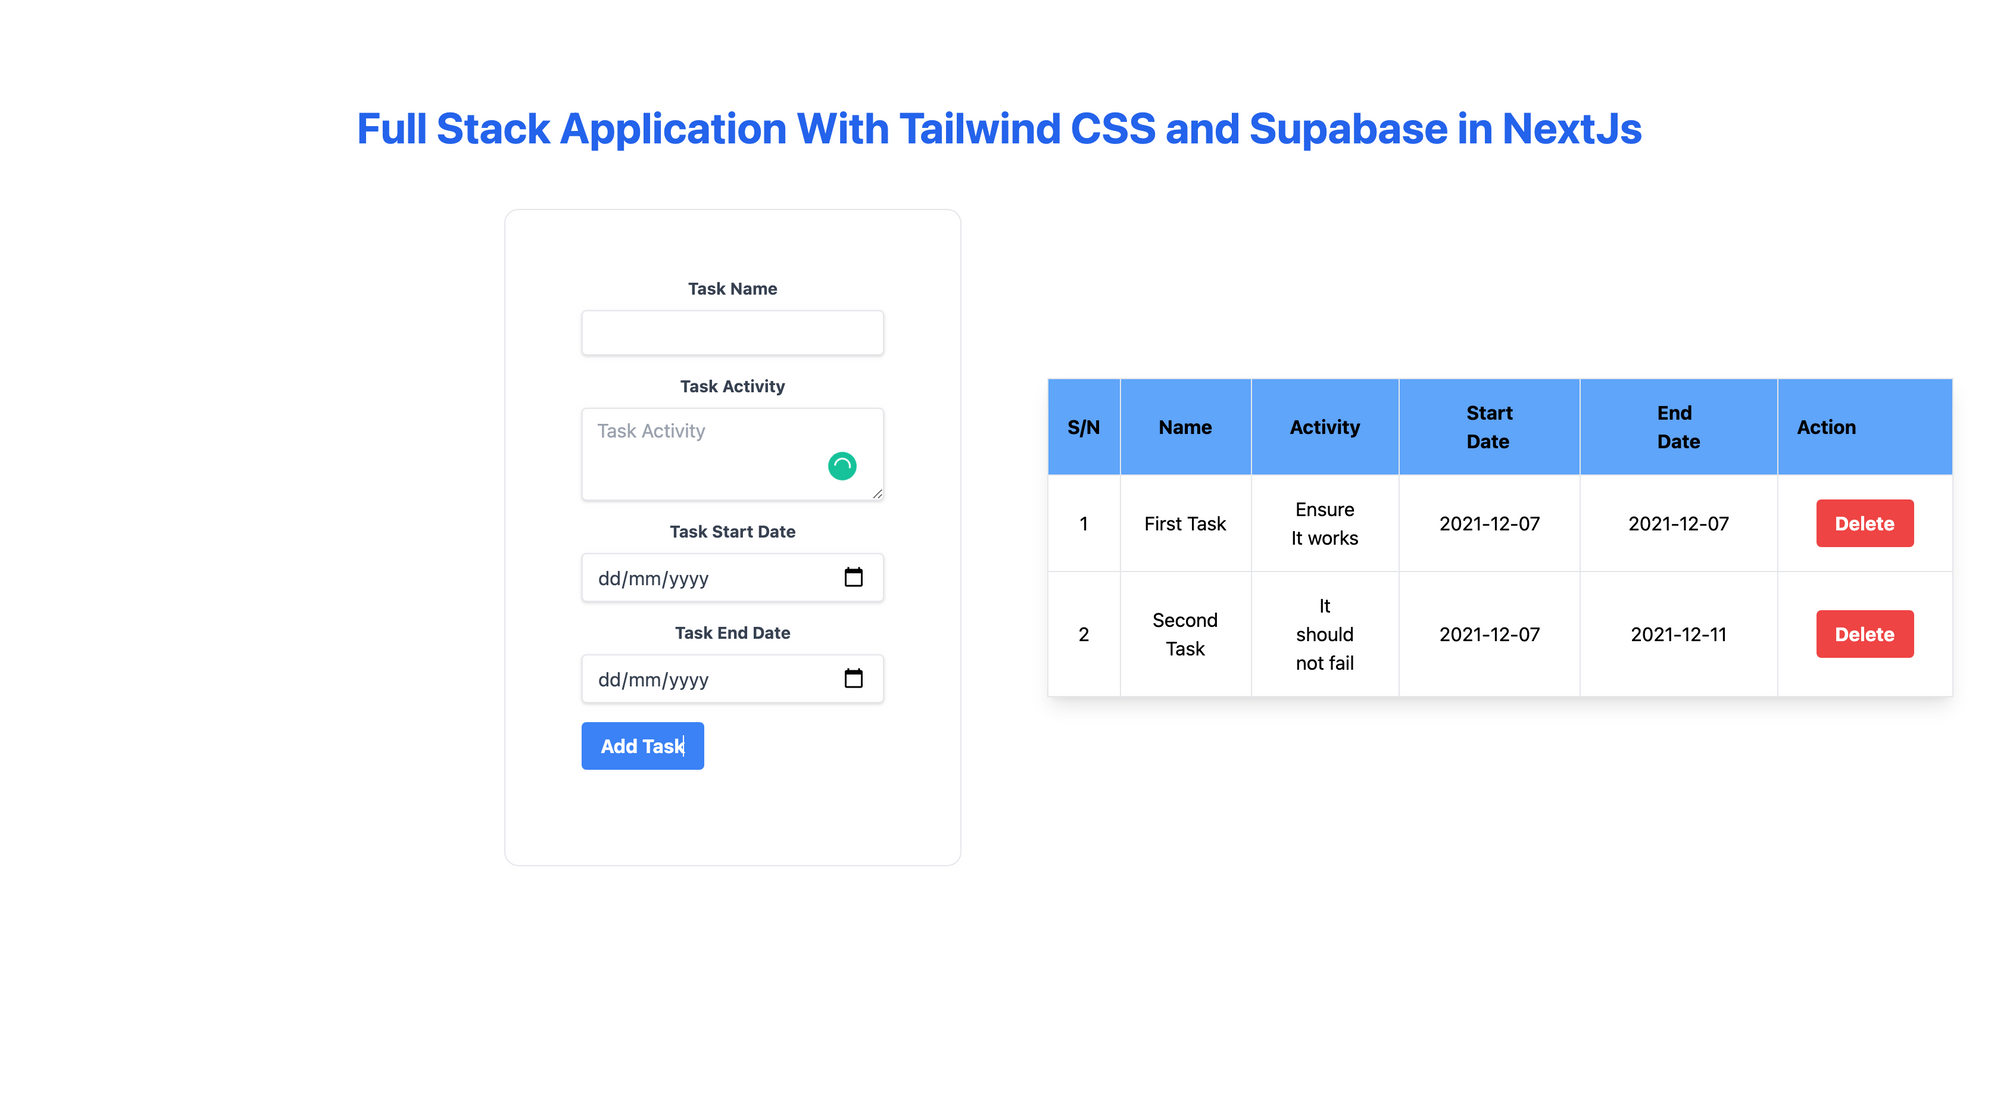
It works! But we had to refresh the page when a new task was added to see the new task. We don't want that. Let's update our addTask function with the code snippet below:
  async function addTask() {
    await supabase
      .from("Task")
      .insert([
        {
          Name,
          Activity,
          StartDate,
          EndDate,
        },
      ])
      .single();
    setTask({
      Name: "",
      Activity: "",
      StartDate: "",
      EndDate: "",
    });
    getTasks(); // Refresh the tasks
  }
We will now see a new task added to our task table without refreshing the page.
Let's make the Delete Button that appears on the right side of the table to delete the task from our database.
Update our pages/index.js file with the following snippet:
 async function deleteTask(id) {
    await supabase.from("Task").delete().eq("id", id); // the id of row to delete
    getTasks();
  }
Update the delete button onClick attribute as shown below:
     // ...

      <button
        className="bg-red-500 hover:bg-red-700 text-white font-bold py-2 px-4 rounded focus:outline-none focus:shadow-outline"
        type="button"
        onClick={() => deleteTask(task.id)} // Delete the task
       >
        Delete
      </button>
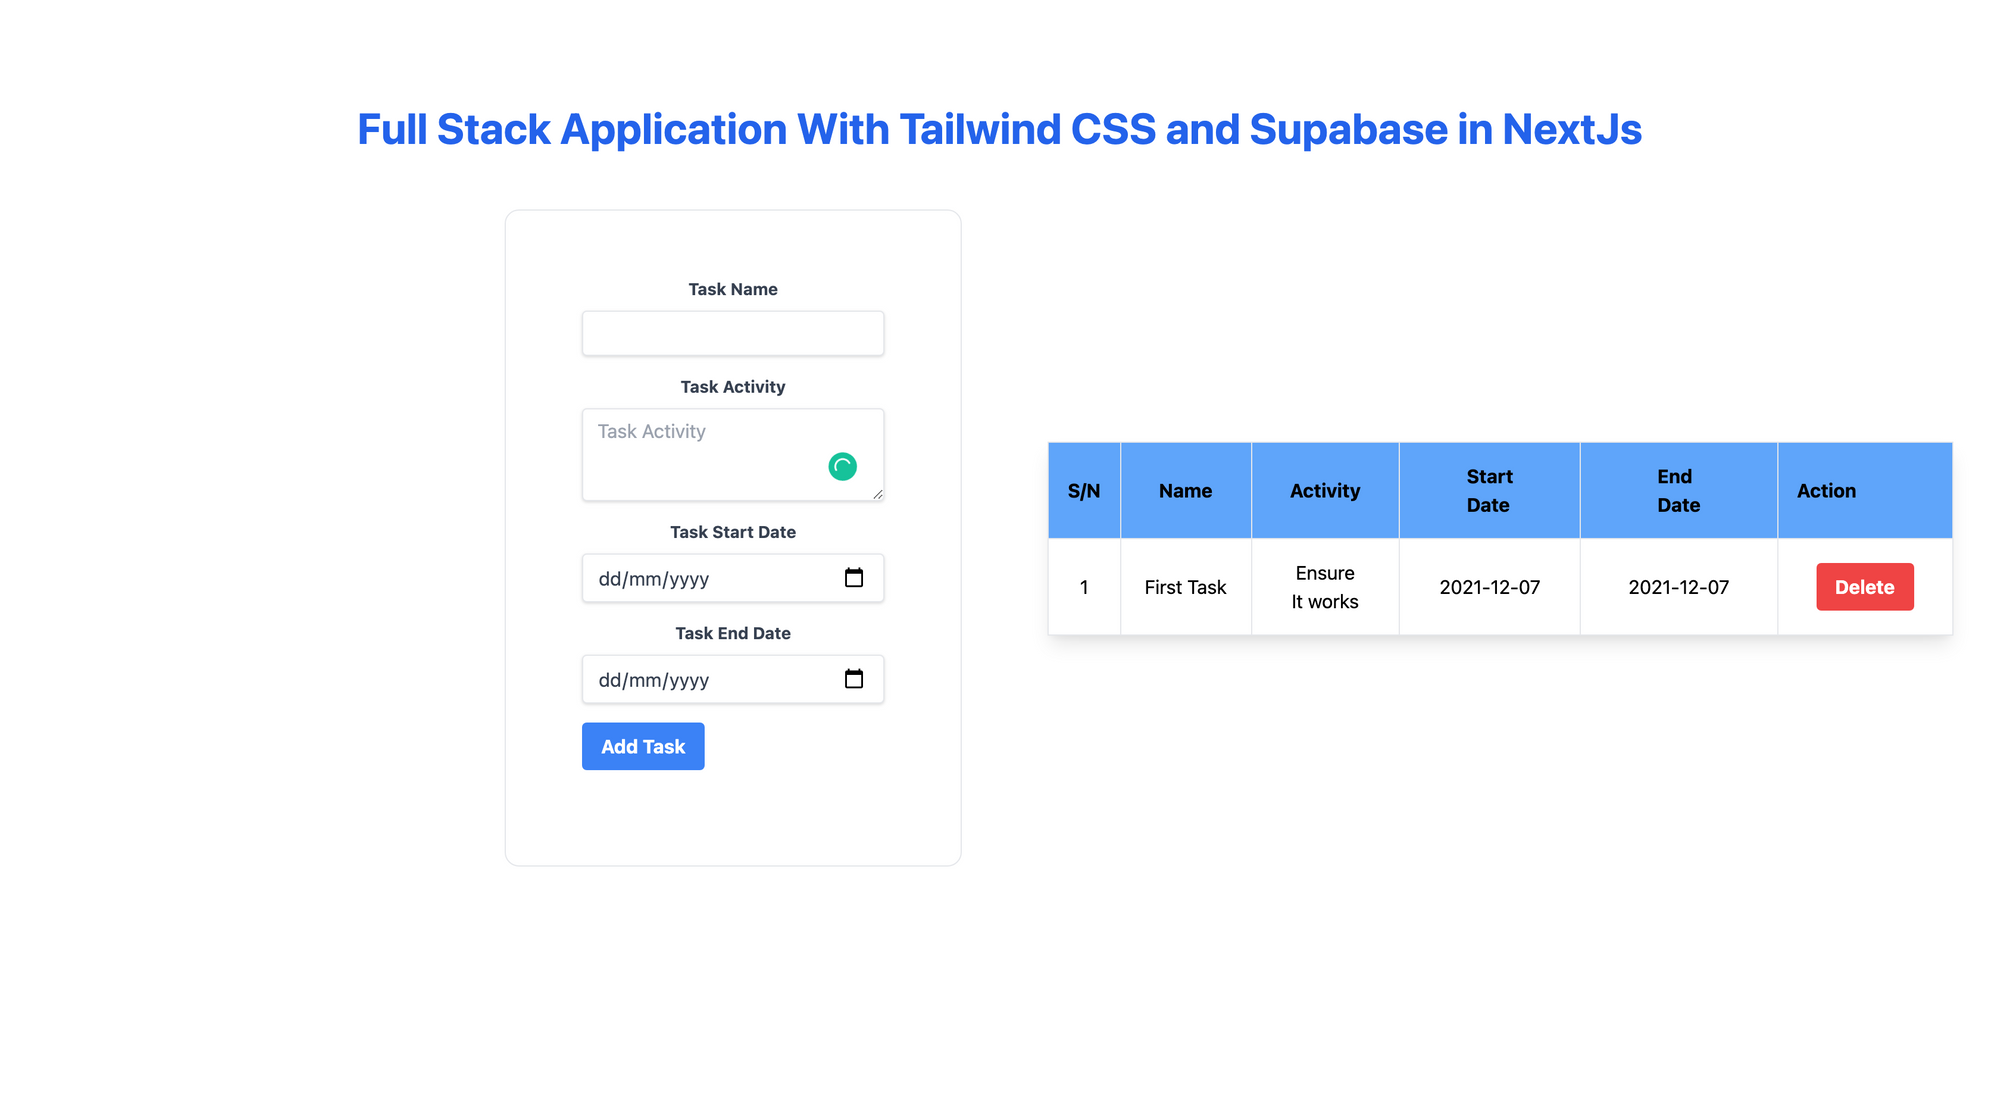
When we test our application, we should add a new task, get all the tasks added, and delete any task we want. We can see how it should look in the image below, where we deleted one of the tasks we created earlier.
You can click here to check out the complete code on GitHub.
Conclusion
This tutorial showed you how to build a full-stack application with Supabase, React, and TailwindCSS in Next.js.
Happy coding!