
When you roll out a new version of your application, you want your users to know about it. Whether you fixed a critical bug, added a new feature, or the application just runs smoother or faster – they need to know.
As application developers, we want all of our users to use the most recent version of our application.
But how can we make sure that users are aware of a new version of our application?
The answer to that question is quite simple: Why not inform them when a new version of the application is out?
You can do this in various ways:
- Use a push notification
- Let them know when the application is launched
We won’t be dealing with push notifications in this article. Instead we'll focus on showing how you can (using a package or two) show a dialog to your users informing them that a new version of the application is out and how to deal with the update.
Wait, Isn’t This Already Included?
You would think that this kind of functionality should already be included in the modern mobile OS systems. And you would be right – but only for Android.
iOS does not (currently) give developers the ability to see if there is a new version of the application and notify users about it. In Android, you have the In-App Update library that is part of the Google Play libraries.
Because of this, and because Flutter supports both platforms, I am going to go over two prominent packages that help you handle version updates to your application:
Both can get you the desired result, but they vary widely in how they do it.
Before we start, it is crucial to understand that you must have a version of your application that was installed directly from the Google Play store. This is required since both packages rely on Google Play services and its ability to verify the owner of the application.
If you fail to do so, you will see the following error when trying to use one of the packages:
Install Error(-10): The app is not owned by any user on this device. An app is “owned” if it has been acquired from Play. (https://developer.android.com/reference/com/google/android/play/core/install/model/InstallErrorCode#ERROR_APP_NOT_OWNED)
How to Use The In App Update Package
Right off the bat you should know that this package will only work on Android. This is because it relies on the in app update library for its inner workings.
This package is basically a wrapper for the Android library. Below are its exposed API methods:
Future<AppUpdateInfo> checkForUpdate(): Checks if there's an update availableFuture<AppUpdateResult> performImmediateUpdate(): Performs an immediate update (full-screen)Future<AppUpdateResult> startFlexibleUpdate(): Starts a flexible update (background download)Future<void> completeFlexibleUpdate(): Actually installs an available flexible update
✋ If you want to read more about the differences between an immediate update or a flexible update, head over here.
How to Set Up the Package
First, add the package to your pubspec.yaml file:
dependencies:
  flutter:
    sdk: flutter
  in_app_update: ^3.0.0
Then perform pub get.
Inside your application, where you intend to perform the logic to handle in app updates, add the following import:
import 'package:in_app_update/in_app_update.dart';We will first need to add logic that checks if our application has an update. To do that, we will use the checkForUpdate method. Its return value is a Future<AppUpdateInfo> which contains information about the availability and progress of an app update.
We can check if an update is available by using the updateAvailability property. If an update is available, it will have the value of UPDATE_AVAILABLE. So, your method may look like this:
InAppUpdate.checkForUpdate().then((updateInfo) {
  if (updateInfo.updateAvailability == UpdateAvailability.updateAvailable) {
      //Logic to perform an update
  }
});
Next, we need to decide which kind of update we want to trigger – either a flexible or an immediate update.
Going for an immediate update should be reserved for an application update that is critical for your users. That may mean a version that fixes a critical bug or offers a new feature.
To start an immediate update, we can use the performImmediateUpdate method. This method returns a AppUpdateResult enum that lets you know if the update was successful or not.
Before calling this method we need to check if we are allowed to run an immediate update. We do that by accessing the immediateUpdateAllowed flag on the AppUpdateInfo object.
If we want to trigger a flexible update, we use the startFleixbleUpdate method. This runs in the background and similar to the immediate update method. It also returns an AppUpdateResult enum.
If in this scenario the update was successful, we need to call the completeFlexibleUpdate method to install the update to our application.
So, if we look at the code snippet above and add the logic for the different types of updates, it will look like this:
InAppUpdate.checkForUpdate().then((updateInfo) {
  if (updateInfo.updateAvailability == UpdateAvailability.updateAvailable) {
      if (updateInfo.immediateUpdateAllowed) {
          // Perform immediate update
          InAppUpdate.performImmediateUpdate().then((appUpdateResult) {
              if (appUpdateResult == AppUpdateResult.success) {
                //App Update successful
              }
          });
      } else if (updateInfo.flexibleUpdateAllowed) {
        //Perform flexible update
        InAppUpdate.startFlexibleUpdate().then((appUpdateResult) {
              if (appUpdateResult == AppUpdateResult.success) {
                //App Update successful
                InAppUpdate.completeFlexibleUpdate();
              }
          });
      }
  }
});
How to Use The Upgrader Package
As opposed to the first option, this one offers a solution for both iOS and Android. It relies on gathering data from the store and checking it against the current data from the application itself.
Instead of having an API to query the data, this package has widgets that perform the logic under the hood.
How to Set Up the Package
First, add the package to your pubspec.yaml file:
dependencies:
  flutter:
    sdk: flutter
  upgrader: ^5.0.0
Then perform pub get.
Inside your application, where you intend to perform the logic to handle in app updates, add the following import:
import 'package:upgrader/upgrader.dart';The main difference between these two options is just a UI one, so pick the one that fits the most for you.
To integrate this package, you will need to wrap your body widget with either UpgradeAlert or UpgradeCard. Below is an example:
class MyApp extends StatelessWidget {
@override
Widget build(BuildContext context) {
return MaterialApp(
title: applicationName,
home: UpgradeAlert( /// <------------------
child: MainPage(
key: Key("YOUR_KEY"),
title: applicationName
),
)
);
}
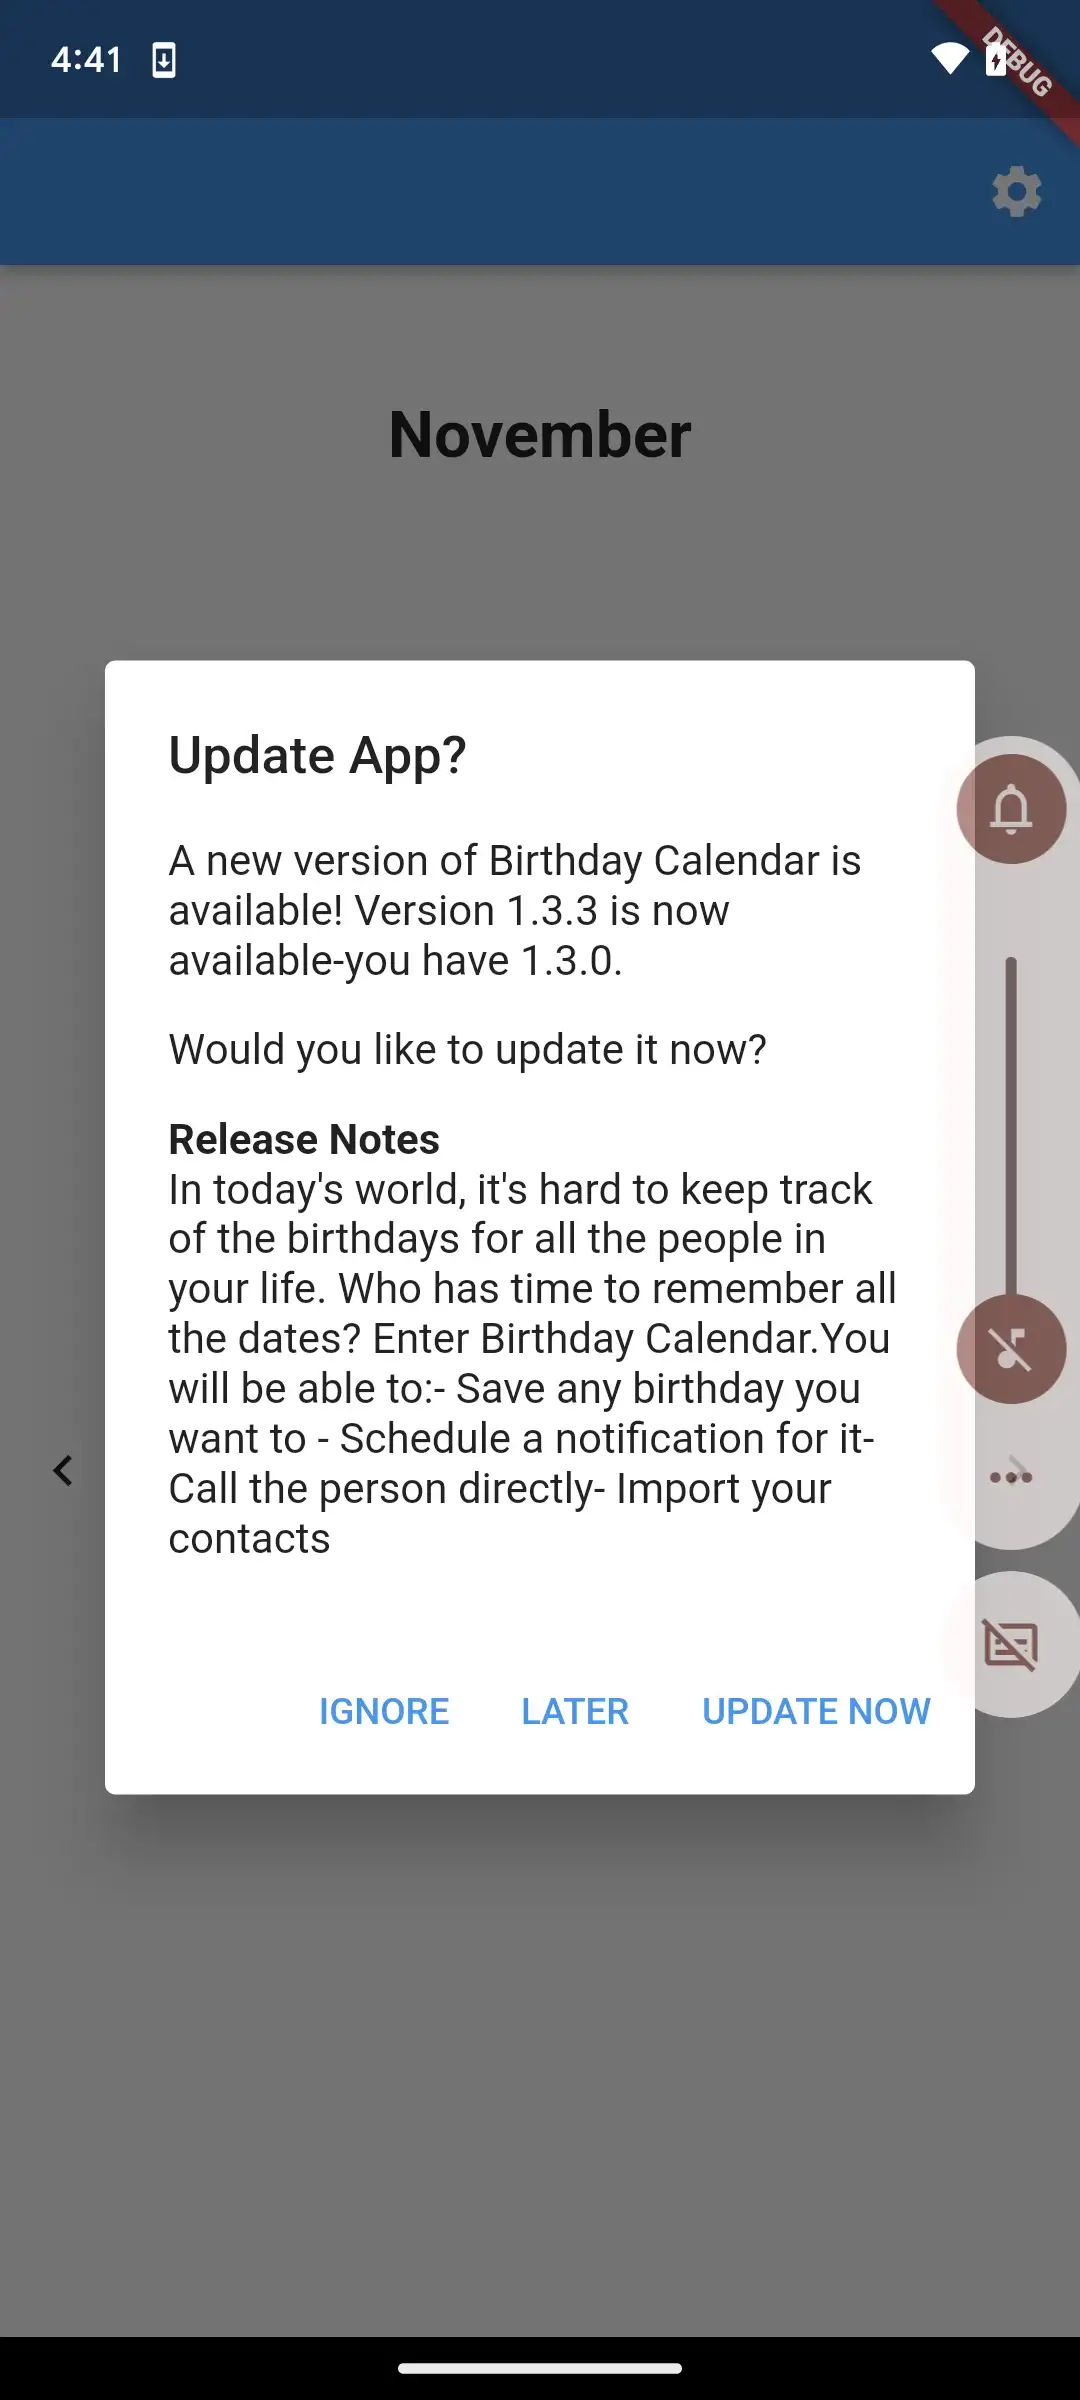
}If a new version of your application is available in the store, you will see this:
To test things out, make sure you add this:
await Upgrader.clearSavedSettings()inside your main method in your main.dart file.
Just so you are aware, there are a ton of configurations that you can set for the Upgrader package. I highly recommend you go and check these out.
How to Test the Packages
Regardless of which package you choose to work with, you need to know that your logic functions properly.
But how can you do that without releasing an official version of your application? You can use the internal testing option in Google Play Console. By releasing a new version of your application to internal testers, it will not be a public one and will allow you to test out the upgrading functionality.
Here is what you need to do:
- Log in to your Google Play Console account and head into the application you are working on to have the updating logic
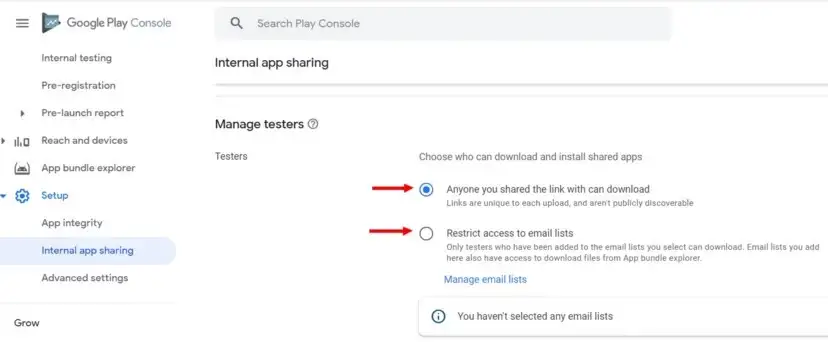
- Under Setup → Internal App Sharing, go to Manage Testers and make sure to allow testers to download and install the shared application. You can either choose to do so via link or by email.
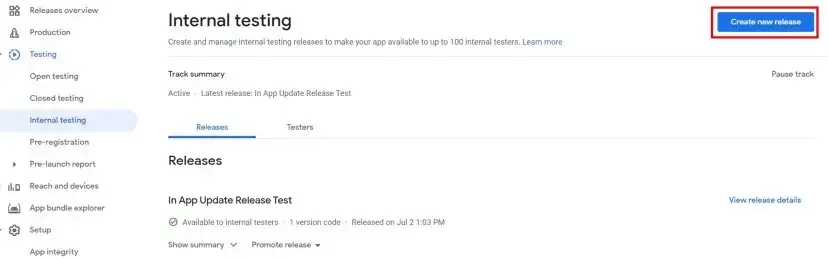
3. Then, go to Testing → Internal Testing and click on the Create new release button (top right).
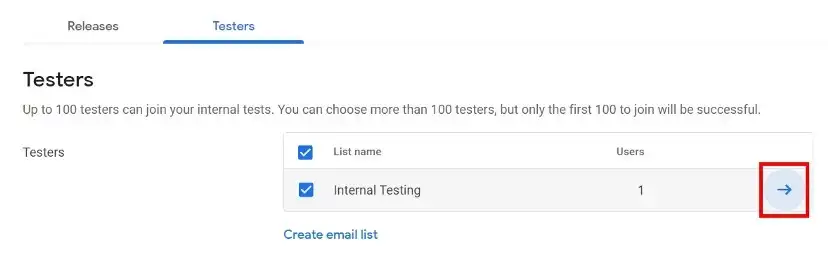
4. Once you have performed a release, you can head back to the main Internal Testing page and click on the Testers tab. There you will see a list containing tester emails (empty right now). Click on the blue arrow icon.
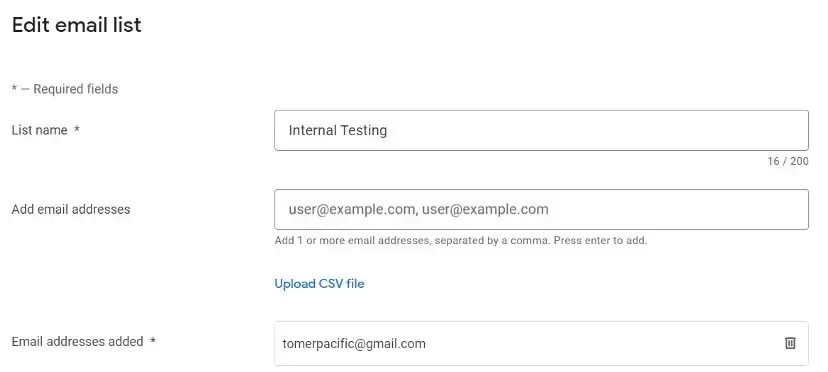
5. In this screen you can add yourself to be an internal tester (in the Add email addresses).
6. When you are done, you can head back to the Internal Testing window. Scroll down to the bottom and you will see the How testers join your test and you will see a Copy link button.
You can now click the button and send yourself the link so you will be able to download the new version of your application.
If you fail to do one of the above steps, the link generated will lead to a not found (Error 404) page:

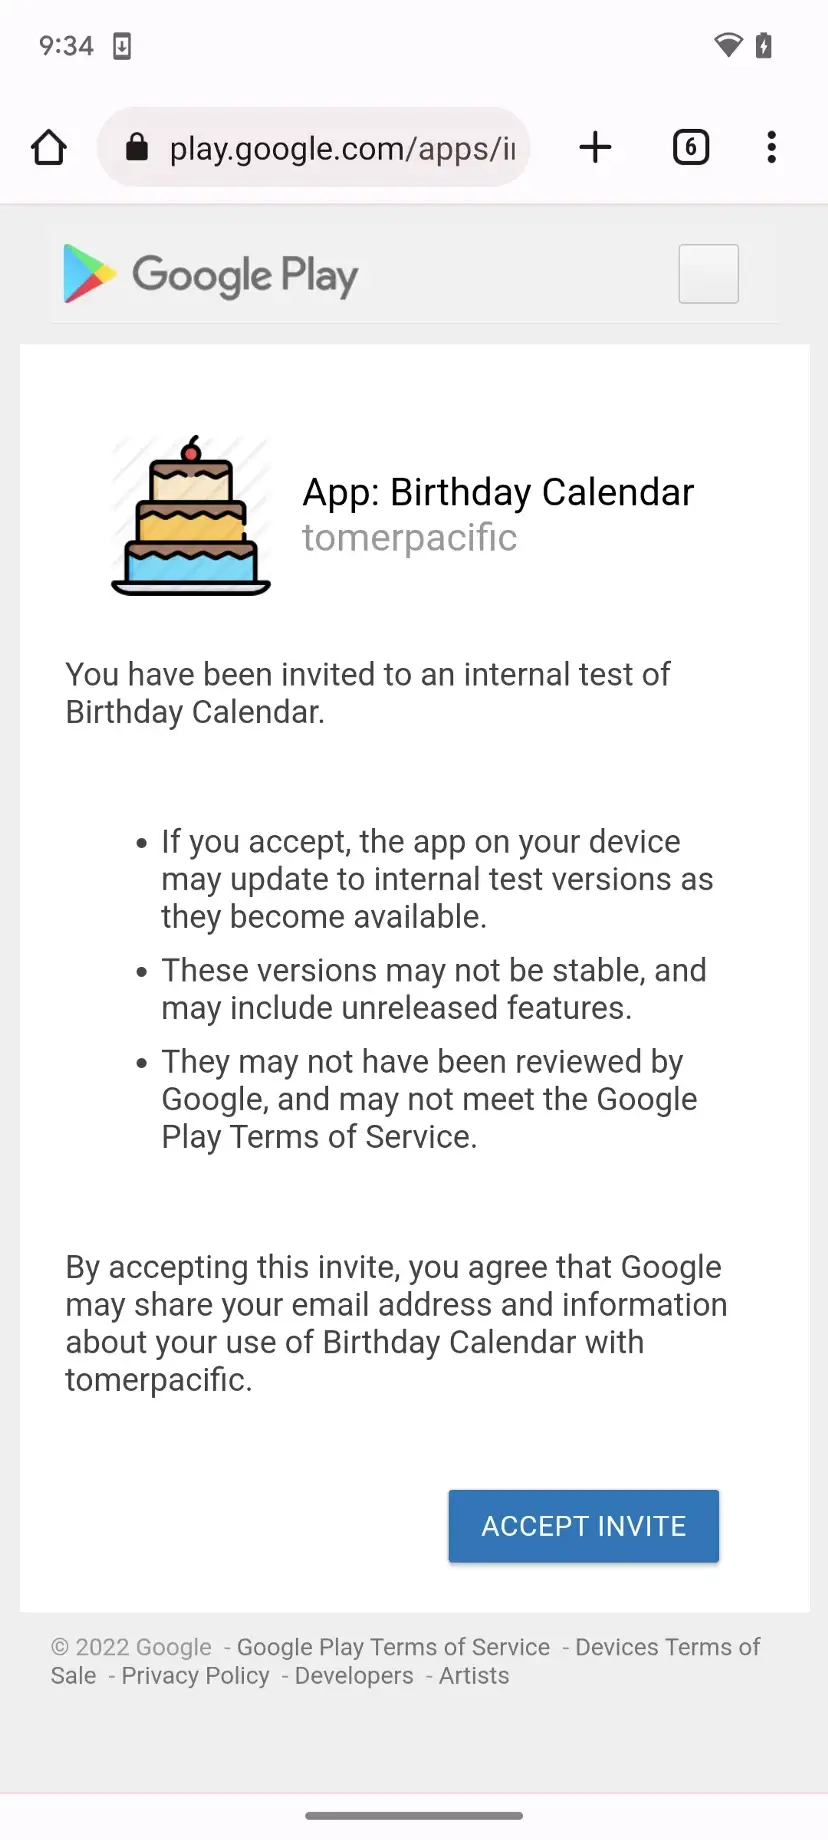
If you did everything successfully, you will see the following when you click on the generated link:
If you see this error:
Install Error(-6): The download/install is not allowed, due to the current device state (e.g. low battery, low disk space, …). (https://developer.android.com/reference/com/google/android/play/core/install/model/InstallErrorCode#ERROR_INSTALL_NOT_ALLOWED)
It might mean you are running your application on an emulated device and you need to have Google Play Store installed on it and be logged in.
Wrapping Up
I wrote this article because I had to go through the same process when integrating the in app update package with my own application.
You are welcome to check it out at the Google Play Store:

And see the entire source code here:
 GitHub
Thank you for reading!