

Building full stack applications can be tough. You have to think about frontend, APIs, databases, authentication - and how all of these things work together.
So, in this article, I'll show you how to do all of those things using NextJS and HarperDB.
We'll be building a full stack task timer app that includes JSON Web Token Authentication, fetching data using HarperDB's built-in API, and rendering the data with NextJS. We will also make use of NextJS's API.
If you're wondering what HarperDB is, it's a database-as-a-service that allows you to query data using either SQL or NoSQL. HarperDB also has a built-in API, saving us from having to write a lot of backend code.
Here is what we'll be building.
Here is the source code (remember to give it a star ⭐).
Contents
- Setup
- Create the Layout component
- Create some reusable components
- Create the Signup Page
- How to log out the user
- The Login Page
- Create a Tasks Context
- Create the Task Timer Page
- Create the Add/Select Task Bar
- Create the Stats Page
Setup
1. Install NextJS with TypeScript:
npx create-next-app@latest --ts
You’ll then be asked for a project name. I’m calling it “task timer”.
We can then change to the project directory:
cd “task timer”
2. Install and set up TailwindCSS
We'll be styling this project with Tailwind, so let's install everything we'll need.
Install TailwindCSS and its peer dependencies via npm, and then run the init command to generate both tailwind.config.js and postcss.config.js:
npm install -D tailwindcss postcss autoprefixer
npx tailwindcss init -p
Add the paths to all of your React component files in your tailwind.config.js file:
module.exports = {
  content: [
    "./src/pages/**/*.{js,ts,jsx,tsx}",
    "./src/components/**/*.{js,ts,jsx,tsx}",
  ],
  theme: {
    extend: {},
  },
  plugins: [],
}
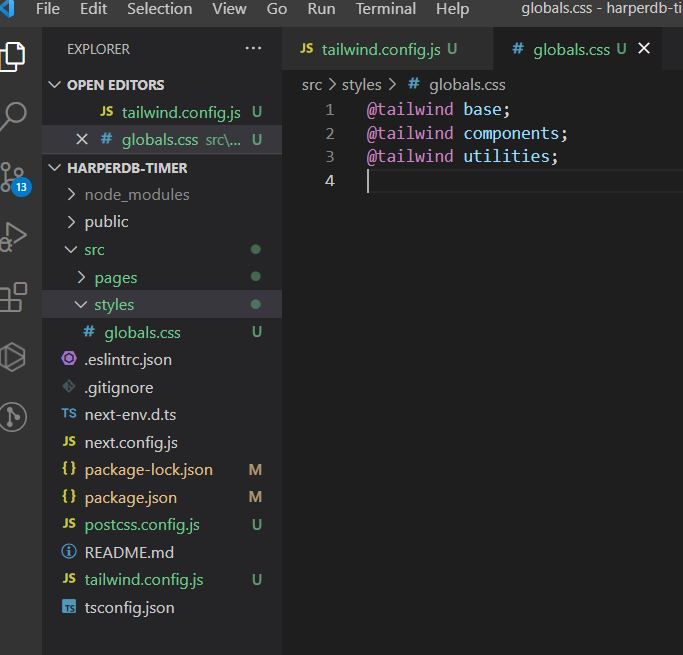
Next, create a src folder in the project root, and drag the styles and pages folders into src. In styles/global.css, add the following Tailwind directives to bring in the Tailwind classes:
@tailwind base;
@tailwind components;
@tailwind utilities;
Our NextJS project is now set up and ready to use with Tailwind.
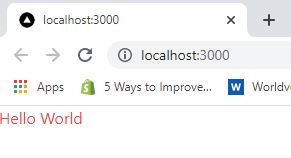
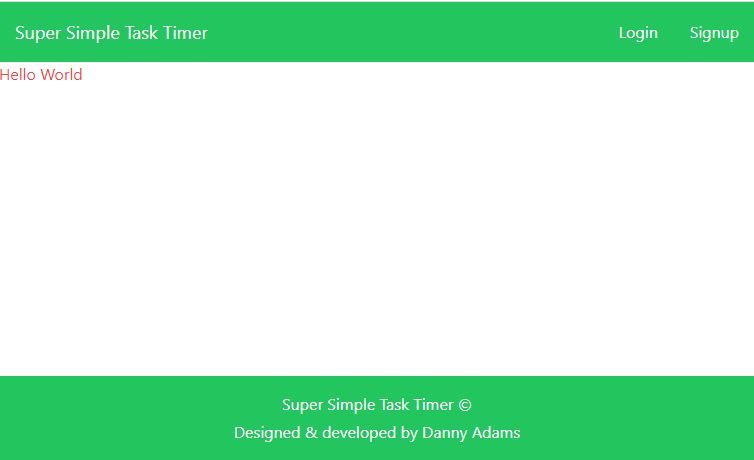
Let's clear out our src/pages/index.tsx page, and add the following:
import type { NextPage } from "next"

const Home: NextPage = () => {
  return (
    <div>
      <h1 className="text-red-500">Hello World</h1>
    </div>
  )
}

export default Home
Run the build process and start the dev server with:
npm run dev
Our server will now be running on http://localhost:3000
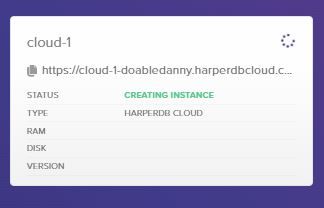
3. Set up HarperDB
First, create an account with HarperDB.
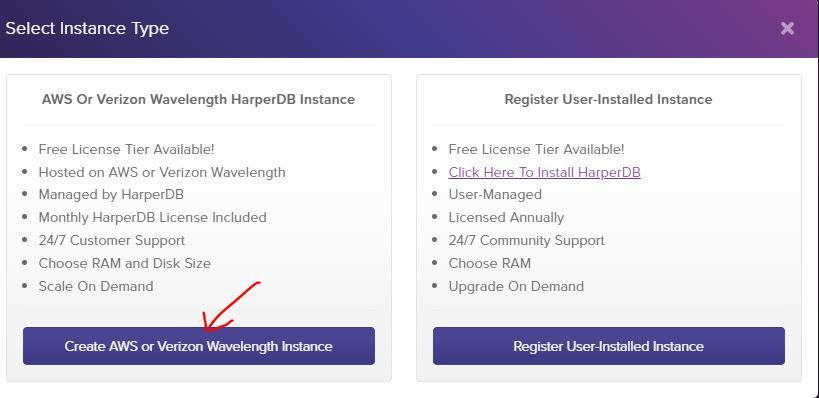
Then create a new HarperDB cloud instance:

To make things easy, select the cloud instance:
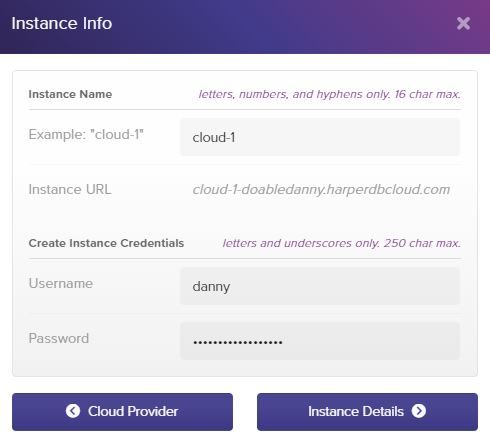
Select the cloud provider (I chose AWS):

Name your cloud instance, and create your instance credentials:
HarperDB has a generous free tier that we can use for this project, so select that:

Check your details are correct, then create the instance.
It will take a few minutes to create the instance, so let's crack on and make the UI for our app!
Create a Layout Component to Wrap Every Page
Create the folder src/components. In here, we will create components that can be reused throughout the project.
First, let's create a file to hold any constants that will be used through our app, such as the site title. It's helpful to keep a single source of truth for values like this, so that if we want to change them, we only have to change them in one place.
// src/constants/constants.ts

export const SITE_TITLE = "Super Simple Task Timer"
Let's now create our navbar:
// src/components/layout/Navbar.tsx

import Link from "next/link"
import { SITE_TITLE } from "../../constants/constants"

const Navbar = () => {
  return (
    <header className="flex justify-between items-center bg-green-600 text-white py-4 px-4">
      <h2 className="text-lg">
        <Link href="/">
          <a>{SITE_TITLE}</a>
        </Link>
      </h2>
      <nav>
        <ul className="flex">
          <NavLink href="/login">Login</NavLink>
          <NavLink href="/signup">Signup</NavLink>
        </ul>
      </nav>
    </header>
  )
}

interface NavLinkProps {
  href: string
  children: string
}

const NavLink: React.FC<NavLinkProps> = ({ href, children }) => {
  return (
    <li className="ml-8">
      <Link href={href}>
        <a>{children}</a>
      </Link>
    </li>
  )
}

export default Navbar
Create the footer:
// src/components/layout/Footer.tsx
import { SITE_TITLE } from "../../constants/constants"
const Footer = () => {
return (
<footer className="bg-green-600 text-white text-center py-4">
<p className="mb-1">{SITE_TITLE} ©</p>
<p>Designed & developed by Danny Adams</p>
</footer>
)
}
export default Footer
Now we can create our layout component to wrap every page. Using flex-grow on the <main> tag ensures that the page content takes up all available space between the header and footer.
// src/components/layout/Layout.tsx

import Navbar from "./Navbar"
import Footer from "./Footer"

const Layout: React.FC = ({ children }) => {
  return (
    <div className="min-h-screen flex flex-col">
      <Navbar />
      <main className="flex flex-col grow">{children}</main>
      <div className="mt-auto">
        <Footer />
      </div>
    </div>
  )
}

export default Layout
Then, in src/pages/_app.tsx, we can wrap every page component with Layout:
import "../styles/globals.css"
import type { AppProps } from "next/app"
import Layout from "../components/layout/Layout"

function MyApp({ Component, pageProps }: AppProps) {
  return (
    <Layout>
      <Component {...pageProps} />
    </Layout>
  )
}

export default MyApp
And there we go! Every page now has a navbar, content area that takes up 100% of available space, and a footer that always sits at the bottom.
Create Some Reusable Components
We will now create some basic components that can be reused throughout the project.
Create a button component:
// src/components/Button.tsx

interface Props {
  children: React.ReactNode
  color: "primary" | "success" | "secondary" | "warning" | "danger"
  handleClick?: () => void
  type?: "button" | "submit"
  extraClasses?: string
}

const Button: React.FC<Props> = ({
  children,
  color,
  handleClick,
  type,
  extraClasses,
}) => {
  let colors: string
  switch (color) {
    case "primary":
      colors = "bg-blue-500 hover:bg-blue-600"
      break
    case "success":
      colors = "bg-green-500 hover:bg-green-600"
      break
    case "warning":
      colors = "bg-yellow-300 hover:bg-yellow-400 text-black"
      break
    case "secondary":
      colors = "bg-pink-500 hover:bg-pink-600"
      break
    default:
      colors = "bg-red-500 hover:bg-red-600"
  }
  const classes = `rounded text-white py-2 px-4 ${colors} ${extraClasses}`

  return (
    <button className={classes} onClick={handleClick} type={type}>
      {children}
    </button>
  )
}

export default Button
Create a link component that uses NextJS Link to automatically prefetch pages it links to in the background - making page loads quickly:
// src/components/Link.tsx

import NextLink from "next/link"

interface Props {
  href: string
  children: React.ReactNode
}

const Link = ({ href, children }: Props) => {
  return (
    <NextLink href={href}>
      <a className="underline underline-offset-1 text-blue-700">{children}</a>
    </NextLink>
  )
}

export default Link
Let's also create an Alert component to display alert messages, for example if a user enters invalid form data, a red error message will be displayed:
// src/components/Alert.tsx

interface Props {
  children: React.ReactNode
  type: "success" | "warning" | "danger"
  key?: number
  extraClasses?: string
}
const Alert = ({ children, type, key, extraClasses }: Props) => {
  let color
  switch (type) {
    case "success":
      color = "bg-blue-500"
      break
    case "warning":
      color = "bg-yellow-300 text-yellow-800"
      break
    default:
      color = "bg-red-500"
  }
  const classes = `text-white text-center p-2 rounded mt-4 ${color} ${extraClasses}`

  return (
    <div key={key} className={classes}>
      {children}
    </div>
  )
}

export default Alert
Create a main page heading component:
// src/components/PageHeading.tsx

interface Props {
  extraClasses: string
}

const PageHeading: React.FC<Props> = ({ children, extraClasses }) => {
  const classes = "text-4xl text-green-900 font-semibold " + extraClasses

  return <h1 className={classes}>{children}</h1>
}

export default PageHeading
Let's also create a component to reuse through our login and signup forms that contains a label and an input:
// src/components/Form.tsx

interface InputProps {
  inputType: "text" | "email" | "password"
  inputName: string
  handleChange: (e: React.ChangeEvent<HTMLInputElement>) => void
  value: string
}

interface LabelAndInputProps extends InputProps {
  label: string
}

export const LabelAndInput: React.FC<LabelAndInputProps> = ({
  label,
  inputType,
  inputName,
  handleChange,
  value,
}) => {
  return (
    <div className="flex flex-col mb-2">
      <label htmlFor="name">{label}</label>
      <Input
        inputType={inputType}
        inputName={inputName}
        handleChange={handleChange}
        value={value}
      />
    </div>
  )
}

export const Input: React.FC<InputProps> = ({
  inputType,
  inputName,
  handleChange,
  value,
}) => {
  return (
    <input
      className="px-3 py-2 border-gray-200 border-2 rounded"
      type={inputType}
      name={inputName}
      id={inputName}
      onChange={handleChange}
      value={value}
    />
  )
}
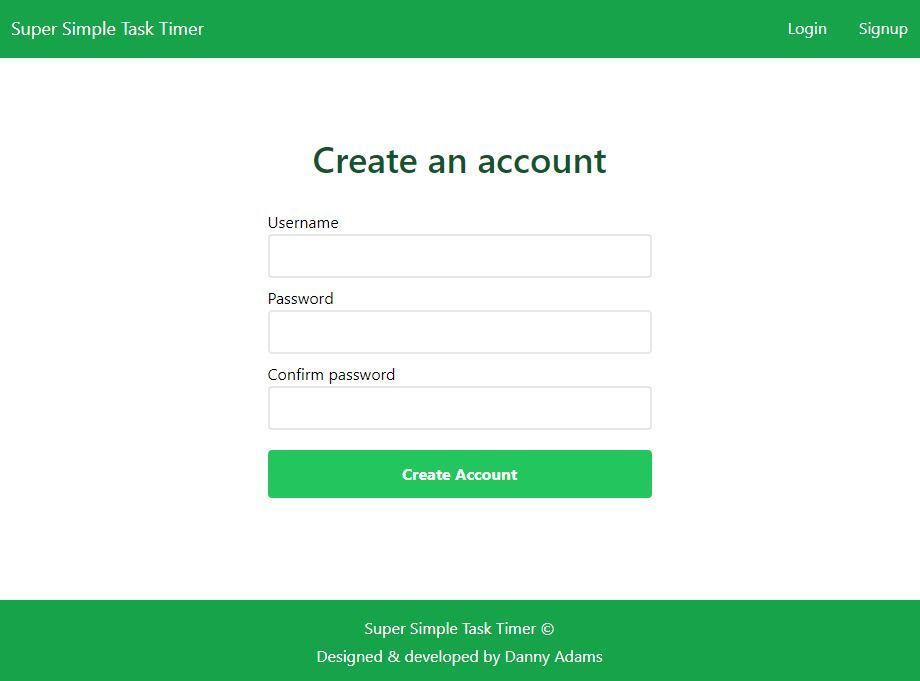
Create the Signup Page
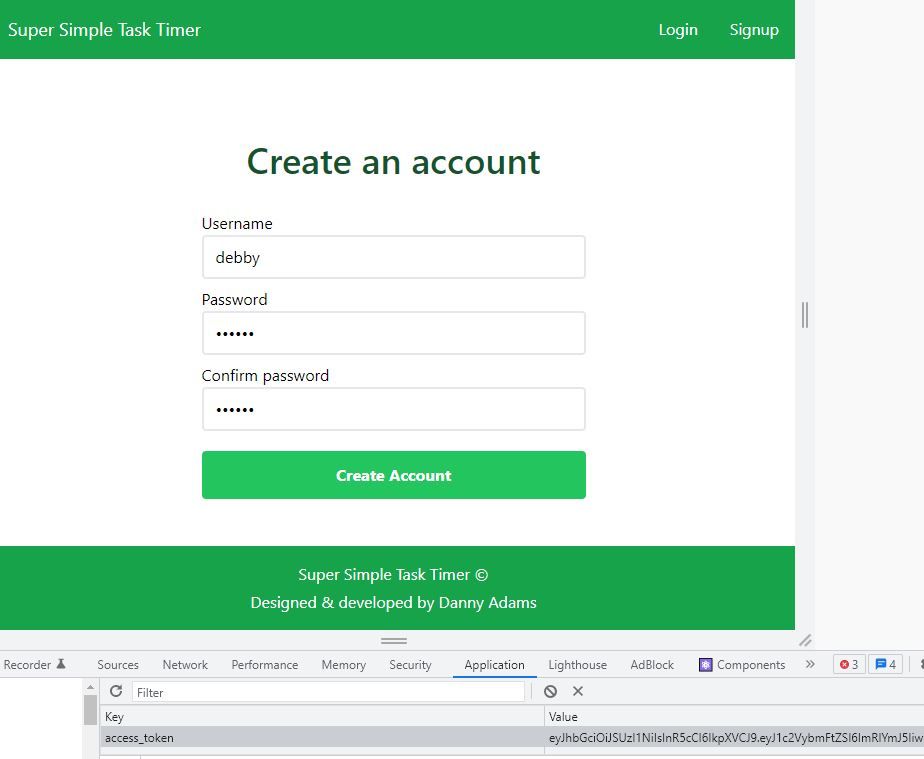
Here is what the signup page will look like.
Signup page UI
First, let's create a signup form component at the location src/components/signup-page/SignupForm.tsx:
// src/components/signup-page/SignupForm.tsx

import { useState } from "react"
import { LabelAndInput } from "../Form"
import Button from "../Button"

const SignupForm = () => {
  const [username, setUsername] = useState("")
  const [password1, setPassword1] = useState("")
  const [password2, setPassword2] = useState("")

  return (
    <form className="w-full sm:w-96">
      <LabelAndInput
        label="Username"
        inputType="text"
        inputName="username"
        handleChange={e => setUsername(e.target.value)}
        value={username}
      />
      <LabelAndInput
        label="Password"
        inputType="password"
        inputName="password1"
        handleChange={e => setPassword1(e.target.value)}
        value={password1}
      />
      <LabelAndInput
        label="Confirm password"
        inputType="password"
        inputName="password2"
        handleChange={e => setPassword2(e.target.value)}
        value={password2}
      />
      <Button
        color="success"
        type="submit"
        extraClasses="w-full mt-3 py-3 font-semibold"
      >
        Create Account
      </Button>
    </form>
  )
}

export default SignupForm
We can create the signup page at src/pages/signup.tsx and import the above form:
// src/pages/signup.tsx

import type { NextPage } from "next"
import SignupForm from "../components/signup-page/SignupForm"
import PageHeading from "../components/PageHeading"

const Signup: NextPage = () => {
  return (
    <div className="mx-auto mt-20">
      <PageHeading extraClasses="text-center mb-8">
        Create an account
      </PageHeading>
      <SignupForm />
    </div>
  )
}

export default Signup
Our signup page UI is now complete:
Signup page logic
Back in our SignupForm component, add a handleSubmit callback function to be called when then form is submitted:
// src/components/signup-page/SignupForm.tsx

<form className='w-full sm:w-96' onSubmit={handleSubmit}>
In the handleSubmit function, we'll need to post the form data to our NextJS API. Our API will then forward this data on to HarperDB to create a new user in our HarperDB database.
Let's first write the beginning of our handleSubmit function:
// src/components/signup-page/SignupForm.tsx

// ...
import { postFormData } from "../../utils/postFormData"

const SignupForm = () => {
  // ...

  const handleSubmit = async (e: React.FormEvent) => {
    e.preventDefault();

    const formData = { username, password1, password2 };
    const { response, result } = await postFormData(formData, '/api/signup');

    console.log({ response, result });
  };
Now create a src/utils folder, and define a utility function that takes any data object and an API route, then returns the response and result:
// src/utils/postFormData.ts

export const postFormData = async (data: { [k: string]: any }, url: string) => {
  const requestOptions: RequestInit = {
    method: "POST",
    headers: {
      "Content-Type": "application/json",
    },
    body: JSON.stringify(data),
  }
  const response = await fetch(url, requestOptions)
  const result = await response.json()
  return { response, result }
}
We need to create our first API route at src/pages/api/signup.
But before we do that, we will install the next-connect package, which allows us to write our APIs with expressJS-like syntax, and saves us some time with error handling:
npm install next-connect
Create a file at src/middleware/_defaultHandler.ts, and add the following:
// src/middleware/_defaultHandler.ts

import { NextApiRequest, NextApiResponse } from "next"
import nextConnect from "next-connect"

// This middleware function will run between every request and api handler
const handler = nextConnect<NextApiRequest, NextApiResponse>({
  onError: (err, req, res) => {
    res.status(501).json({ error: `Something went wrong! ${err.message}` })
  },
  onNoMatch: (req, res) => {
    res.status(405).json({ error: `Method ${req.method} Not Allowed` })
  },
})

export default handler
The above middleware function will run with every API request, and handle any request errors.
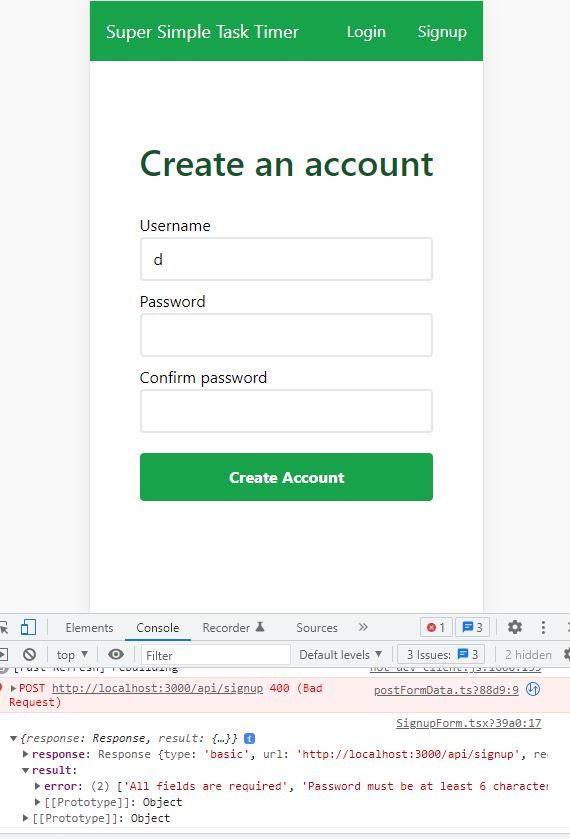
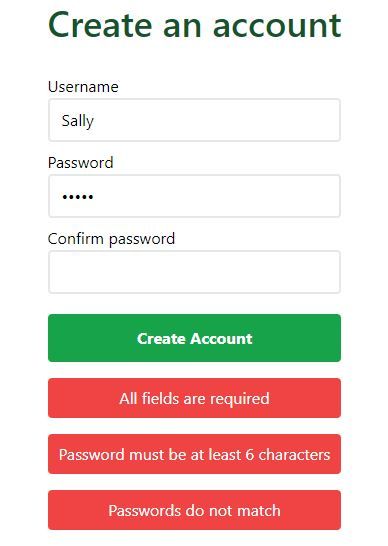
We can now create our API route at src/pages/api/signup. First, let's check for any errors in the posted form data, and send back an array of error messages to the client if so:
// src/pages/api/signup

import type { NextApiRequest, NextApiResponse } from "next"
import handler from "../../middleware/_defaultHandler"

export default handler.post(
  async (req: NextApiRequest, res: NextApiResponse) => {
    const { username, password1, password2 } = req.body

    const errors: string[] = getFormErrors(username, password1, password2)
    if (errors.length > 0) {
      return res.status(400).json({ error: errors })
    }
  }
)

const getFormErrors = (
  username: string,
  password1: string,
  password2: string
) => {
  const errors: string[] = []
  if (!username || !password1 || !password2) {
    errors.push("All fields are required")
  }
  if (password1.length < 6) {
    errors.push("Password must be at least 6 characters")
  }
  if (password1 !== password2) {
    errors.push("Passwords do not match")
  }
  return errors
}
Now, if we post some incorrect form data from the frontend, we get error messages logged to the console:
Once we know the form data is legit, we need to post it to the HarperDB API, which will create a new user for us. Let's write a function that will do this.
First, we need our HarperDB instance URL. If you click on your instance, then go to "config", you will find your instance URL, and your instance API Auth Header – that is, your "super_user" password that allows you to make any request to the database – FOR YOUR EYES ONLY!

We will be needing the instance URL on both frontend and backend, so let's store it in our constants file:
// src/constants/constants.ts

export const SITE_TITLE = "Super Simple Task Timer"
export const DB_URL = "Your_HDB_URL_Here"
Our password must be kept secret, so it should never be available on the frontend. Our password will be loaded into the server as an environment variable. Add your password to .env.local in your project root:
HARPERDB_PW=Basic yourpasswordgoeshere
HarperDB lists all of the operations that can be performed by category in the "example code" tab:
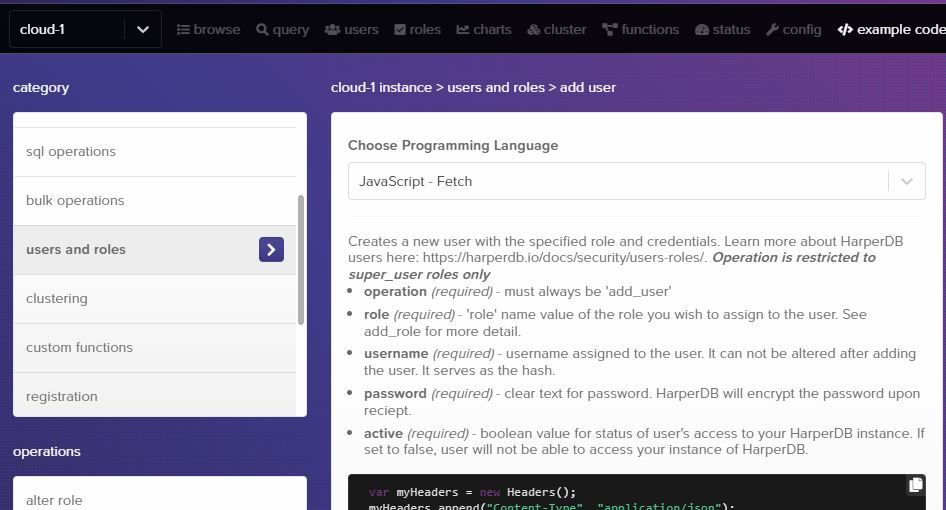
We want to use the HarperDB "add_user" operation, so let's create our own function to do just that:
// src/utils/harperdb/createNewUser.ts

import { DB_URL } from "../../constants/constants"

// This function can only be ran on the backend as it requires a "super_user" password
export const harperCreateNewUser = async (
  username: string,
  password: string
) => {
  const DB_PW = process.env.HARPERDB_PW
  if (!DB_URL || !DB_PW) {
    console.log("Error: .env variables are undefined")
    throw "Internal server error"
  }
  const myHeaders = new Headers()
  myHeaders.append("Content-Type", "application/json")
  myHeaders.append("Authorization", DB_PW)
  const raw = JSON.stringify({
    operation: "add_user",
    role: "standard_user",
    username: username.toLowerCase(),
    password: password,
    active: true,
  })
  const requestOptions: RequestInit = {
    method: "POST",
    headers: myHeaders,
    body: raw,
    redirect: "follow",
  }

  const response = await fetch(DB_URL, requestOptions)
  const result = await response.json()
  return { response, result }
}
Notice how the "role" is "standard_user". If we gave everyone that created an account a "super_user" role, then anybody would be able to delete your tables and wreak havoc on our database!
Let's now set up this "standard_user" role, and make the tables we will need.
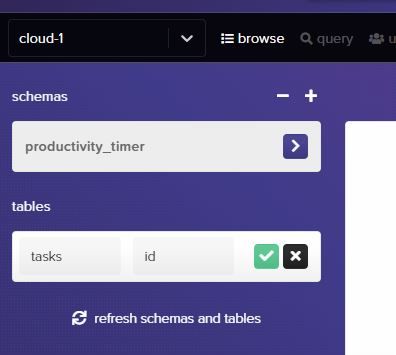
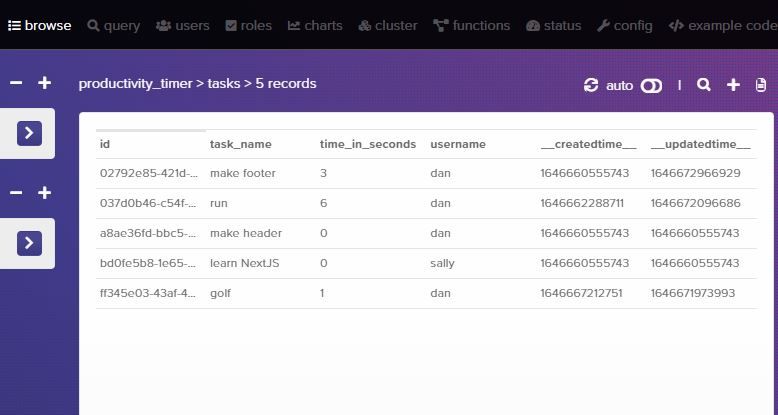
Create a scheme called "productivity_timer" (a schema is a group of tables). In this schema, create a table called "tasks" with hash attribute (each entries unique key) "id":
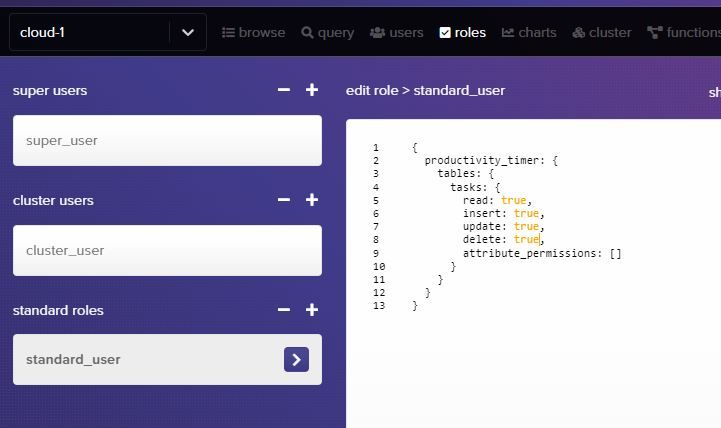
We now need to create the "standard_user" role to limit the access that our users will have. Go to "roles", and create a standard role called "standard_user". Then change all the tasks table access permissions to true:
Let's also add some tasks to our table that we can fetch into our application later:
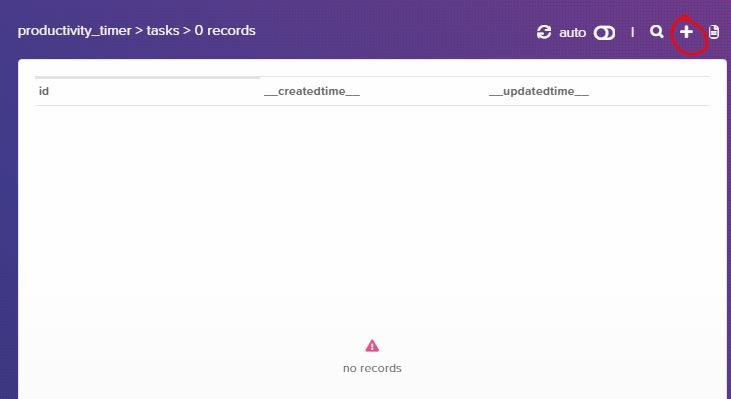
Add the following JSON to add some tasks:
[
  { "username": "dan", "task_name": "make header", "time_in_seconds": 0 },
  { "username": "dan", "task_name": "make footer", "time_in_seconds": 0 },
  { "username": "sally", "task_name": "learn NextJS", "time_in_seconds": 0 }
]
Back to our API route at src/pages/api/signup, we can now add the code to create a new user in HarperDB:
// src/pages/api/signup

import type { NextApiRequest, NextApiResponse } from "next"
import handler from "../../middleware/_defaultHandler"
import { harperCreateNewUser } from "../../utils/harperdb/createNewUser"

export default handler.post(
  async (req: NextApiRequest, res: NextApiResponse) => {
    const { username, password1, password2 } = req.body

    const errors: string[] = getFormErrors(username, password1, password2)
    if (errors.length > 0) {
      return res.status(400).json({ error: errors })
    }

    // Create new user with HarperDB, and send back result
    try {
      const { response, result } = await harperCreateNewUser(
        username,
        password1
      )
      return res.status(response.status).json(result)
    } catch (err) {
      return res.status(500).json({ error: err })
    }
  }
)
To test creating a new user, you will now need to stop the dev server with "ctrl + c", then restart with npm run dev – in order to load in the .env variables.
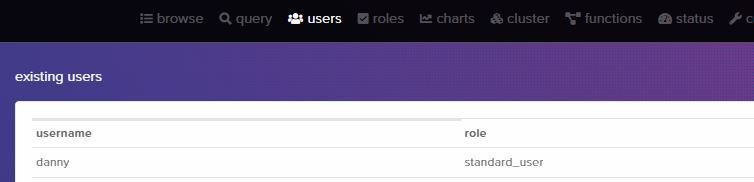
Go to the signup page, fill in the form, and submit. WOOHOO! We have created our first user!
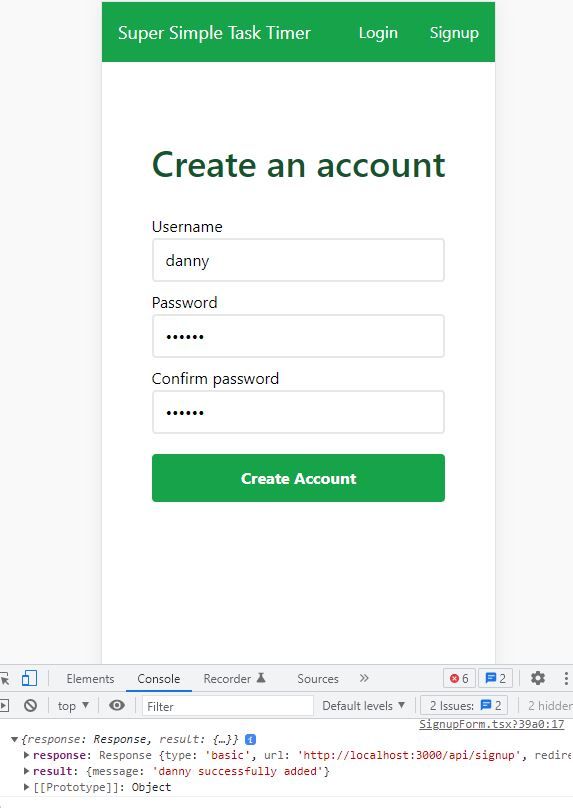
And if we look in the users table on HarperDB, we see that the new user was added successfully:
Now, back on the frontend, we need to handle the response and result that is sent back from the server.
If the response status code sent back from the server is not 200, we know that something went wrong. So we can set the errors in a state variable, and return from handleSubmit early:
// src/components/signup-page/SignupForm.tsx

const [errors, setErrors] = useState<string | string[]>("")

const handleSubmit = async (e: React.FormEvent) => {
  e.preventDefault()
  setErrors("")

  const formData = { username, password1, password2 }
  const { response, result } = await postFormData(formData, "/api/signup")

  // Account not created successfully
  if (response.status !== 200) {
    setErrors(result.error)
    return
  }
}
Let's display these errors at the bottom of the form:
// src/components/signup-page/SignupForm.tsx

// ...
import Alert from "../Alert"

const SignupForm = () => {
  // ...
  const [errors, setErrors] = useState<string | string[]>("")

  // ...

  const displayErrors = () => {
    if (errors.length === 0) return

    return typeof errors === "string" ? (
      <Alert type="danger">{errors}</Alert>
    ) : (
      errors.map((err, i) => (
        <Alert key={i} type="danger">
          {err}
        </Alert>
      ))
    )
  }

  return (
    <form className="w-full sm:w-96" onSubmit={handleSubmit}>
      {/* form stuff... */}

      {displayErrors()}
    </form>
  )
}

export default SignupForm
Now if the user enters invalid form data, errors will be displayed:
And if the user already exists, HarperDB will send us an appropriate error message:
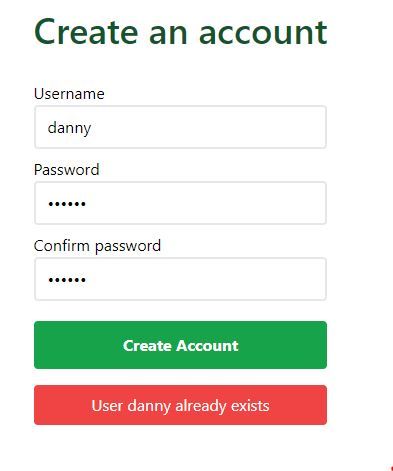
Nice!
But if the response status code is 200, then we know that the account was created successfully. So, we can get the user a JSON Web Token (JWT) which will be used to authenticate the user and allow them to access protected routes.
How to get the user a JSON Web Token
HarperDB can create JWTs for each user in the database, meaning we don't have to install any packages and handle the logic ourselves - nice!
How will our JWT auth work? When HarperDB sends back a JWT to the frontend, we will save the JWT in localStorage in the browser. Then, every time the user makes a request, we will get the JWT from localStorage and attach it to the request header. HarperDB will automatically check if there is a JWT in the request header, and check that it is valid. If so, it will go ahead with the request.
But first, we need to create a User context using React's context API so that the user's username is available throughout the whole of the app.
// src/contexts/UserContext.ts

import { createContext } from "react"

export const UserContext = createContext({
  username: "",
  setUsername: (username: string) => {},
})
We then need to wrap our whole application in the UserContext.Provider, so username and setUsername are available on every page. Initially, username will be an empty string.
// src/pages/_app.tsx

import { useState } from "react"
// ...
import { UserContext } from "../contexts/UserContext"

function MyApp({ Component, pageProps }: AppProps) {
  const [username, setUsername] = useState("")

  return (
    <UserContext.Provider value={{ username, setUsername }}>
      <Layout>
        <Component {...pageProps} />
      </Layout>
    </UserContext.Provider>
  )
}

export default MyApp
Let's now write a function that will fetch JWTs from HarperDB. HarperDB will check that the username and password are correct, then create the JWTs from the username, and send them back to our app:
// src/utils/harperdb/fetchJWTTokens.ts

import { DB_URL } from "../../constants/constants"

export const harperFetchJWTTokens = async (
  username: string,
  password: string
) => {
  if (!DB_URL) {
    console.log("Error: DB_URL undefined")
    throw "Internal server error"
  }

  const myHeaders = new Headers()
  myHeaders.append("Content-Type", "application/json")

  const raw = JSON.stringify({
    operation: "create_authentication_tokens",
    username: username,
    password: password,
  })

  const requestOptions: RequestInit = {
    method: "POST",
    headers: myHeaders,
    body: raw,
    redirect: "follow",
  }

  const response = await fetch(DB_URL, requestOptions)
  const result = await response.json()
  return { response, result }
}
Back to SignupForm.tsx, we need to fetch the JWTs using the above function, check if HarperDB created and sent them back successfully, and if so authenticate the user:
// src/components/signup-page/SignupForm.tsx

import { useState, useContext } from "react"
import { UserContext } from "../../contexts/UserContext"
import { useRouter } from "next/router"
import { harperFetchJWTTokens } from "../../utils/harperdb/fetchJWTTokens"
// ...

const SignupForm = () => {
  //...

  const user = useContext(UserContext)
  const router = useRouter()

  const handleSubmit = async (e: React.FormEvent) => {
    // ...

    // Account created successfully; get JWTs
    try {
      const { response, result } = await harperFetchJWTTokens(
        username,
        password1
      )
      const accessToken = result.operation_token
      if (response.status === 200 && accessToken) {
        authenticateUser(username, accessToken)
      } else {
        // Account created, but failed to get JWTs
        // Redirect to login page
        router.push("/login")
      }
    } catch (err) {
      console.log(err)
      setErrors("Whoops, something went wrong :(")
    }
  }

  const authenticateUser = (username: string, accessToken: string) => {
    user.setUsername(username)
    localStorage.setItem("access_token", accessToken)
  }

  // ...
}

export default SignupForm
Above, if HarperDB sends back the operation token successfully, we save it to localStorage so it can be used to authenticate the user for as long as the JWT hasn't expired, and set the username in context.
Let's test this out. When we create a new user we should get an access token stored in localStorage. Create a new user, open your chrome dev tools, then under "Application" you should see the access token.
Awesome!
In src/pages/signup.tsx, let's render a different component depending on if the username is set:
// src/pages/signup.tsx

import { useContext } from "react"
import { UserContext } from "../contexts/UserContext"
import Alert from "../components/Alert"
// ...

const Signup: NextPage = () => {
  const { username } = useContext(UserContext)

  return (
    <div className="mx-auto mt-20">
      {username ? (
        <Alert type="success">You are logged in as {username}</Alert>
      ) : (
        <>
          <PageHeading extraClasses="text-center mb-8">
            Create an account
          </PageHeading>
          <SignupForm />
        </>
      )}
    </div>
  )
}

export default Signup
Now when we create an account, we get this:

But we have a problem: context doesn't keep the username when we refresh the page, meaning when we refresh the page, the signup form will be displayed again, even though the user is logged in.
To solve this problem, we can create a custom hook called useUser.
Creating a useUser custom hook
The useUser hook will run once every time the user goes to a new page, or refreshes the current page.
Let's first create the hook. We will also move username and setUsername into this hook to keep things organized.
// src/custom-hooks/useUser.ts

import { useState, useEffect } from "react"
import { harperGetUsername } from "../utils/harperdb/getUsername"

export const useUser = () => {
  const [username, setUsername] = useState("")

  useEffect(() => {
    // User is logged in
    if (username) return

    // Check for access token and try to log user in
    const accessToken = localStorage.getItem("access_token")
    if (accessToken) {
      tryLogUserIn(accessToken)
    }

    async function tryLogUserIn(accessToken: string) {
      const username = await harperGetUsername(accessToken)
      if (username) {
        setUsername(username)
      }
    }
  })

  return { username, setUsername }
}
Now we need to create the harperGetUsername function. This function will send the access token to HarperDB. HarperDB will then check if the access token is valid, and check which user it belongs to. If all is good, then HarperDB will send back the corresponding user's info.
// src/utils/harperdb/getUsername.ts

import { DB_URL } from "../../constants/constants"

export const harperGetUsername = async (accessToken: string) => {
  const myHeaders = new Headers()
  myHeaders.append("Content-Type", "application/json")
  myHeaders.append("Authorization", "Bearer " + accessToken)

  const raw = JSON.stringify({
    operation: "user_info",
  })

  const requestOptions: RequestInit = {
    method: "POST",
    headers: myHeaders,
    body: raw,
    redirect: "follow",
  }

  try {
    const response = await fetch(DB_URL, requestOptions)
    const result = await response.json()
    if (response.status === 200) {
      return result.username
    }
  } catch (err) {
    console.log(err)
  }
  return null
}
Our useUser hook is made. Let's instantiate it in _app.tsx so that every time a new page is visited, the useEffect function will run and authenticate the user:
// src/pages/_app.tsx

// ...
import { useUser } from "../custom-hooks/useUser"

function MyApp({ Component, pageProps }: AppProps) {
  // Remove below line
  // const [username, setUsername] = useState('');
  const { username, setUsername } = useUser()

  return (
    <UserContext.Provider value={{ username, setUsername }}>
      <Layout>
        <Component {...pageProps} />
      </Layout>
    </UserContext.Provider>
  )
}

export default MyApp
Now when we refresh the page, the user's username is fetched using the access JWT stored in localStorage, keeping our user logged in. Awesome!

How to Log Out the User
The auth system we are implementing is "stateless" – meaning that no information will be stored in the database or on the server that tells us who is logged in and who isn't. Just an access JWT is stored on the client to authenticate users.
The only way we have of logging out a user is by deleting the access token in the user’s localStorage. Of course, if they are logged in on multiple devices, then they can only log out of the device they are on.
Also, if the access token was stolen, then anybody could pretend to be that user and access their data. This is a major weakness in our auth system.
One way to solve this would be to use refresh tokens, but we'll keep things simple in this tutorial and just use one JWT for accessing protected routes.
In our Navbar components, let's add a logout button. We will use a ternary operator to display the "Login" and "Signup" links if username isn't set. If username is set, then the user is logged in so we can show them links to the "Timer" and "Stats" pages, as well as the "Logout" button.
// src/components/layout/Navbar.tsx

import Link from "next/link"
import { useContext } from "react"
import { SITE_TITLE } from "../../constants/constants"
import { UserContext } from "../../contexts/UserContext"

const Navbar = () => {
  const { username, setUsername } = useContext(UserContext)

  const handleLogout = () => {
    localStorage.removeItem("access_token")
    setUsername("")
  }

  return (
    <header className="flex justify-between items-center bg-green-600 text-white py-4 px-4">
      <h2 className="text-lg">
        <Link href="/">
          <a>{SITE_TITLE}</a>
        </Link>
      </h2>
      <nav>
        <ul className="flex items-center">
          {username ? (
            <>
              <NavLink href="/">Timer</NavLink>
              <NavLink href="/stats">Stats</NavLink>
              <button
                onClick={handleLogout}
                className="border py-1 px-3 ml-8 rounded hover:bg-green-700"
                type="button"
              >
                Logout
              </button>
            </>
          ) : (
            <>
              <NavLink href="/login">Login</NavLink>
              <NavLink href="/signup">Signup</NavLink>
            </>
          )}
        </ul>
      </nav>
    </header>
  )
}
// ...
The Login page
Here is the login page we'll be building in this section.
Login page UI
Let's make the UI for the login page. First:
// src/pages/login.tsx

import { useContext } from "react"
import type { NextPage } from "next"
import { UserContext } from "../contexts/UserContext"
import PageHeading from "../components/PageHeading"
import LoginForm from "../components/login-page/LoginForm"

const Login: NextPage = () => {
  const { username } = useContext(UserContext)

  return (
    <div className="grow flex flex-col items-center mt-20">
      {username ? (
        <p>
          You are logged in as{" "}
          <span className="text-green-600 font-semibold">{username}</span> 👋
        </p>
      ) : (
        <>
          <PageHeading extraClasses="text-center mb-8">Log in</PageHeading>
          <LoginForm />
        </>
      )}
    </div>
  )
}

export default Login
Next, create LoginForm:
// src/components/login-page/LoginForm.tsx

import { useState } from "react"
import { LabelAndInput } from "../Form"
import Button from "../Button"
import Alert from "../Alert"

const LoginForm = () => {
  const [username, setUsername] = useState("")
  const [password, setPassword] = useState("")

  return (
    <form className="w-full sm:w-96">
      <LabelAndInput
        label="Username"
        inputType="text"
        inputName="username"
        handleChange={e => setUsername(e.target.value)}
        value={username}
      />
      <LabelAndInput
        label="Password"
        inputType="password"
        inputName="password"
        handleChange={e => setPassword(e.target.value)}
        value={password}
      />
      <Button color="success" extraClasses="w-full mt-3 py-3 font-semibold">
        Login
      </Button>

      {error && <Alert type="danger">{error}</Alert>}
    </form>
  )
}

export default LoginForm
Now we can create a handleSubmit function on our login form:
// src/components/login-page/LoginForm.tsx

import { useState, useContext } from "react"
// ...
import { UserContext } from "../../contexts/UserContext"

const LoginForm = () => {
  // ...
  const [error, setError] = useState("")
  const user = useContext(UserContext)

  const handleSubmit = (e: React.FormEvent) => {
    e.preventDefault()
    setError("")
  }

  return (
    <form className="w-full sm:w-96" onSubmit={handleSubmit}>
      {/* ... */}
    </form>
  )
}

export default LoginForm
Completing the rest of our handleSubmit function:
// src/components/login-page/LoginForm.tsx

const handleSubmit = async (e: React.FormEvent) => {
  e.preventDefault()
  setError("")
  if (!username || !password) {
    setError("Username and password required")
    return
  }

  try {
    const { response, result } = await harperFetchJWTTokens(username, password)
    const { status } = response
    const accessToken = result.operation_token
    if (status === 200 && accessToken) {
      authenticateUser(username, accessToken)
    } else if (status === 401) {
      setError("Check your username and password are correct")
    } else {
      setError("Whoops, something went wrong :(")
    }
  } catch (err) {
    console.log(err)
    setError("Whoops, something went wrong :(")
  }
}

const authenticateUser = (username: string, accessToken: string) => {
  user.setUsername(username)
  localStorage.setItem("access_token", accessToken)
}
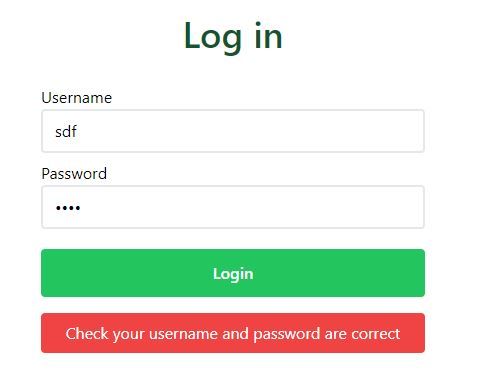
Now if we enter the details of a user not in our database, we get an error:
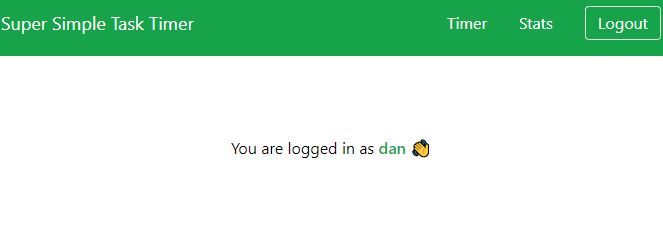
If we log in as a user that exists:
We can now create an account and log in to our app. Awesome!
Create a Tasks Context
Our timer page ('/') and our stats page ('/stats') will both need to know the tasks that the user has added, as well as the number of seconds the user has spent on each task. We can share the tasks state between pages using the context API.
First, let's create a type for tasks so that TypeScript can tell us if a task is missing a property, or if we try to access a property that doesn't exist on tasks, making our code more robust:
// src/types/Task.ts

export interface Task {
  __createdtime__: number
  __updatedtime__: number
  username: string
  time_in_seconds: number
  id: string
  task_name: string
}
Next, we can create our tasks context:
// src/contexts/TasksContext.ts

import React, { createContext } from "react"
import type { Task } from "../types/Task"

interface TasksContext {
  tasks: Task[]
  setTasks: React.Dispatch<React.SetStateAction<Task[]>>
  getAndSetTasks: (username: string) => Promise<void>
}

export const TasksContext = createContext({} as TasksContext)
Before we wrap our application with the tasks context provider, let's create a custom hook that will contain a useEffect hook that will run every time a new page is visited, or every time a page is refreshed. It will check if the user is logged in, and if the tasks state contains no tasks, it will try to fetch tasks from the database:
// src/custom-hooks/useTasks.ts

import { useState, useCallback, useEffect } from "react"
import type { Task } from "../types/Task"
import { harperGetTasks } from "../utils/harperdb/getTasks"

export const useTasks = (username: string) => {
  const [tasks, setTasks] = useState<Task[]>([])

  // Get tasks from db then set task state
  const getAndSetTasks = useCallback(
    async (username: string) => {
      try {
        const tasks: Task[] = await harperGetTasks(username)
        setTasks(tasks)
      } catch (err) {
        console.log(err)
      }
    },
    [setTasks]
  )

  useEffect(() => {
    if (!username || tasks.length > 0) return
    getAndSetTasks(username)
  }, [username, tasks.length, getAndSetTasks])

  return { tasks, setTasks, getAndSetTasks }
}
Now we need to define the harperGetTasks function to fetch all tasks from the database that have our user's username. As you can see, HarperDB supports both SQL and NoSQL operations. We are ordering the tasks with the ones the user most recently worked on at the top:
// src/utils/harperdb/getTasks.ts

import { harperFetch } from "./harperFetch"

export const harperGetTasks = async (username: string) => {
  const data = {
    operation: "sql",
    sql: `SELECT * FROM productivity_timer.tasks WHERE username = '${username}' ORDER BY __updatedtime__ DESC`,
  }

  const { result } = await harperFetch(data)
  return result
}
All of our HarperDB functions from now on include the same boilerplate, so I created a harperFetch utility function to keep the code DRY:
// src/utils/harperFetch.ts

import { DB_URL } from "../../constants/constants"

export const harperFetch = async (data: { [key: string]: any }) => {
  const accessToken = localStorage.getItem("access_token")
  if (!accessToken) throw { error: "You need to log in" }

  const myHeaders = new Headers()
  myHeaders.append("Content-Type", "application/json")
  myHeaders.append("Authorization", "Bearer " + accessToken)

  const raw = JSON.stringify(data)

  const requestOptions: RequestInit = {
    method: "POST",
    headers: myHeaders,
    body: raw,
    redirect: "follow",
  }

  const response = await fetch(DB_URL, requestOptions)
  const result = await response.json()
  return { response, result }
}
OK, let's now give all pages in our application access to the tasks state:
// src/pages/_app.tsx

// ...
import { TasksContext } from "../contexts/TasksContext"
import { useTasks } from "../custom-hooks/useTasks"

function MyApp({ Component, pageProps }: AppProps) {
  // ...
  const { tasks, setTasks, getAndSetTasks } = useTasks(username)

  console.log(tasks)

  return (
    <UserContext.Provider value={{ username, setUsername }}>
      <TasksContext.Provider value={{ tasks, setTasks, getAndSetTasks }}>
        <Layout>
          <Component {...pageProps} />
        </Layout>
      </TasksContext.Provider>
    </UserContext.Provider>
  )
}

export default MyApp
Now, I am logged in as "dan", so I should now see all of dan's tasks console.logged – and I do:

Create the Task Timer Page
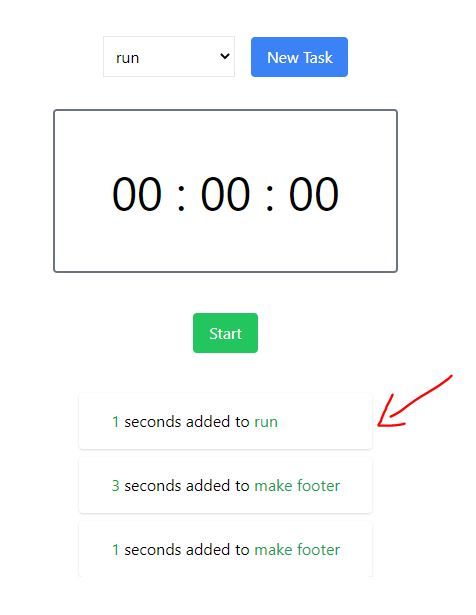
The homepage UI needs to look like this:
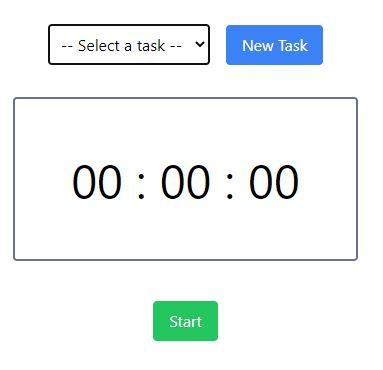
The top row is where the user can select one of their tasks stored in the database from a dropdown menu. They can also add a new task to the database.
Then below, we have the timer that will track how long the user has spent on each task.
Here is the page we'll be building in this section.
Create the Add/Select Taskbar
Let's first create the select or add a task row, making it as a component to be imported into the home page:
// src/components/home-page/Taskbar.tsx

import { useState, useContext } from "react"
import { harperAddNewTask } from "../../utils/harperdb/addNewTask"
import { UserContext } from "../../contexts/UserContext"
import { TasksContext } from "../../contexts/TasksContext"
import Button from "../Button"

interface Props {
  selectedTaskId: string
  setSelectedTaskId: React.Dispatch<React.SetStateAction<string>>
  setErrorMessage: React.Dispatch<React.SetStateAction<string>>
  setSeconds: React.Dispatch<React.SetStateAction<number>>
  pauseTimer: () => void
}

const TaskBar = ({
  selectedTaskId,
  setSelectedTaskId,
  setErrorMessage,
  setSeconds,
  pauseTimer,
}: Props) => {
  const { username } = useContext(UserContext)
  const { tasks, getAndSetTasks } = useContext(TasksContext)

  const [isUserAddingNewTask, setIsUserAddingNewTask] = useState(false)
  const [taskInputValue, setTaskInputValue] = useState("")

  const handleChangeTaskInput = (e: { target: HTMLInputElement }) => {
    setTaskInputValue(e.target.value)
  }

  const handleSelectTask = (e: { target: HTMLSelectElement }) => {
    setErrorMessage("")
    setSelectedTaskId(e.target.value)
    setSeconds(0)
    pauseTimer()
  }

  const handleClickAddNewTask = () => {
    if (taskInputValue.trim() === "") {
      setErrorMessage("Type a task!")
      return
    }
    addNewTask()
    resetAddingNewTask()
  }

  const addNewTask = async () => {
    try {
      const { response } = await harperAddNewTask(username, taskInputValue)
      if (response.status === 200) {
        // Task added to db successfully
        getAndSetTasks(username)
      } else setErrorMessage("Whoops, something went wrong")
    } catch (err) {
      console.log(err)
      setErrorMessage("Whoops, something went wrong")
    }
  }

  const resetAddingNewTask = () => {
    setTaskInputValue("")
    setIsUserAddingNewTask(false)
  }

  return (
    <div>
      {isUserAddingNewTask ? (
        <>
          <input
            type="text"
            placeholder="Enter task here..."
            value={taskInputValue}
            onChange={handleChangeTaskInput}
            className="border p-2 mr-2"
          />
          <Button color="primary" handleClick={handleClickAddNewTask}>
            Add task
          </Button>
          <Button
            color="secondary"
            handleClick={() => setIsUserAddingNewTask(false)}
            extraClasses="ml-1"
          >
            Cancel
          </Button>
        </>
      ) : (
        <>
          <select
            className="mr-4 p-2 border"
            name="task"
            id="task"
            onChange={handleSelectTask}
          >
            {selectedTaskId === "" && (
              <option disabled selected value="" hidden>
                -- Select a task --
              </option>
            )}
            {tasks.map(task => (
              <option
                key={task.id}
                value={task.id}
                selected={task.id === selectedTaskId}
              >
                {task.task_name}
              </option>
            ))}
          </select>
          <Button
            handleClick={() => setIsUserAddingNewTask(true)}
            color="primary"
          >
            New Task
          </Button>
        </>
      )}
    </div>
  )
}

export default TaskBar
Above, in the JSX, when the user clicks the "New Task" button, isUserAddingNewTask is set to true, and the first part of the ternary statement is rendered. This allows the user to add a new task.
Let's create the harperAddNewTask function:
// src/utils/harperdb/addNewTask.ts

import { harperFetch } from "./harperFetch"

export const harperAddNewTask = async (username: string, taskName: string) => {
  const data = {
    operation: "insert",
    schema: "productivity_timer",
    table: "tasks",
    records: [
      {
        username: username,
        task_name: taskName,
        time_in_seconds: 0,
      },
    ],
  }

  const responseAndResult = await harperFetch(data)
  return responseAndResult
}
Now, if we import our Taskbar into the home page, we will see it:
// src/pages/index.tsx

import type { NextPage } from "next"
import Taskbar from "../components/home-page/Taskbar"

const Home: NextPage = () => {
  return (
    <div>
      <Taskbar />
    </div>
  )
}

export default Home

TypeScript is correctly telling us off because Taskbar is missing some props, but we will come back to that soon.
Create the timer
First, let's write a function that will take a task ID and time in seconds, and update the task in the database:
// src/utils/harperdb/saveTaskTime.ts

import { harperFetch } from "./harperFetch"

export const harperSaveTaskTime = async (
  taskId: string,
  newSeconds: number
) => {
  const data = {
    operation: "sql",
    sql: `UPDATE productivity_timer.tasks SET time_in_seconds = '${newSeconds}' WHERE id = '${taskId}'`,
  }

  const responseAndResult = await harperFetch(data)
  return responseAndResult
}
Next, create a custom hook to keep the state of the seconds (seconds), whether the timer is running (isTimerOn), and the functions needed to start and stop the timer from running:
// src/custom-hooks/useTimer.ts

import { useState, useRef } from "react"

const useTimer = () => {
  const [isTimerOn, setIsTimerOn] = useState(false)
  const [seconds, setSeconds] = useState(0)

  const intervalRef = useRef<NodeJS.Timer | null>(null)

  const startTimer = () => {
    setIsTimerOn(true)

    const intervalId = setInterval(() => {
      setSeconds(prev => prev + 1)
    }, 1000)

    intervalRef.current = intervalId
  }

  const pauseTimer = () => {
    setIsTimerOn(false)
    clearInterval(intervalRef.current as NodeJS.Timeout)
  }

  return {
    isTimerOn,
    seconds,
    setSeconds,
    startTimer,
    pauseTimer,
  }
}

export default useTimer
On our timer, we want to display the time in hours:mins:seconds, but we will be recording the time passed in seconds. So we need a way of converting seconds into HH:MM:SS. We will do this with a formatTime utility function:
// src/utils/formatTime.ts

const SECONDS_PER_HOUR = 3600
const SECONDS_PER_MINUTE = 60

// HH:MM:SS
export const formatTime = (seconds: number) => {
  const { hours, mins, secs } = calculateHoursMinsAndSecs(seconds)

  const formattedHours = prependZeroIfLessThanTen(hours)
  const formattedMins = prependZeroIfLessThanTen(mins)
  const formattedSecs = prependZeroIfLessThanTen(secs)

  return {
    formattedHours,
    formattedMins,
    formattedSecs,
  }
}

// Prefix time with 0 if less than 10. E.g. '1' => '01'.
const prependZeroIfLessThanTen = (time: number) => {
  const formattedTime: string = time < 10 ? `0${time}` : `${time}`
  return formattedTime
}

// Convert seconds into hours, mins, and secs
const calculateHoursMinsAndSecs = (seconds: number) => {
  const hours = calculateHours(seconds)
  const mins = calculateMins(seconds)
  const secs = calculateSecs(seconds)

  return {
    hours,
    mins,
    secs,
  }
}

const calculateHours = (seconds: number) => {
  const hours = Math.floor(seconds / SECONDS_PER_HOUR)
  return hours
}

const calculateMins = (seconds: number) => {
  const mins = Math.floor((seconds % SECONDS_PER_HOUR) / SECONDS_PER_MINUTE)
  return mins
}

const calculateSecs = (seconds: number) => {
  const secs = Math.floor((seconds % SECONDS_PER_HOUR) % SECONDS_PER_MINUTE)
  return secs
}
Let's now create our Timer component (note: don't panic, we will pass all of the props down next!):
// src/components/home-page/Timer.tsx

import { useContext } from "react"
import { TasksContext } from "../../contexts/TasksContext"
import { UserContext } from "../../contexts/UserContext"
import { formatTime } from "../../utils/formatTime"
import { harperSaveTaskTime } from "../../utils/harperdb/saveTaskTime"
import Button from "../Button"
import type { RecentTaskTime } from "../../types/RecentTaskTime"

interface TimerProps {
  seconds: number
  setSeconds: React.Dispatch<React.SetStateAction<number>>
  isTimerOn: boolean
  startTimer: () => void
  pauseTimer: () => void
  setErrorMessage: React.Dispatch<React.SetStateAction<string>>
  selectedTaskId: string
  selectedTaskName: string
  setRecentTaskTimes: React.Dispatch<React.SetStateAction<RecentTaskTime[]>>
}

export const Timer: React.FC<TimerProps> = ({
  seconds,
  setSeconds,
  isTimerOn,
  startTimer,
  pauseTimer,
  setErrorMessage,
  selectedTaskId,
  selectedTaskName,
  setRecentTaskTimes,
}) => {
  const { tasks, getAndSetTasks } = useContext(TasksContext)
  const { username } = useContext(UserContext)

  const { formattedHours, formattedMins, formattedSecs } = formatTime(seconds)

  const handleStartTimer = () => {
    setErrorMessage("")
    if (selectedTaskId == "") {
      setErrorMessage("Please select a task")
    } else {
      startTimer()
    }
  }

  const handleLogTime = async () => {
    pauseTimer()
    const prevTaskSeconds = getTaskTimeFromId(selectedTaskId)
    const newTaskSeconds = prevTaskSeconds + seconds
    const { response, result } = await harperSaveTaskTime(
      selectedTaskId,
      newTaskSeconds
    )
    if (response.status === 200) {
      getAndSetTasks(username)
      setSeconds(0)
      setRecentTaskTimes(prev => [
        { name: selectedTaskName, seconds: seconds },
        ...prev,
      ])
    } else setErrorMessage("Whoops, something went wrong :(")
    console.log({ response, result })
  }

  const getTaskTimeFromId = (id: string) => {
    const task = tasks.find(task => task.id === id)
    if (!task) return 0
    return task.time_in_seconds
  }

  const handleResetTimer = () => {
    pauseTimer()
    setSeconds(0)
  }

  return (
    <div>
      <div className="mt-8 border-2 border-gray-500 rounded p-14 text-5xl">
        {formattedHours} : {formattedMins} : {formattedSecs}
      </div>
      <div className="flex justify-center mt-10">
        {/* Pause and start the timer buttons */}
        {isTimerOn ? (
          <>
            <Button color="warning" handleClick={pauseTimer}>
              Pause
            </Button>
          </>
        ) : (
          <Button color="success" handleClick={handleStartTimer}>
            Start
          </Button>
        )}

        {/* Button to update the time in the db for the chosen task */}
        {(seconds > 0 || isTimerOn) && (
          <Button
            color="danger"
            handleClick={handleLogTime}
            extraClasses="ml-4"
          >
            Log time
          </Button>
        )}
      </div>

      {/* Stop timer and reset to 0 secs */}
      {(seconds > 0 || isTimerOn) && (
        <button
          onClick={handleResetTimer}
          className="underline underline-offset-2 mt-8 cursor-pointer text-gray-500 mx-auto block"
        >
          Reset
        </button>
      )}
    </div>
  )
}

interface TimerBtnProps {
  handleClick: () => void
  text: string
  extraClasses?: string
}

export const TimerBtn: React.FC<TimerBtnProps> = ({
  handleClick,
  text,
  extraClasses,
}) => {
  return (
    <button
      className={`${
        text === "Start" ? "bg-blue-500" : "bg-red-500"
      } rounded px-4 py-2 text-white mt-8 ${extraClasses}`}
      onClick={handleClick}
    >
      {text}
    </button>
  )
}
We can now add Taskbar and Timer to our index page, and pass down all necessary props to these components:
// src/pages/index.tsx

import { useState, useContext } from "react"
import type { NextPage } from "next"
import type { RecentTaskTime } from "../types/RecentTaskTime"
import { UserContext } from "../contexts/UserContext"
import useTimer from "../custom-hooks/useTimer"
import Taskbar from "../components/home-page/Taskbar"
import { Timer } from "../components/home-page/Timer"
import Alert from "../components/Alert"
import Link from "../components/Link"

const Home: NextPage = () => {
  const [selectedTaskId, setSelectedTaskId] = useState("")
  const [selectedTaskName, setSelectedTaskName] = useState("")
  const [errorMessage, setErrorMessage] = useState("")
  const [recentTaskTimes, setRecentTaskTimes] = useState<RecentTaskTime[]>([])

  const { isTimerOn, seconds, setSeconds, startTimer, pauseTimer } = useTimer()

  const { username } = useContext(UserContext)

  return (
    <div className="flex flex-col items-center justify-center pt-4 grow">
      {!username && (
        <Alert type="warning" extraClasses="mb-12">
          Please <Link href="/login">log in</Link> or{" "}
          <Link href="/signup">create an account</Link> to use Super
          Productivity Timer
        </Alert>
      )}

      <Taskbar
        selectedTaskId={selectedTaskId}
        setSelectedTaskId={setSelectedTaskId}
        setSelectedTaskName={setSelectedTaskName}
        setErrorMessage={setErrorMessage}
        setSeconds={setSeconds}
        pauseTimer={pauseTimer}
      />
      <Timer
        seconds={seconds}
        setSeconds={setSeconds}
        setRecentTaskTimes={setRecentTaskTimes}
        selectedTaskName={selectedTaskName}
        isTimerOn={isTimerOn}
        startTimer={startTimer}
        pauseTimer={pauseTimer}
        setErrorMessage={setErrorMessage}
        selectedTaskId={selectedTaskId}
      />

      {errorMessage && <div className="text-red-500 mt-4">{errorMessage}</div>}
    </div>
  )
}

export default Home
Our timer should now be working. Try adding a task, starting the timer, then logging the time. It should show up in your HarperDB database:
Add a recently completed times log
Let's finish off our timer page by adding a log to give the user feedback that the times have been recorded successfully. It will look like this:
Create a type called RecentTaskTime:
// src/types/RecentTaskTime.ts

export interface RecentTaskTime {
  name: string
  seconds: number
}
Then in index.tsx:
// ...
import LogOfRecentTaskTimes from "../components/home-page/LogOfRecentTaskTimes"

const Home: NextPage = () => {
  // ...
  const [recentTaskTimes, setRecentTaskTimes] = useState<RecentTaskTime[]>([])

  return (
    <div className="flex flex-col items-center justify-center pt-4 grow">
      {/* ... */}

      {recentTaskTimes.length > 0 && (
        <LogOfRecentTaskTimes recentTaskTimes={recentTaskTimes} />
      )}
    </div>
  )
}
Now let's create the LogOfRecentTaskTimes component:
// src/components/home-page/LogOfRecentTaskTimes.tsx

import type { RecentTaskTime } from "../../types/RecentTaskTime"

interface Props {
  recentTaskTimes: RecentTaskTime[]
}

const LogOfRecentTaskTimes = ({ recentTaskTimes }: Props) => {
  return (
    <div className="mt-8 max-h-56 overflow-y-auto px-8">
      {recentTaskTimes.map((t, i) => (
        <div key={i} className="flex shadow rounded px-8 py-4 mt-2">
          <p>
            <span className="text-green-600">{t.seconds}</span> seconds added to{" "}
            <span className="text-green-600">{t.name}</span>
          </p>
        </div>
      ))}
    </div>
  )
}

export default LogOfRecentTaskTimes
Our timer page is complete 🎉
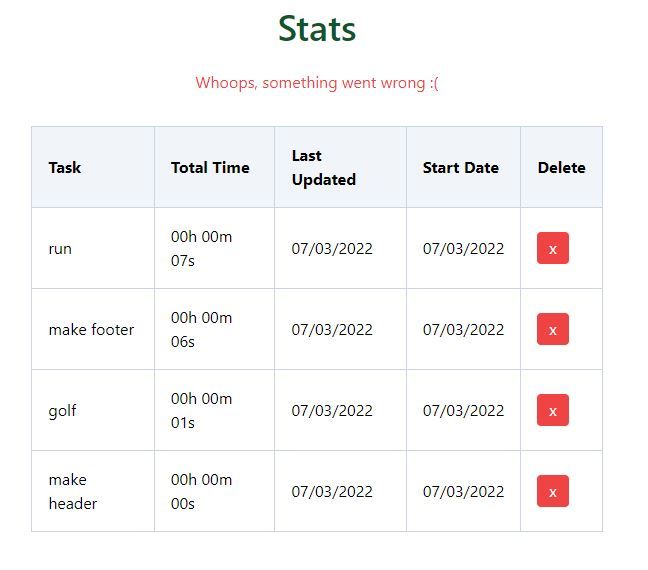
The Stats Page
Well done if you made it this far! We only have one more page to go: the stats page.
In the stats page, we'll be fetching all of the user's tasks from the HarperDB tasks table, and displaying them nicely in a table.
First, we will need some utility functions to display time and date nicely in our stats page table. Add the following two functions to our formatTime utils file:
// src/utils/formatTime.ts

// ...

export const displayTimeString = (seconds: number) => {
  const { formattedHours, formattedMins, formattedSecs } = formatTime(seconds)
  return `${formattedHours}h ${formattedMins}m ${formattedSecs}s`
}

// timestamp => dd/mm/yyyy
export const timestampToDayMonthYear = (timestamp: number) => {
  const date = new Date(timestamp)
  const formattedDate = date.toLocaleDateString()
  return formattedDate
}

// ...
We can now create a table, and loop through tasks to display the data in the table rows. At the end of each row, I've added a delete button so the user can permanently delete tasks from the DB:
// src/pages/stats.tsx

import { useState, useContext } from "react"
import type { NextPage } from "next"
import { UserContext } from "../contexts/UserContext"
import { TasksContext } from "../contexts/TasksContext"
import Header from "../components/PageHeading"
import Link from "../components/Link"
import Alert from "../components/Alert"
import { displayTimeString, timestampToDayMonthYear } from "../utils/formatTime"
import { harperDeleteTask } from "../utils/harperdb/deleteTask"

const Stats: NextPage = () => {
  const [errorMessage, setErrorMessage] = useState("")

  const { username } = useContext(UserContext)
  const { tasks, getAndSetTasks } = useContext(TasksContext)

  const handleDeleteRow = async (taskId: string) => {
    setErrorMessage("")
    const areYouSure = confirm("Are you sure you want to delete this row?")
    if (!areYouSure) return

    try {
      // Delete task from db
      const { response } = await harperDeleteTask(taskId)
      if (response.status === 200) {
        // Get tasks from db and setTasks
        getAndSetTasks(username)
        return
      }
    } catch (err) {
      console.log(err)
    }
    setErrorMessage("Whoops, something went wrong :(")
  }

  return (
    <div>
      {!username && (
        <Alert type="warning" extraClasses="mb-12">
          Please <Link href="/login">log in</Link> or{" "}
          <Link href="/signup">create an account</Link> to use Super
          Productivity Timer
        </Alert>
      )}

      <Header extraClasses="mb-6 text-center mt-8">Stats</Header>

      {errorMessage && (
        <p className="text-center text-red-500 mb-8">{errorMessage}</p>
      )}

      <div className="overflow-x-auto ">
        <table className="table-auto border-collapse border border-slate-400 w-full sm:w-3/4 mx-auto">
          <thead className="bg-slate-100 text-left">
            <tr>
              <TH>Task</TH>
              <TH>Total Time</TH>
              <TH>Last Updated</TH>
              <TH>Start Date</TH>
              <TH>Delete</TH>
            </tr>
          </thead>
          <tbody>
            {tasks.length > 0 &&
              tasks.map(task => (
                <tr key={task.id}>
                  <TD>{task.task_name}</TD>
                  <TD>{displayTimeString(task.time_in_seconds)}</TD>
                  <TD>{timestampToDayMonthYear(task.__updatedtime__)}</TD>
                  <TD>{timestampToDayMonthYear(task.__createdtime__)}</TD>
                  <TD>
                    <button
                      onClick={() => handleDeleteRow(task.id)}
                      className="bg-red-500 text-white rounded px-3 py-1"
                    >
                      x
                    </button>
                  </TD>
                </tr>
              ))}
          </tbody>
        </table>
      </div>
    </div>
  )
}

const TH: React.FC<{ children: string }> = ({ children }) => {
  const classes = "border border-slate-300 rounded-top p-4"
  return <th className={classes}>{children}</th>
}

interface TDProps {
  children: React.ReactNode
}
const TD = ({ children }: TDProps) => {
  const classes = "border border-slate-300 p-4"
  return <td className={classes}>{children}</td>
}

export default Stats
And here is our stats page:
One last thing to do: create the harperDeleteTask function:
// src/utils/harperdb/deleteTask.ts

import { harperFetch } from "./harperFetch"

export const harperDeleteTask = async (taskId: string) => {
  const data = {
    operation: "delete",
    schema: "productivity_timer",
    table: "tasks",
    hash_values: [taskId],
  }

  const responseAndResult = await harperFetch(data)
  return responseAndResult
}
Now try deleting a task and checking your DB – it will be gone. Perfect!
Also, try adding a new task, then logging some time. Then go to the stats page and you'll see that the stats page is updated, too.
You now know how to build a full stack application with NextJS and HarperDB.
Thank you for reading!
If you found this article useful, feel free to:
- Subscribe to my YouTube channel. I plan to turn it into a React/NextJS/Node-focused channel.
- Follow me on Twitter where I tweet about my freelancing journey, side projects, and current learnings.
Cheers!