
Object-Oriented Programming is a programming style based on classes and objects. These group data (properties) and methods (actions) inside a box.
OOP was developed to make code more flexible and easier to maintain.
JavaScript is prototype-based procedural language, which means it supports both functional and object-oriented programming.
What are Classes and Objects in JavaScript?
What is a Class?
You can think of a class like a blueprint of a house. A class is not a real world object but we can create objects from a class. It is like an template for an object.
We can create classes using the class keyword which is reserved keyword in JavaScript. Classes can have their own properties and methods. We will study how to create a class in detail shortly. This is just a high level overview of a class.
Let's take an example. Below is a blueprint for a house (like a class).

What is an Object?
An object is an instance of a class. Now with the help of the house class we can construct a house. We can construct multiple houses with the help of same house class.
Example of Classes and Objects in Action
Let's take a simple example to understand how classes and objects work.
The below example has nothing to do with JavaScript syntax. It is just to explain classes and objects. We will study the syntax of OOP in JavaScript in a bit.
Consider a Student class. Student can have properties like name, age, standard, and so on, and functions like study, play, and do home work.
class Student{
 // Data (Properties)
 Name
 Age
 Standard

 // Methods (Action)
 study(){
 // Study
 }

 Play(){
 // Play
 }

 doHomeWork(){
 // Do Home Work
 }

}
With the help of the above class, we can have multiple students or instances.
Here's info for Student - 01:
// Student 1
{
Name = "John"
Age = 15
Standard = 9

study(){
 // Study
 }

 Play(){
 // Play
 }

 doHomeWork(){
 // Do Home Work
 }

}
Here's info for Student - 02:
// Student 2
{
Name = "Gorge"
Age = 18
Standard = 12

study(){
 // Study
 }

 Play(){
 // Play
 }

 doHomeWork(){
 // Do Home Work
 }

}
How Do We Actually Design a Class?
There is no perfect answer to this question. But we can get help from some OOP principles when designing our classes.
There are 4 main principles in OOP, and they are:
- Abstraction
- Encapsulation
- Inheritance
- Polymorphism
We will dive deep into these concepts in JavaScript below. But first, let's get a high level overview of these concepts to understand them better.
What Does Abstraction Mean in OOP?
Abstraction means hiding certain details that don't matter to the user and only showing essential features or functions.
For example, take a cell phone. We don't show details like verifyTemperature(), verifyVolt(), frontCamOn(), frontCamOff() and so on. Instead we provide essential features which matter to user like camera(), volumeBtn(), and others.
What Does Encapsulation Mean in OOP?
Encapsulation means keeping properties and methods private inside a class, so that they are not accessible from outside that class.
This will keep code that's outside the class from accidentally manipulating internal methods and properties.
What Does Inheritance Mean in OOP?
Inheritance makes all properties and methods available to a child class. This allows us to reuse common logic and to model real-world relationships. We will discuss inheritance in further section of this article with pratical example.
What Does Polymorphism Mean in OOP?
Polymorphism means having different and many forms. We can overwrite a method inherited from a parent class.
// Not actual JavaScript syntax
class User{
email
password

login(providedPassword){
	// Login User
}

checkMessage(){
// Check any new message
}
}
// Not actual JavaScript syntax
class Admin inherit user{
email // Inherited Property
password // Inherited Property
permissions // Own Property

// Inherited Method
login(providedPassword){
	// Different Login User
}

// Inherited Method
checkMessage(){
// Check any new message
}

// Own Method
chechStats(){
// Check Stats
}
}
The Login method in Admin is different from the inherited class user.
Object-Oriented Programming in JavaScript
We have now discussed the basics of OOP. But OOP in JavaScript is bit different. We have an object linked to a prototype. Prototypes contain all methods and these methods are accessible to all objects linked to this prototype. This is called Prototypal Inheritance (or Prototypal Delegation).
What is Prototypal Inheritance in JavaScript?
You have likely already used Prototypal Inheritance without knowing it – for example, if you've used methods on arrays like push(), pop(), map() and so on (which are available on all arrays).
If we go to the official documentation we will see Array.prototype.map() because Array.prototype is a prototype of all array objects that we create in JavaScript. This is an example of prototypal inheritance that we are going to learn to implement.
Just like Array.prototype we will create our own prototypes and this will help you understand JavaScript inside out.
How to Implement Prototypal Inheritance in JavaScript
There are three main ways to implement Prototypal Inheritance in JavaScript:
Using Constructor Functions
We can create objects from a function. With the help of a constructor function, built-in objects like arrays, sets, and others are actually implemented.
In JavaScript, a constructor gets called when an object is created using the new keyword. The purpose of a constructor is to create a new object and set its values for any existing object properties
Using ES6 Classes
Classes are an alternative to the constructor function syntax for implementing prototypal inheritance. We also call classes syntactic sugar.
Behind the scenes, classes work exactly like constructor functions. Prior to ES6, JavaScript had no concepts of classes. To mock a class, you often use the constructor or prototype pattern.
Using Object.create()
This is the easiest way to link an object to a prototype object. It is a method used to create a new object with the specified prototype object and properties.
The object.create() method returns a new object with the specified prototype object and properties.
Let's look at these in more detail now:
How to Implement Prototypal Inheritance with Constructor Functions in JavaScript
We will use a function to create prototypal inheritance. We will start by implementing a User function expression. Remember to always start the name of a constructor function with capital letter (standard convention).
function User(name){
    this.name = name;

    // never create function inside constructor function
    this.printName = function(){
        console.log(this.name);
    }

    console.log(this);
}


let kedar = new User("kedar")
Output
We created a constructor function in the above example. But what is the new keyword? With the help of the new keyword we can create an instance of that constructor.
When we create an instance of the constructor object, an empty object is created ({}). This empty object ({}) is then linked to the prototype.
We should never create a function inside of a constructor function. Because every time an instance is created, a new function is created with it which we created inside the constructor function. This will create major issues for performance.
The solution to this problem is prototypes. We can define a function on the prototype of an object directly. So the object created by using that constructor function will have access to that function.
Example:
function User(name){
    this.name = name;

    console.log(this);
}

User.prototype.printName = function(){
	console.log(this.name)
}


let kedar = new User("kedar")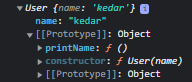
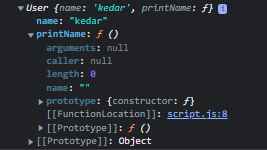
In the above output, you can see the printName() method in the prototype of the User constructor function. This is the preferred way to create a function in a constructor function to optimize performance.
So now all objects created by this constructor function will have access to the printName() function.
We can access these functions with objectName.functionName() like this:
function User(name){
    this.name = name;

    console.log(this);
}

User.prototype.printName = function(){
	console.log(this.name)
}


let kedar = new User("kedar")
kedar.printName()
We can access the prototype of the constructor function with the following syntax:
console.log(User.__proto__)The object prototype is the same as the constructor function prototype. Don't believe me? Check this out:
console.log(kedar.__proto__ === User.prototype)
// True

console.log(User.prototype.isPrototypeOf(kedar))
// True
The prototype of User is the prototype used by its object and doesn't belong to User.
console.log(User.prototype.isPrototypeOf(User))
// False
We can also link a variable to prototype:
User.prototype.species = "Homo Sapiens"Now this variable belong to prototype and not to object. We can check this by using hasOwnProperty().
Prototypal Inheritance of Built-in Objects
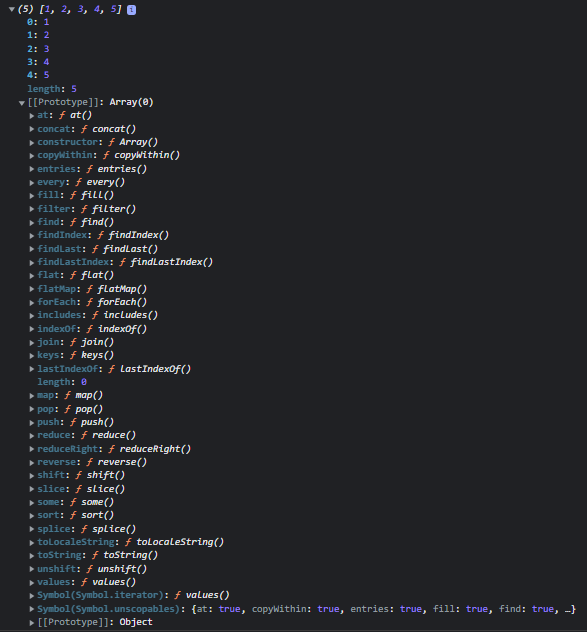
We have many methods available to use on arrays. How does this work?
The answer is prototypal inheritance. When we create a new array, every time it inherits from Array.prototype. That is how we have access to all those different methods.
const arr = [1,2,3,4,5]
console.log(arr)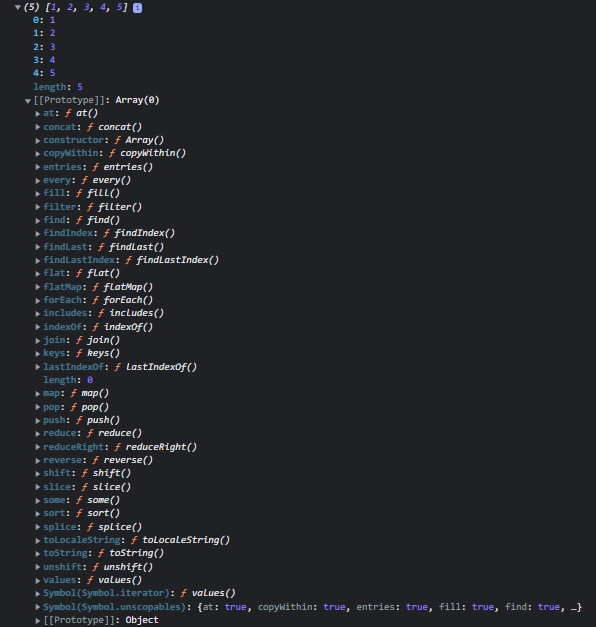
We can also attach our own method to Array.prototype so that whenever we create new array we will have access to that method.
const arr = [1,2,4,4,5,5]

Array.prototype.unique = function(){
    return [...new Set(this)]
}

console.log(arr.unique());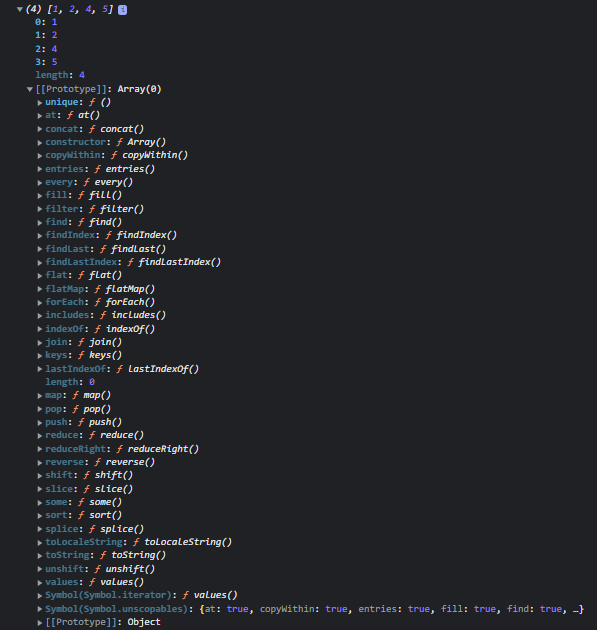
How to Implement Prototypal Inheritance with ES6 Classes in JavaScript
We can implement OOP using classes, but behind the scenes it uses prototypal inheritance. This method was introduced to make sense to people coming from other languages like C++ and Java.
We will implement the User classes from the above example:
// Class Expression
class User = class{

}

// Class Declaration
class User{

}
In the above example, we can see that there are 2 ways to implement a class in JavaScript. You can choose either one according to your preference.
Inside the class, the first thing we need to do is add a constructor method. The constructor can also take arguments.
class User{
	constructor(name){
    	this.name = name
    }

    printName(){
        console.log(this.name);
    }
}

const kedar = new User("kedar")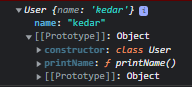
Remember that whenever we create an object of a class, a constructor is invoked first. If there is no constructor, the default constructor is invoked which does nothing.
3 things to remember about classes
- Classes are not hoisted (if you don't know what hoisting is, read this guide)
- Classes are first-class citizens (If a programming language has the ability to pass a function as an argument – to treat functions as values and to return functions – it is said that the language has first-class functions and those function are called first-class citizens)
- Classes are executed in strict mode. (If you don't know what strict mode is, read this guide)
What are Setters and Getters?
These are simple methods of classes which will get and set a value. But from the outside they look like simple methods. Let's take a look at the below example.
class User{
	constructor(name){
    	this._name = name
    }

    get getName(){
        console.log(this._name)
    }

    set setName(newName){
        this._name = newName
    }
}

const kedar = new User("kedar")
kedar.setName = "John"
kedar.getName
In above example, you can see the getter getName logs a name. Setters are used to set the value of an existing property. When setting a name using setter, we have to use (_) before the name of the property as a convention.
How to Use Static Methods
Static methods are bound to a class and not to the instances of class or object of the class. We can access static methods through classes only and not through the object of that class.
class User{
	constructor(name){
    	this._name = name
    }

    static anonymous(){
        console.log("anonymous");
    }
}

const kedar = new User("kedar")
kedar.anonymous() // error
User.anonymous() // "anonymous"
We can directly create static methods inside classes using the static keyword before the method name. In the above example, notice that we can only call the static method on a class and not on a class object.
There is one more way to implement a static method:
class User{
	constructor(name){
    	this._name = name
    }
}

User.anonymous = function(){
	console.log("anonymous");
}

const kedar = new User("kedar")
kedar.anonymous() // error
User.anonymous() // "anonymous"
How to Implement Prototypal Inheritance with Object.create() in JavaScript
const User = {
    init(name){
        this.name = name
    },

    printName(){
        console.log(this.name);
    }
}

let kedar = Object.create(User)
kedar.init("kedar")
kedar.printName()
The newly created object will inherit all the prototype object's properties. You can specify a second parameter to add new properties to the object, that the prototype lacked:
const newObject = Object.create(prototype, newProperties)const User = {
printName(){
console.log(this.name);
}
}
let properties = {
name: {
value:"John"
}
}
let John = Object.create(User,properties)
John.printName()How Inheritance Works in JavaScript
Inheritance enables you to define a class/object that takes all the functionality from a parent class/object and allows you to add more. Using class inheritance, a class/object can inherit all the methods and properties of another class. It is a useful feature that allows code reusability.
Now we will take a look at inheritance in the constructor function, ES6 classes, and Object.create().
Constructor Function
Let's understand constructor function inheritance by example. If you don't know how inheritance works at a high level, check out the section where we discussed "How Do We Actually Design a Class".
Example:
const User = function(name, password){

    this.name = name
    this.password = password
}

User.prototype.printName = function(){
    console.log(this.name);
}

const Admin = function(name, password){
    this.name = name
    this.password = password
}

Admin.prototype.Stats = function(){
    console.log("Stats");
}

const kedar = new Admin("kedar", 12345)
kedar.Stats()
In the above code, we have 2 constructor functions, and they have some similarities. Still we wrote it twice which violates the DRY (Don't Repeat Yourself) principle. To avoid repeating the same code, we use inheritance.
const User = function(name, password){

    this.name = name
    this.password = password
}

User.prototype.printName = function(){
    console.log(this.name);
}

const Admin = function(name, password, course){
    User.call(this, name, password)
    this.course = course
}

Admin.prototype = Object.create(User.prototype)

Admin.prototype.Stats = function(){
    console.log("Stats");
}

const kedar = new Admin("kedar", 12345, "JavaScript")
kedar.printName()
In the above code, first in the Admin (child) function we attached this to the User (parent) and called it with parameters. Once we did that, we were able to access the name and password fields. But we were not able to access the methods of the parent function. Because we need to connect the prototype of User and Admin.
For that, just after the child function, we pointed the Admin prototype to the User prototype which gave us access to the methods of the parent function (User).
Make sure to point the child (Admin) prototype to the parent (User) function immediately after the child (Admin) function. Because it returns an empty object and removes all methods on the child (Admin) function. So always create methods of the child (Admin) function after pointing the child (Admin) prototype to the parent (User) prototype.
Now let's see how our prototype chain looks:
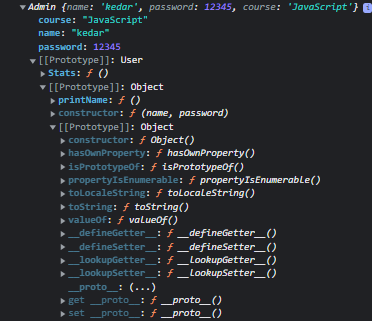
At the bottom there is an Object prototype. After that we can see there is a User prototype and at the top we see an Admin prototype.
ES6
It is super simple to implement inheritance using ES6 syntax. But remember ES6 uses constructor functions to implement inheritance behind the scenes.
class User{
    constructor(name, password){
        this.name = name
        this.password  =password
    }

    printName(){
        console.log(this.name);
    }
}

class Admin extends User{
    constructor(name, password, course){
        super(name, password)
        this.course = course
    }

    Stats(){
        console.log("Stats");
    }
}

const kedar = new Admin("kedar", 123456, "JavaScript")
kedar.printName()
So we have 2 classes, User and Admin. When we want to inherit, we simply add extends and the class we want to inherit from in-front of the child class similar to the syntax shown in the above code.
When we are done with that, in the constructor of the child class, we call the super() method to pass an argument to the parent class which is required. That's how we can implement inheritance in JavaScript using ES6 syntax.
We can also override the parent method by implementing a method with the same name in the child class.
class User{
    constructor(name, password){
        this.name = name
        this.password  =password
    }

    printName(){
        console.log(this.name);
    }
}

class Admin extends User{
    constructor(name, password, course){
        super(name, password)
        this.course = course
    }

    Stats(){
        console.log("Stats");
    }

    printName(){
    	console.log("Child class " + this.name)
    }
}

const kedar = new Admin("kedar", 123456, "JavaScript")
kedar.printName()
Object.create()
Implementing inheritance in Object.create() is simple. Check out the code below:
const User = {
    printName(){
        console.log(this.name);
    },

    init(name, password){
        this.name = name
        this.password = password
    }
}

const Admin = Object.create(User)
Admin.init = function(name, password, course){
    User.init.call(this, name, password)
    this.course = course
}

Admin.stats = function(){
    console.log("Stats");
}

const kedar = Object.create(Admin)
kedar.init("kedar", 123456)
kedar.printName()
kedar.stats()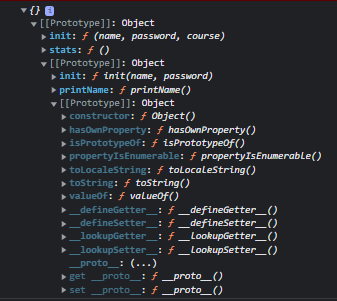
First, we created a User function. Then we created an Admin pointing to User with the help of Object.create(). With the help of the Admin.init() method we called the init() method of User and passed values to the parent function.
How Encapsulation Works in JavaScript
Above, we looked at what encapsulation means at a very high level. Now we will look at an example to explain it more thoroughly.
Encapsulation can be defined as “the packing of data and functions into one component”. This is also known as grouping or bundling, and simply means to bring together data and the methods which operate on data. It can be a function, a class, or an object.
Encapsulation enables “controlling access to that component”. When we have the data and related methods in a single unit, we can control how is it accessed outside the unit. This process is called Encapsulation.
Protected properties
class User{
    constructor(name, password){
        this._name = name
        this._password = password
    }
}

const kedar = new User("kedar", 123456)
console.log(kedar._password);
A protected member is accessible within the class and any object that inherits from it. A protected value is shared across all layers of the prototype chain.
We used (_) in this._name , which is a protected property. We can still access this property outside of the class. This is just a convention programmers use.
If we know there is (_) in a property name we are not supposed to manipulate that property from outside the class.
class User{
    constructor(name, password){
        this._name = name
        this._password = password
    }

    get getName(){
    	console.log(this._name)
    }
}

const kedar = new User("kedar", 123456)
kedar.getName
Private properties
class User{
    constructor(name, password){
        this.#name = name
        this._password = password
    }

    get getName(){
    	console.log(this._name)
    }
}

const kedar = new User("kedar", 123456)
console.log(kedar.#name);
To implement a truly private property in JavaScript we have to use (#) before the property name or method. These private properties and methods will not be accessible from outside of class which will make them truly private.
This will help restrict accessing properties from outside of the class. If we want to access property from outside we have to make method which will only print properties without giving access to change value of that property.
class User{
    #name

    constructor(name, password){
        this.#name = name
        this._password = password
    }

    #printName(){
        console.log(this.#name);
    }

    PrintFromPrivateMethod(){
        this.#printName()
    }
}

const kedar = new User("kedar", 123456)
kedar.PrintFromPrivateMethod()
Wrapping Up
I hope you now understand how OOP works in JavaScript. Thank you for reading!
You can follow me on: